Hosting WebRTC Server on IP Camera

Popular industrial and home monitoring systems are based on a central media server that connects cameras with the end users. This architecture is fine for most use cases, however have some drawbacks such as: higher latency, privacy concerns (if you use 3rd party server), and high cost.
In the article we present a peer-to-peer alternative: let's remove a media server and directly access a camera streaming service running on the camera itself.
The project is based on WebRTC for audio and video streaming to a web browser. Access to the server over the Internet is possible thanks to Husarnet VPN Client.
Here are some of the advantages of our solution:
- low latency over the Internet
- simple infrastructure architecture (only your laptop and Internet camera)
- quick setup (everything is dockerized)
Basically all WebRTC infrastructure is hosted on the Internet camera (Single Board Computer + webcam) together with a simple web server.

Use the prebuilt husarnet/webrtc-streamer:latest Docker image from our Docker Hub account to run the project faster.
👉 https://hub.docker.com/r/husarnet/webrtc-streamer 👈
Supported architectures:
linux/amd64(Intel x64)linux/arm64(eg. Raspberry Pi 4)linux/arm/v7
Otherwise, the following steps will show you how to build and run a container by yourself.
You will find a complete source code allowing you to modify and build a Docker image on our GitHub:
https://github.com/husarnet/blog-examples/tree/main/webrtc-streamer
About WebRTC
WebRTC is a technology designed for web browsers for a real-time audio and video streaming. It is commonly used in teleconferencing products like Google Meet, Jitsi or TokBox to mention a few of them. External WebRTC servers help web browsers in establishing a real-time connection over the Internet.
In the project we run the WebRTC server not on external server, but on the Internet camera itself. That makes the infrastructure maintanance and setup far easier. Establishing P2P connection is done by Husarnet VPN, so we do not need to host WebRTC servers with a static IP any more.
When it comes to WebRTC streaming there are multiple options available, including but not limited to:
In this project we have choosen Janus as it's a free, open source soultion with relatively easy installation and configuration. In combination wtih FFmpeg, a simple websocket server written in Python and utilizing Husarnet's P2P connection establishment, we are able to provide video stream over WAN with latency as low as 200 - 400 ms.
One potential question about the technical feasibility of this project may be "Why use WebRTC instead of simple RTSP server?". Anwser to this question is quite straight forward:
RTSP is not directly supported by web browsers.
Requirements
- A single board computer (SBC) with connected USB camera
- End user's laptop running Linux with Firefox or Chrome web browser to access a video stream over the Internet.
- Husarnet VPN Join Code.
You will find your Join Code at https://app.husarnet.com
-> Click on the desired network
-> Add element button
-> Join code tab
The whole project runs in a Docker Container.
A SBC with a connected USB camera is in our case Raspberry Pi 4 running Ubuntu 20.04 and Logitech C920 (the old version of C920 had embedded H.264 support - current model unfortunately do not).
If connected USB camera provides a H.264 stream, then this stream is directly used by a WebRTC server. If not, the FFmpeg VP8 codec is used.
To access the webserver with a video stream over the Internet it is required to be in the same Husarnet VPN network. So basically to access a video stream over the Internet install Husarnet VPN client on your laptop and add it to the same Husarnet network.
Image has been build and run on the following clear installations of host systems:
  Laptop with a built-in webcam
  Operating System: Ubuntu 22.04.1 LTS
            Kernel: Linux 5.15.0-56-generic
      Architecture: x86-64
  Raspberry Pi with Logitech C920 camera connected
  Operating System: Raspbian GNU/Linux 10 (buster)
            Kernel: Linux 5.4.83-v7l+
      Architecture: armv7l
Installing Docker
If you have Docker already installed - you can skip this step.
The official instruction is the best tutorial but here's a quick rundown for you:
curl -fsSL https://get.docker.com | sudo sh
sudo systemctl daemon-reload
sudo systemctl restart docker
Clonning the Example and Building an Image
All code is in the GitHub repository:
git clone https://github.com/husarnet/blog-examples/
cd blog-examples/webrtc-streamer
Ensure bash scrpit is executable.
sudo chmod +x init-container.sh
Then build an image.
sudo docker build -t webrtc-streamer .
On Raspberry Pi OS you may see a signature error when trying to build the image. In order to solve this you need to manually install the latest libseccomp2.
To do so go to: https://packages.debian.org/sid/libseccomp2 and download armhf version.
Then install it as such:
sudo dpkg -i libseccomp2_2.4.3-1+b1_armhf.deb
Starting the Project Using docker run
Creating .env File:
After you created it, specify the Husarnet JoinCode and hostname there. Also change CAM_AUDIO_CHANNELS to =1 if you can't hear a sound. The file should look something like this:
HOSTNAME=webrtc-streamer-1
JOINCODE=fc94:b01d:1803:8dd8:3333:2222:1234:1111/xxxxxxxxxxxxxxxxx
CAM_AUDIO_CHANNELS=2
You will find your JoinCode at https://app.husarnet.com
-> Click on the desired network
-> Add element button
-> Join code tab
Running a Container
sudo docker run --rm -it \
--env-file ./.env \
--volume webrtc_streamer_v:/var/lib/husarnet \
--device /dev/net/tun \
--device /dev/video0:/dev/video0  \
--device /dev/snd \
--cap-add NET_ADMIN \
--sysctl net.ipv6.conf.all.disable_ipv6=0 \
webrtc-streamer
description:
--volume webrtc_streamer_v:/var/lib/husarnet- you need to make/var/lib/husarnetas a volume to preserve it's state for example if you would like to update the image your container is based on. If you would like to run multiple containers on your host machine remember to provide unique volume name for each container (in our caseHOSTNAME-v).--device /dev/video0:/dev/video0- you need to give the container access to your webcam in this case/dev/video0which will be referenced in thepipline.shscript as/dev/video0
Result
Runing above commands should result in the following output:
$ sudo docker run --rm -it \
--env-file ./.env \
--volume webrtc_streamer_v:/var/lib/husarnet \
--device /dev/net/tun \
--device /dev/video0:/dev/video0  \
--device /dev/snd \
--cap-add NET_ADMIN \
--sysctl net.ipv6.conf.all.disable_ipv6=0 \
webrtc-streamer


🔥 Connecting to Husarnet network as "webrtc-streamer-1":
 ERROR:  Wrong number of arguments provided. Provided 3, required between 0 and 2
NAME:
   husarnet join - Connect to Husarnet group with given join code and with specified hostname
USAGE:
   husarnet join [command options] [join code] [device name]
OPTIONS:
   --help, -h  show help (default: false)
done
*******************************************
💡 Tip
To access a live video stream visit:
👉 http://[::]:80/ 👈
in your web browser 💻
*******************************************
VP8
Janus commit: 18ebf62db7e8f7a965a2e6b1dd1ed2a8a3a396d4
Compiled on:  Tue Dec 20 09:40:21 UTC 2022
Logger plugins folder: /opt/janus/lib/janus/loggers
[WARN] 	Couldn't access logger plugins folder...
---------------------------------------------------

  Starting Meetecho Janus (WebRTC Server) v0.13.2
---------------------------------------------------
Checking command line arguments...
Debug/log level is 0
Debug/log timestamps are disabled
Debug/log colors are enabled
/app/websocket_server.py:15: DeprecationWarning: There is no current event loop
  loop = asyncio.get_event_loop()
vp8_not_supp
ffmpeg version 4.4.2-0ubuntu0.22.04.1ffmpeg version 4.4.2-0ubuntu0.22.04.1 Copyright (c) 2000-2021 the FFmpeg developers
  built with gcc 11 (Ubuntu 11.2.0-19ubuntu1)
 Copyright (c) 2000-2021 the FFmpeg developers
  built with gcc 11 (Ubuntu 11.2.0-19ubuntu1)
  configuration: --prefix=/usr --extra-version=0ubuntu0.22.04.1 --toolchain=hardened --libdir=/usr/lib/x86_64-linux-gnu --incdir=/usr/include/x86_64-linux-gnu --arch=amd64 --enable-gpl --disable-stripping --enable-gnutls --enable-ladspa --enable-libaom --enable-libass --enable-libbluray --enable-libbs2b --enable-libcaca --enable-libcdio --enable-libcodec2 --enable-libdav1d --enable-libflite --enable-libfontconfig --enable-libfreetype --enable-libfribidi --enable-libgme --enable-libgsm --enable-libjack --enable-libmp3lame --enable-libmysofa --enable-libopenjpeg --enable-libopenmpt --enable-libopus --enable-libpulse --enable-librabbitmq --enable-librubberband --enable-libshine --enable-libsnappy --enable-libsoxr --enable-libspeex --enable-libsrt --enable-libssh --enable-libtheora --enable-libtwolame --enable-libvidstab --enable-libvorbis --enable-libvpx --enable-libwebp --enable-libx265 --enable-libxml2 --enable-libxvid --enable-libzimg --enable-libzmq --enable-libzvbi --enable-lv2 --enable-omx --enable-openal --enable-opencl --enable-opengl --enable-sdl2 --enable-pocketsphinx --enable-librsvg --enable-libmfx --enable-libdc1394 --enable-libdrm --enable-libiec61883 --enable-chromaprint --enable-frei0r --enable-libx264 --enable-shared
  configuration: --prefix=/usr --extra-version=0ubuntu0.22.04.1 --toolchain=hardened --libdir=/usr/lib/x86_64-linux-gnu --incdir=/usr/include/x86_64-linux-gnu --arch=amd64 --enable-gpl --disable-stripping --enable-gnutls --enable-ladspa --enable-libaom --enable-libass --enable-libbluray --enable-libbs2b --enable-libcaca --enable-libcdio --enable-libcodec2 --enable-libdav1d --enable-libflite --enable-libfontconfig --enable-libfreetype --enable-libfribidi --enable-libgme --enable-libgsm --enable-libjack --enable-libmp3lame --enable-libmysofa --enable-libopenjpeg --enable-libopenmpt --enable-libopus --enable-libpulse --enable-librabbitmq --enable-librubberband --enable-libshine --enable-libsnappy --enable-libsoxr --enable-libspeex --enable-libsrt --enable-libssh --enable-libtheora --enable-libtwolame --enable-libvidstab --enable-libvorbis --enable-libvpx --enable-libwebp --enable-libx265 --enable-libxml2 --enable-libxvid --enable-libzimg --enable-libzmq --enable-libzvbi --enable-lv2 --enable-omx --enable-openal --enable-opencl --enable-opengl --enable-sdl2 --enable-pocketsphinx --enable-librsvg --enable-libmfx --enable-libdc1394 --enable-libdrm --enable-libiec61883 --enable-chromaprint --enable-frei0r --enable-libx264 --enable-shared
  libavutil      56. 70.100 / 56. 70.100
  libavcodec     58.134.100 / 58.134.100
  libavformat    58. 76.100 / 58. 76.100
  libavdevice    58. 13.100 / 58. 13.100
  libavfilter     7.110.100 /  7.110.100
  libswscale      5.  9.100 /  5.  9.100
  libswresample   3.  9.100 /  3.  9.100
  libpostproc    55.  9.100 / 55.  9.100
Guessed Channel Layout for Input Stream #0.0 : stereo
Input #0, alsa, from 'hw: 0':
  Duration: N/A, start: 1671530654.229114, bitrate: 1536 kb/s
  Stream #0:0: Audio: pcm_s16le, 48000 Hz, stereo, s16, 1536 kb/s
Stream mapping:
  Stream #0:0 -> #0:0 (pcm_s16le (native) -> opus (libopus))
Press [q] to stop, [?] for help
Output #0, rtp, to 'rtp://localhost:8007':
  Metadata:
    encoder         : Lavf58.76.100
  Stream #0:0: Audio: opus, 48000 Hz, stereo, s16, 16 kb/s
    Metadata:
      encoder         : Lavc58.134.100 libopus
SDP:
v=0
o=- 0 0 IN IP6 ::1
s=No Name
c=IN IP6 ::1
t=0 0
a=tool:libavformat 58.76.100
m=audio 8007 RTP/AVP 97
b=AS:16
a=rtpmap:97 opus/48000/2
a=fmtp:97 sprop-stereo=1
Input #0, video4linux2,v4l2, from '/dev/video0':bits/s speed=0.621x
  Duration: N/A, start: 368.444011, bitrate: N/A
  Stream #0:0: Video: mjpeg (Baseline), yuvj422p(pc, bt470bg/unknown/unknown), 320x240 [SAR 1:1 DAR 4:3], 30 fps, 30 tbr, 1000k tbn, 1000k tbc
Codec AVOption preset (Configuration preset) specified for output file #0 (rtp://localhost:8006) has not been used for any stream. The most likely reason is either wrong type (e.g. a video option with no video streams) or that it is a private option of some encoder which was not actually used for any stream.
Stream mapping:
  Stream #0:0 -> #0:0 (mjpeg (native) -> vp8 (libvpx))
Press [q] to stop, [?] for help
[swscaler @ 0x55bdd8aadc00] deprecated pixel format used, make sure you did set range correctly
[libvpx @ 0x55bdd8a4b780] v1.11.0
Output #0, rtp, to 'rtp://localhost:8006':
  Metadata:
    encoder         : Lavf58.76.100
  Stream #0:0: Video: vp8, yuv420p(tv, bt470bg/unknown/unknown, progressive), 320x240 [SAR 1:1 DAR 4:3], q=2-31, 1000 kb/s, 30 fps, 90k tbn
    Metadata:
      encoder         : Lavc58.134.100 libvpx
    Side data:
      cpb: bitrate max/min/avg: 0/0/0 buffer size: 0 vbv_delay: N/A
SDP:
v=0
o=- 0 0 IN IP6 ::1
s=No Name
c=IN IP6 ::1
t=0 0
a=tool:libavformat 58.76.100
m=video 8006 RTP/AVP 96
b=AS:1000
a=rtpmap:96 VP8/90000
frame=    1 fps=0.0 q=0.0 size=       8kB time=00:00:00.00 bitrate=6323636.4kbitframe=    9 fps=0.0 q=0.0 size=      43kB time=00:00:00.26 bitrate=1321.6kbits/s[alsa @ 0x5653fc4a4700] ALSA buffer xrun.
frame=   19 fps= 18 q=0.0 size=      83kB time=00:00:00.60 bitrate=1128.3kbits/s[alsa @ 0x5653fc4a4700] ALSA buffer xrun.   4.3kbits/s speed=0.52x
frame=   32 fps= 20 q=0.0 size=     134kB time=00:00:01.03 bitrate=1061.6kbits/s[alsa @ 0x5653fc4a4700] ALSA buffer xrun.   2.7kbits/s speed=0.748x
frame=   40 fps= 19 q=0.0 size=     166kB time=00:00:01.30 bitrate=1046.6kbits/s[alsa @ 0x5653fc4a4700] ALSA buffer xrun.   2.6kbits/s speed=0.688x
frame=   51 fps= 19 q=0.0 size=     209kB time=00:00:01.66 bitrate=1029.7kbits/sframe=   60 fps= 19 q=0.0 size=     250kB time=00:00:01.96 bitrate=1040.1kbits/s[alsa @ 0x5653fc4a4700] ALSA buffer xrun.
frame=   77 fps= 21 q=0.0 size=     319kB time=00:00:02.53 bitrate=1031.4kbits/s[alsa @ 0x5653fc4a4700] ALSA buffer xrun.   1.9kbits/s speed=0.936x
[alsa @ 0x5653fc4a4700] ALSA buffer xrun.   1.9kbits/s speed=0.874x
frame=   87 fps= 20 q=0.0 size=     360kB time=00:00:02.86 bitrate=1027.6kbits/s[alsa @ 0x5653fc4a4700] ALSA buffer xrun.   1.8kbits/s speed=0.873x
frame=   93 fps= 19 q=0.0 size=     386kB time=00:00:03.06 bitrate=1031.3kbits/sframe=  101 fps= 18 q=0.0 size=     420kB time=00:00:03.33 bitrate=1031.7kbits/s[alsa @ 0x5653fc4a4700] ALSA buffer xrun.
frame=  117 fps= 19 q=0.0 size=     487kB time=00:00:03.86 bitrate=1031.6kbits/s[alsa @ 0x5653fc4a4700] ALSA buffer xrun.   1.7kbits/s speed=0.887x
frame=  135 fps= 21 q=0.0 size=     554kB time=00:00:04.46 bitrate=1016.6kbits/s[alsa @ 0x5653fc4a4700] ALSA buffer xrun.   1.5kbits/s speed=0.963x
frame=  157 fps= 22 q=0.0 size=     604kB time=00:00:05.20 bitrate= 951.7kbits/sframe=  170 fps= 22 q=0.0 size=     672kB time=00:00:05.63 bitrate= 977.4kbits/s[alsa @ 0x5653fc4a4700] ALSA buffer xrun.
frame=  184 fps= 22 q=0.0 size=     759kB time=00:00:06.10 bitrate=1019.7kbits/s[alsa @ 0x5653fc4a4700] ALSA buffer xrun.   1.6kbits/s speed=0.959x
frame=  202 fps= 23 q=0.0 size=     835kB time=00:00:06.70 bitrate=1020.7kbits/s[alsa @ 0x5653fc4a4700] ALSA buffer xrun.   1.6kbits/s speed=0.973x
frame=  226 fps= 24 q=0.0 size=     909kB time=00:00:07.50 bitrate= 992.6kbits/s[alsa @ 0x5653fc4a4700] ALSA buffer xrun.   1.6kbits/s speed=0.949x
frame=  241 fps= 24 q=0.0 size=     980kB time=00:00:08.00 bitrate=1003.3kbits/sframe=  256 fps= 25 q=0.0 size=    1063kB time=00:00:08.50 bitrate=1024.0kbits/s[alsa @ 0x5653fc4a4700] ALSA buffer xrun.   1.6kbits/s speed=0.967x
Accessing a Web User Interface and a Stream
To access a web UI and video stream hosted by the SBC, you need to connect your computer running Firefox or Chrome web browser to the same Husarnet network as the SBC.
Simply use the same Husarnet Join Code as used befor for SBC
-
Save your Husarnet VPN Join Code as an environmental variable:
export HUSARNET_JOINCODE="fc94:b01d:1803:8dd8:3333:2222:1234:1111/xxxxxxxxxxxxxxxxx" -
Install Husarnet VPN client:
curl -s https://install.husarnet.com/install.sh | sudo bashFor more detail about installation of the VPN client and managing networks go to
https://husarnet.com/docs/tutorial-linux-begin -
Connect your laptop to the same Husarnet VPN network as SBC, by using the same Husarnet Join Code:
sudo husarnet join ${HUSARNET_JOINCODE} mylaptop -
Open the URL provided by the SBC in Firefox or Chrome web browser on your laptop:
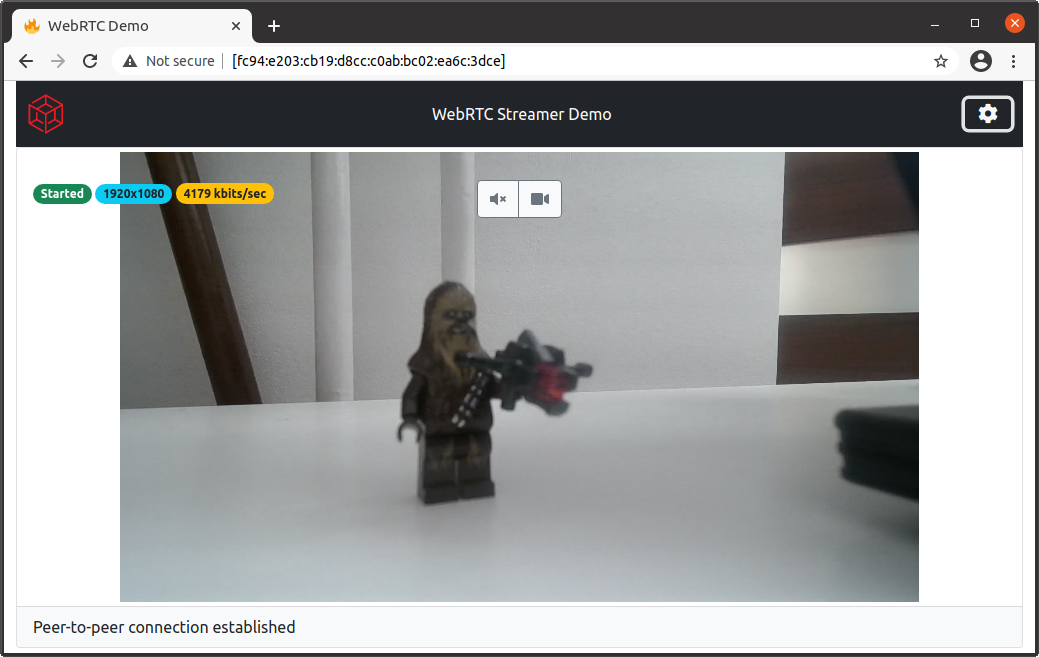
With stream parameters panel after expansion looking as such

Due to the way Janus handles networking you may need to disable mDNS in your browser setttings in order to view the stream.
On FireFox open URL: about:config and setup:
mdns -> false
media.peerconnection.ice.obfuscate_host_addresses -> false
Remarks
Lowering latency
In order to stream with lowest latency possible it is advisable to use a camera that offers feed preencoded with the H264 codec (such as Logitech C920 which was used during testing). The application detects camera support for H264 codec and makes FFmpeg take advantage of it, which reduces latency significantly. However any camera that offers feed in YUVU format is supported.
On Linux you can check available output stream options for your USB camera like that:
$ sudo v4l2-ctl --list-formats
ioctl: VIDIOC_ENUM_FMT
    Type: Video Capture

    [0]: 'YUYV' (YUYV 4:2:2)
    [1]: 'MJPG' (Motion-JPEG, compressed)
    [2]: 'H264' (H.264, compressed)
Another important thing to remember is to ensure that a P2P connection has been established between hosts, connection status is detected by server running in the container and sent to UI which displays connection status int the lower part of the screen.
If you face any issues in establishing a P2P connection read our troubleshotting guide
Audio streaming
By default audio is streamed alongside the video, and can be muted in the UI.
If You don't want to stream audio altogether in order to preserve CPU or bandwith it can be stoped by setting the AUDIO environment variable to false when running the container this results in stoping aduio streaming and encoding.
Testing feed
If You don't have a camera at hand or just want to quickly test the stream without bothering with the hardware aspects of the setup it is possible to use a feed generated by ffmpeg rather than one coming from a camera. In order to do so just set he TEST environment variable to false when running the container
Adding support for different codecs
You can quite easily add support for any of the WebRTC used codecs. By implementing Your own functions that setup ffmpeg pipelines and caling them in appropiate places in websocket server.
Summary
In this blog post we have shown a simple and fast way to setup WebRTC stream over VPN all inside a docker container.
The solution is quite flexible, with all WebRTC infrastructure contained inside the container which can run on a range of hosts form Raspberry Pi to a standard laptop.
Thanks to high configurabilty of stream parameters, codecs and other options described solution can be adopted in different use cases ranging from telepresence robots remote control to survelience or "baby monitoring".
If you would like to send a comment to this blog post, you can do that on Husarnet Community Forum.