Host a Private Website With No Static IP

In this article I present how to host a web app on your Raspberry Pi (or other computers) with a couple of interesting features.
- ⛔ no static IP address, Dynamic DNS or port forwarding on your router needed
- 🚀 low latency access over the public Internet without server in the middle
- 🔁 possibility to easily share access to that web app only to specific people
The web app will consist of two elements:
- ✏️ front-end: using Bootstrap 4 and websocket client written in JS
- ✏️ back-end: Python app with a websocket server providing a JSON API to the front-end part
I show a bi-directional connection over a single websocket. The demo application will be very simple - controlling a LED connected to Raspberry Pi using a button in web UI and controlling an indicator in the web UI over the button connected to Raspberry Pi.
💭 You can treat this app as a boilerplate code for your own, more sophisticated apps requiring a low-latency control over a web user interface.

Connecting RaspberryPi and laptop using a VPN
To access a Raspberry Pi over the Internet, we need to configure a VPN service, because our computers don't have static IP addresses. Our choice is Husarnet VPN Client, because it works peer-to-peer so the latency to our web user interface will be minimized in comparison to solutions based on central cloud/server software.
Husarnet Client creates a virtual network interface on the level of your operating system. So from your applications point of view it's like a network adapter with IPv6 (but works over physical IPv4 or IPv6 networks provided by Ethernet, Wi-Fi, LTE or 5G). Husarnet is trying to establish a direct, peer-to-peer connection between your devices (with a fail-over route over Husarnet Base Servers), so latency is minimized and you do not need to worry about configuring a VPN server.
Husarnet infrastructure is used to help your devices find each other over the Internet, even if they do not have static IP addresses, or are behing NAT's and firewalls.
Husarnet is free to use for up to 5 devices, without any transfer limits. We do not care about how much data your devices transfer if the traffic goes directly between them, not through our servers. We don't even know how much data you transfer.
1. Installing Husarnet VPN Client on your Raspberry Pi and laptop:
curl -s https://install.husarnet.com/install.sh | sudo bash
2. Connecting your devices to the same VPN network.
At first you will need to obtain a Husarnet join code for the network you want your devices to be connected to. To find your join code, create an account and log into https://app.husarnet.com . Then create a new network, by clicking [Create network] button, and then click [Add element] button. Your join code will be available under join code tab:
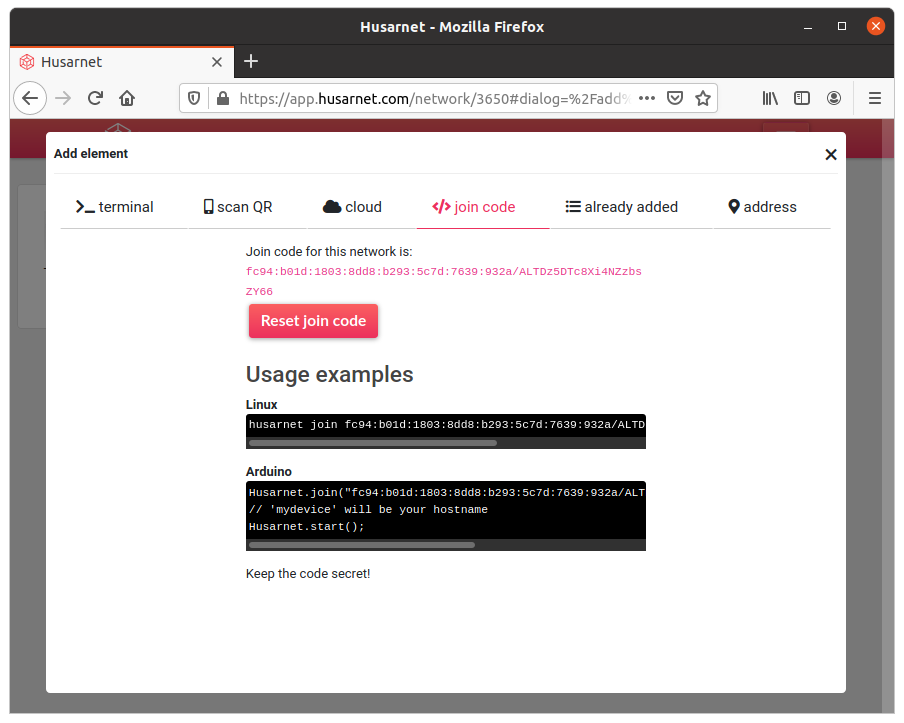 It looks like this:
 fc94:b01d:1803:8dd8:b293:5c7d:7639:932a/XXXXXXXXXXXXXXXXXXXXX.
Now when you have your join code available all you have to do is to execute:
a) on your Raspberry Pi:
sudo husarnet join fc94:b01d:1803:8dd8:b293:5c7d:7639:932a/XXXXXXXXXXXXXXXXXXXXX myrpi
b) on your laptop:
sudo husarnet join fc94:b01d:1803:8dd8:b293:5c7d:7639:932a/XXXXXXXXXXXXXXXXXXXXX mylaptop
where: myrpi and mylaptop are easy to remember host names under which you will be able to access your devices.
Configuring Apache 2 webserver
- Install Apache 2:
sudo apt update && sudo apt install apache2 -y
- Create a folder for "myrpi" domain (the same as your device hostname)
sudo mkdir /var/www/myrpi
sudo mkdir /var/www/myrpi/public_html
- Change permissions:
sudo chmod -R 755 /var/www
- Copy a config file for "myrpi" domain
cd /etc/apache2/sites-available
sudo cp 000-default.conf myrpi.conf
- Edit
myrpi.conf:
<VirtualHost *:8000>
        # The ServerName directive sets the request scheme, hostname and port that
        # the server uses to identify itself. This is used when creating
        # redirection URLs. In the context of virtual hosts, the ServerName
        # specifies what hostname must appear in the request's Host: header to
        # match this virtual host. For the default virtual host (this file) this
        # value is not decisive as it is used as a last resort host regardless.
        # However, you must set it for any further virtual host explicitly.

        ServerName www.myrpi
        ServerAlias myrpi
        ServerAdmin pi@myrpi
        DocumentRoot /var/www/myrpi/public_html

        # Available loglevels: trace8, ..., trace1, debug, info, notice, warn,
        # error, crit, alert, emerg.
        # It is also possible to configure the loglevel for particular
        # modules, e.g.
        #LogLevel info ssl:warn

        ErrorLog ${APACHE_LOG_DIR}/error.log
        CustomLog ${APACHE_LOG_DIR}/access.log combined

        # For most configuration files from conf-available/, which are
        # enabled or disabled at a global level, it is possible to
        # include a line for only one particular virtual host. For example the
        # following line enables the CGI configuration for this host only
        # after it has been globally disabled with "a2disconf".
        #Include conf-available/serve-cgi-bin.conf
</VirtualHost>
We placed our server under 8000 port, so we also need to modify /etc/patache2/ports.conf file:
# If you just change the port or add more ports here, you will likely also
# have to change the VirtualHost statement in
# /etc/apache2/sites-enabled/000-default.conf

Listen 80
Listen 8000

<IfModule ssl_module>
        Listen 443
</IfModule>

<IfModule mod_gnutls.c>
        Listen 443
</IfModule>
- Enable a custom config file:
a) disable default config file at first:
sudo a2dissite 000-default.conf
Result should look like this:
Site 000-default disabled.
To activate the new configuration, you need to run:
  systemctl reload apache2
b) enable a new config file:
sudo a2ensite myrpi.conf
Result should look like this:
Enabling site myrpi.
To activate the new configuration, you need to run:
  systemctl reload apache2
c) reload apache2
sudo systemctl reload apache2
Installing Python3 libraries
websockets
sudo apt install python3-pip && sudo pip3 install websockets
also run websockettest.py as a root becasue of access rights to GPIO
gpiozero
pi@myrpi:~$ sudo apt install python3-gpiozero
If during executing a python3 script you will face and error like this RuntimeError: Not running on a RPi!
You will probably need to modify access rights to GPIO:
pi@myrpi:~$ ls -l /dev/gpio*
crw------- 1 root root    254, 0 wrz 24 21:27 /dev/gpiochip0
crw------- 1 root root    254, 1 wrz 24 21:27 /dev/gpiochip1
crw-rw---- 1 root dialout 240, 0 wrz 24 21:27 /dev/gpiomem
and then:
pi@myrpi:~$ sudo chown root:$USER /dev/gpiomem
If this is no critical for your application, the most comfortable way however is running the script as root
Now connect a LED to your RaspberryPi with a serial resistor. In our case it's GPIO16.
Also connect a button to the GPIO23.
The source code
On my GitHub profile there is repository with the source code: Python, HTML and JS files.
Let's focus on client and server websocket communication implementation.
- Server (Python)
- Client (JavaScript)
import asyncio
import websockets
import json

from gpiozero import LED
from gpiozero import Button

from time import sleep

btn = Button(23)
led = LED(16)

event = asyncio.Event()
loop = asyncio.get_event_loop()

def __execute_btn_changed():
   event.set()

def btn_changed(self):
   loop.call_soon_threadsafe(__execute_btn_changed)

async def rx_handler(websocket):
   async for rx_msg in websocket:
       print(rx_msg)
       rx_json = json.loads(rx_msg)

       if rx_json["led"] == 1:
           led.on()
       else:
           led.off()

async def tx_handler(websocket):
   tx_msg = {"counter": 0, "button":0}
   cnt = 0

   while True:
       await event.wait()
       event.clear()

       cnt = cnt + 1
       tx_msg["counter"] = cnt
       tx_msg["button"] = int(btn.is_pressed == True)
       print(tx_msg)
       await websocket.send(json.dumps(tx_msg))

async def ws_handler(websocket, path):
   rx_task = asyncio.ensure_future(rx_handler(websocket))
   tx_task = asyncio.ensure_future(tx_handler(websocket))

   done, pending = await asyncio.wait(
       [rx_task, tx_task],
       return_when=asyncio.FIRST_COMPLETED,
   )

   for task in pending:
       task.cancel()

btn.when_pressed = btn_changed
btn.when_released = btn_changed

start_server = websockets.serve(ws_handler, port=8001)

loop.run_until_complete(start_server)
loop.run_forever()
var ws;

window.addEventListener('beforeunload', (event) => {
    ws.close();
    // Cancel the event as stated by the standard.
    event.preventDefault();
    // Older browsers supported custom message
    event.returnValue = '';
});

function mouseDown() {
    ws.send('{"led" : 1}');
}

function mouseUp() {
    ws.send('{"led" : 0}');
}

function WebSocketBegin() {
    if ("WebSocket" in window) {
        // Let us open a web socket
        ws = new WebSocket(
            location.hostname.match(/\.husarnetusers\.com$/) ? "wss://" + location.hostname + "/__port_8001/" : "ws://" + location.hostname + ":8001"
        );

        ws.onopen = function () {
            // Web Socket is connected
        };

        ws.onmessage = function (evt) {
            //create a JSON object
            var jsonObject = JSON.parse(evt.data);
            var cnt = jsonObject.counter;
            var btn = jsonObject.button;

            document.getElementById("cnt").innerText = cnt;
            if (btn == 1) {
                document.getElementById("btn").style.color = "green";
            } else {
                document.getElementById("btn").style.color = "red";
            }
        };

        ws.onclose = function (evt) {
            if (evt.wasClean) {
                alert(`[close] Connection closed cleanly, code=${evt.code} reason=${evt.reason}`);
            } else {
                // e.g. server process killed or network down
                // event.code is usually 1006 in this case
                alert('[close] Connection died');
            }
        };

        ws.onerror = function (error) {
            alert(`[error] ${error.message}`);
        }


    } else {
        // The browser doesn't support WebSocket
        alert("WebSocket NOT supported by your Browser!");
    }
}
Runing a web server
a) Clone the projects repository
git clone https://github.com/DominikN/rpi_websocket_server
b) Copy index.html and websocket_client.js to the Apache webserver folder:
sudo cp ./rpi_websocket_server/frontend_src/* /var/www/myrpi/public_html/
c) Start a python3 script running a websocket server:
sudo python3 ./rpi_websocket_server/backend_src/websocket_server.py
At this point everything should be up and running!
Testing the webserver
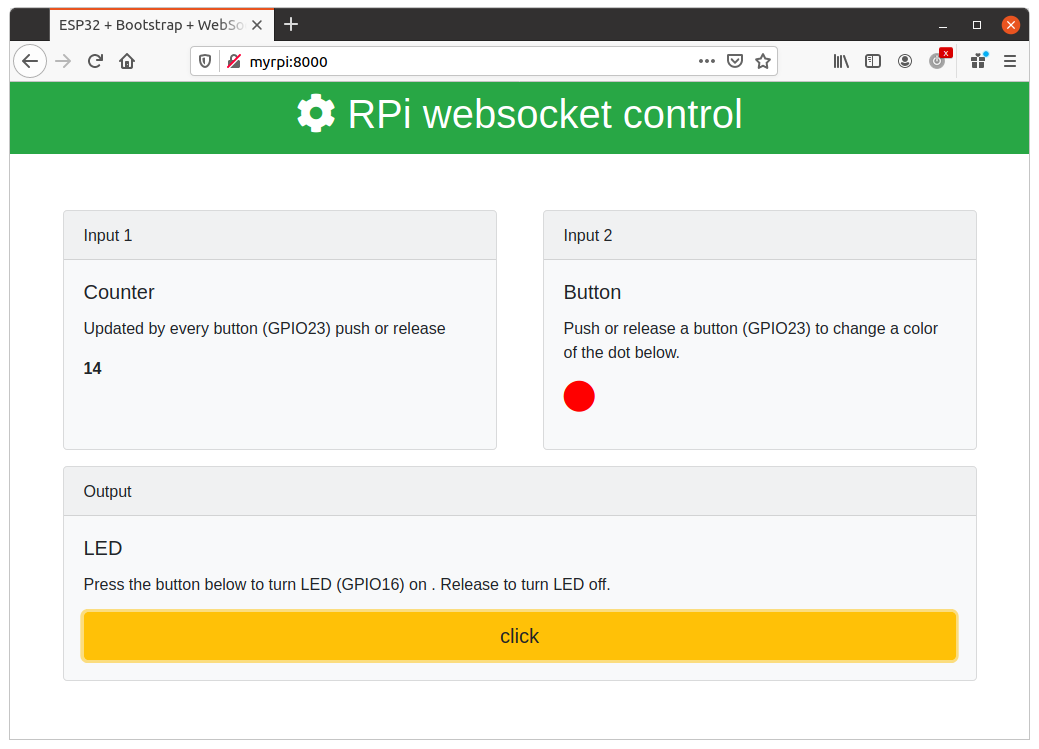
On your mylaptop device (that is in the same Husarnet VPN network as myrpi device), open a web browser and open the following URLs:
on Firefox
http://myrpi:8000
on other browsers
http://[MYRPI_IPv6_ADDRESS_FROM_APP_HUSARNET_COM]:8000
end result
You should see a simple website hosted by your Raspberry Pi where you can control a LED (connected to GPIO16) and if you click a button (connected to GPIO23) you should see reaction on the red/green dot:
Summary
I presented in this article:
- how to configure a Apache 2 on Raspberry Pi,
- how to establish a bi-directional websocket connection in the Python3 script running on RaspberryPi
- how to make that working not only in LAN but also over the Internet, even if you don't have static IP and don't want to configure port forwarding on your router or dynamic DNS service.
I hope you will find this article helpful.
In case of any questions related to this blog post please contact us using Husarnet Community Forum or via email at support@husarnet.com.