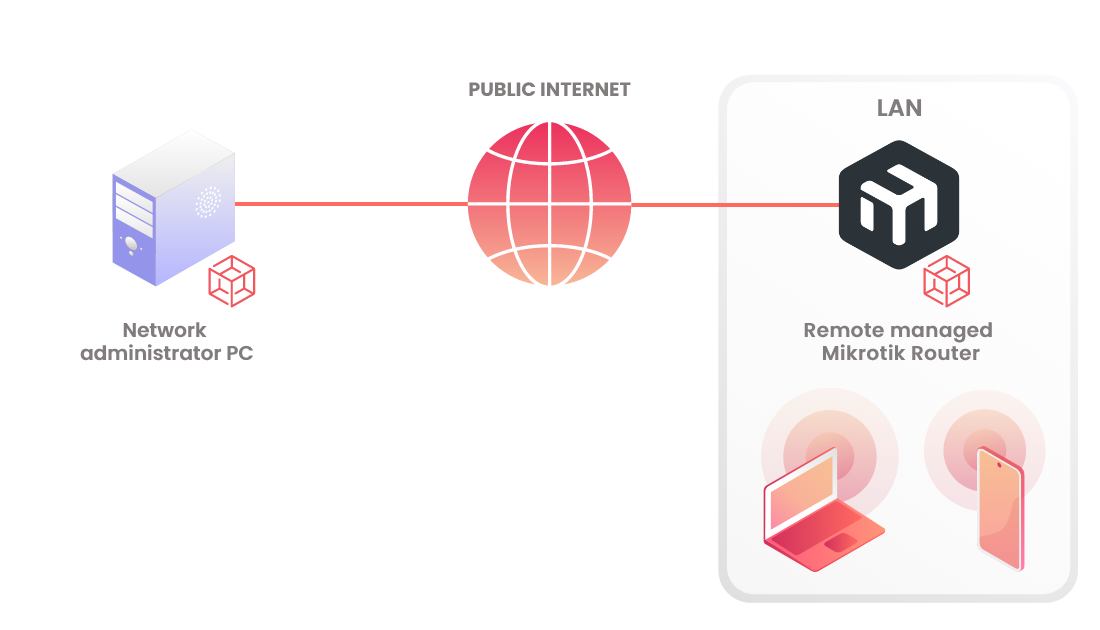
How to Access Mikrotik Router over the Internet
Facing the challenge of remotely accessing Mikrotik routers in a secure and efficient manner? This blog post dives into the technical nuances of setting up Husarnet on a Mikrotik router, leveraging the Mikrotik containers feature. By implementing the guides outlined in this post, you can achieve robust and secure remote access to your Mikrotik router without the need for a public IP address or complex port forwarding configurations, ensuring both ease of management and enhanced security.
Prerequisites for Configuration
Before starting the setup, ensure you have the following:
- A Mikrotik device equipped with an
ARM,ARM64, orx86_64CPU. - Your Mikrotik should run at least
RouterOS v7.12. - Additional storage for the Mikrotik device, such as a USB Pendrive.
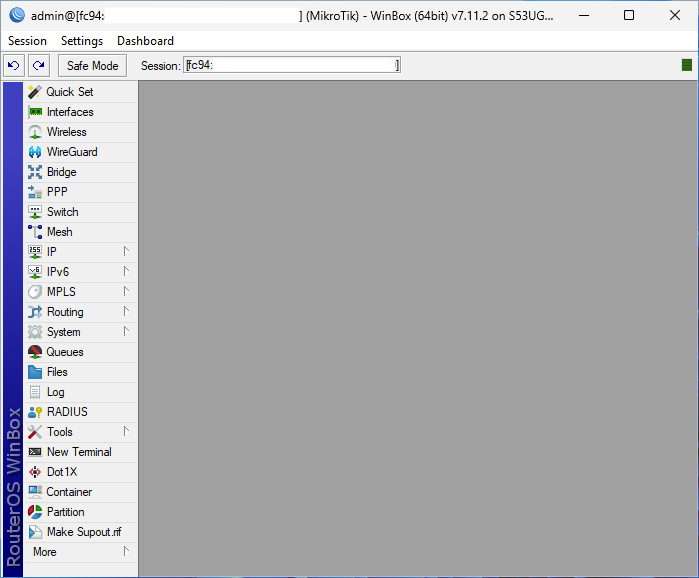
- Access to Winbox for configuration.
- The Netinstall tool for RouterOS.
- Husarnet VPN Client installed on your PC.
- Physical access to your Mikrotik device.
- The
Containerspackage installed on your Mikrotik device. - This guide uses
Windows 11Pro 22H2 (22621.2283) for demonstration purposes, but you can also use Winbox on Linux with Wine.
Overview of Mikrotik Tools Used
Container Package for Mikrotik: The Container package in Mikrotik's RouterOS is a powerful feature allowing the running and management of Docker containers directly on Mikrotik routers. This enables the extension of router capabilities through additional software and services in isolated environments. For more information on RouterOS and the Container Package visit Mikrotik's official website.
Winbox: Winbox is a configuration tool for Mikrotik RouterOS, offering a graphical interface for the efficient management of various router functions. It's primarily designed for Windows but can be used on Linux with Wine. Winbox can be downloaded from Mikrotik's Download webpage.
Netinstall: Netinstall is a tool provided by Mikrotik for reinstalling or resetting the RouterOS on a Mikrotik router. It's particularly useful in scenarios where the router's operating system needs to be reinstalled from scratch, such as in case of corruption or when upgrading to a different version. Netinstall requires physical access to the router and is an important tool for managing the firmware and software running on Mikrotik devices. Detailed information and the download option for Netinstall are available on Mikrotik's Documentation.
Scenarios for This Setup
Consider utilizing this guide under the following circumstances:
- You wish to avoid port forwarding configurations on your router or firewall.
- A public IP address for your network is not available or desired.
- You prefer keeping Winbox access restricted from direct internet exposure.
- You require a contingency plan for accessing your Mikrotik router in case of accidental disconnection from the LAN network.
Connecting Your Devices to the Same VPN Network
First, you'll need to obtain a Husarnet join code for the network you want your devices to be connected to. To find your join code, create an account and log into https://app.husarnet.com. Then create a new network by clicking [Create network] button and then click [Add element] button. Your join code will be available under join code tab:
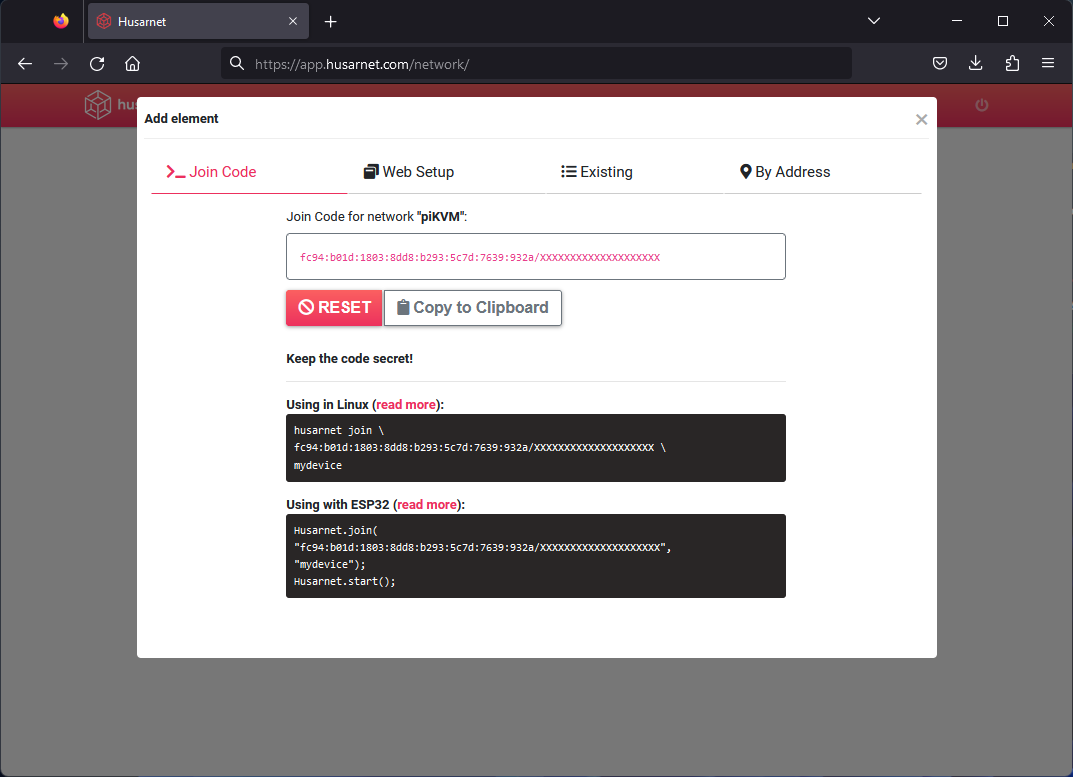
It looks like this: fc94:b01d:1803:8dd8:b293:5c7d:7639:932a/XXXXXXXXXXXXXXXXXXXXX.
With your join code in hand, follow our Windows or Linux installation guide to install the Husarnet Client on your PC.
Steps for WinBox Configuration
1. Installing Containers Package on RouterOS
- Visit the Mikrotik Downloads page to download the latest versions of Winbox, Netinstall, RouterOS, and extra packages suitable for your device's architecture.
- Perform a Netinstall on your Mikrotik device. This is necessary to free up as much main memory space as possible. Follow this guide for Netinstall instructions.
- Ensure the installation of at least the
Containerspackage. If needed, also install theWiFiWave2package.
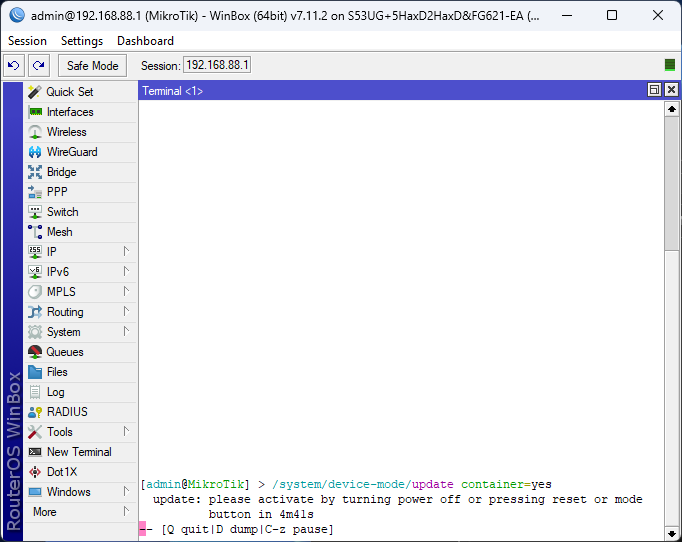
2. Enabling Container Mode
-
In WinBox, open a new Terminal and execute:
/system/device-mode/update container=yes -
Follow the on-screen instructions:
- For x86-64 PC-based routers, execute a hard reset by using the reset button or by unplugging the router from its power source and then replugging it.
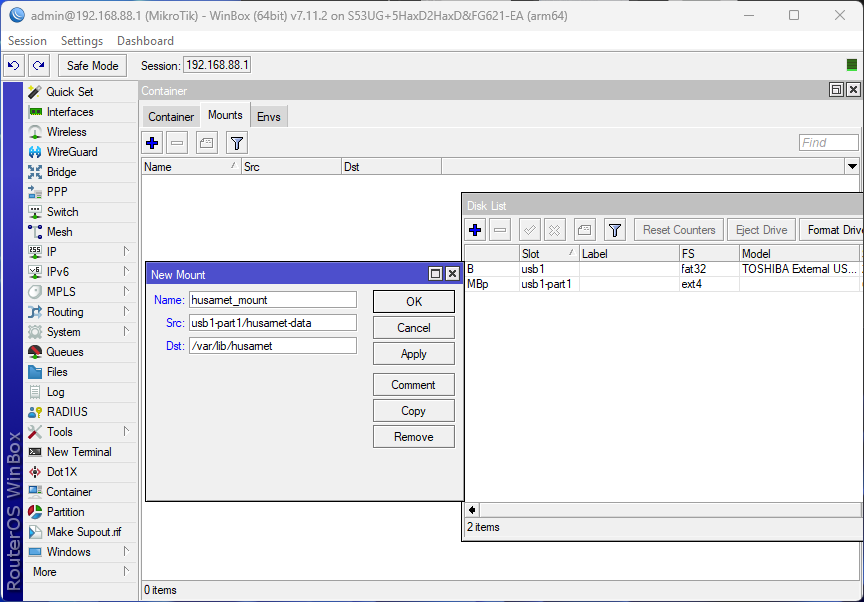
3. Setting up Storage
- Ensure sufficient storage space for running containers, both on external and internal storage.
- Connect external storage via USB or internally and format it with the
ext4filesystem using theMBRpartition table.
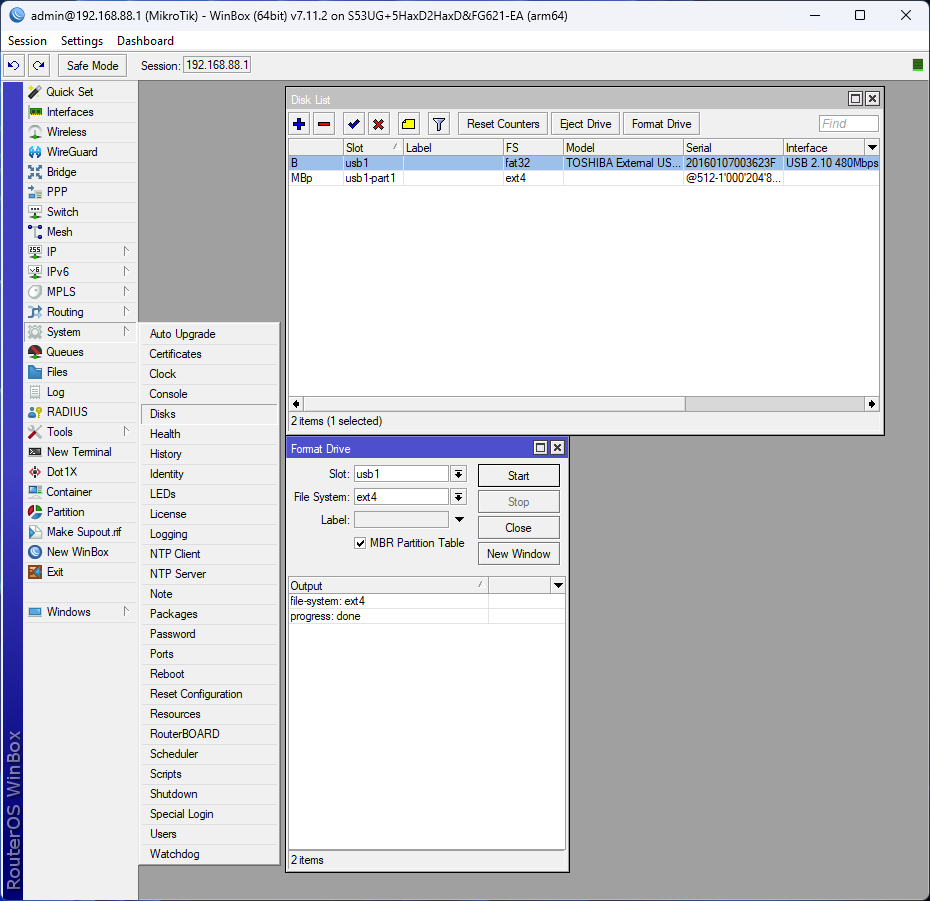
- Note down Slot value (In my case it's
usb1-part1).
4. Creating Virtual Ethernet (VETH)
- In the Interfaces section, select the VETH tab and create a new Interface with the
+button.
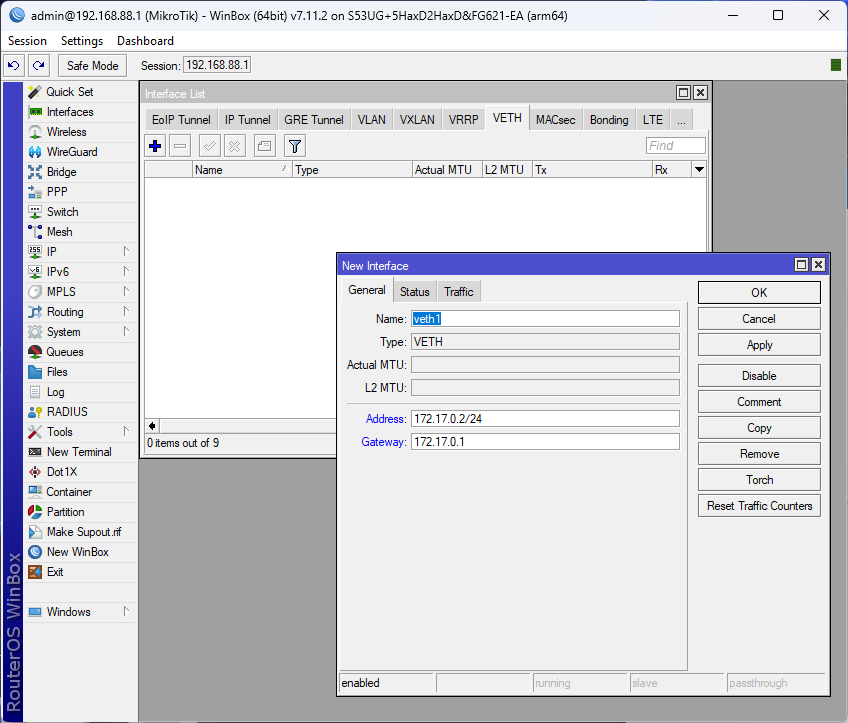
-
In this tutorial we'll be using following setup:
- Name:
veth1 - Address:
172.17.0.2/24 - Gateway:
172.17.0.1
- Name:
5. Creating and Configuring a Bridge for Husarnet Container
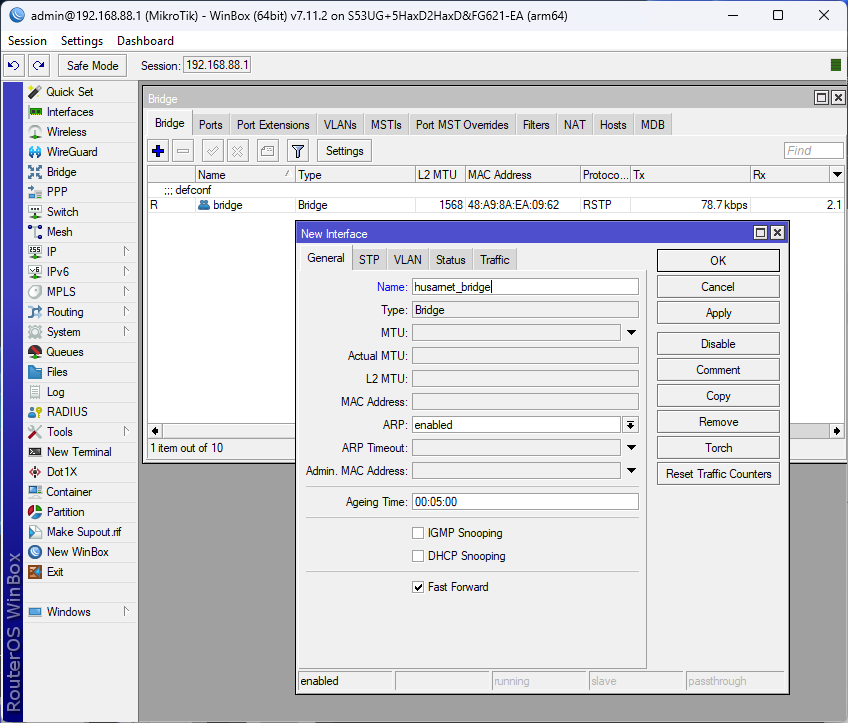
- To create new bridge on Left Toolbar click on the Bridge button then in the Bridge tab click the + Button. For this tutorial we'll set the name
husarnet_bridgeand leave everything else on it's default value. Click theApplyand theOKbuttons and the new bridge is now created.
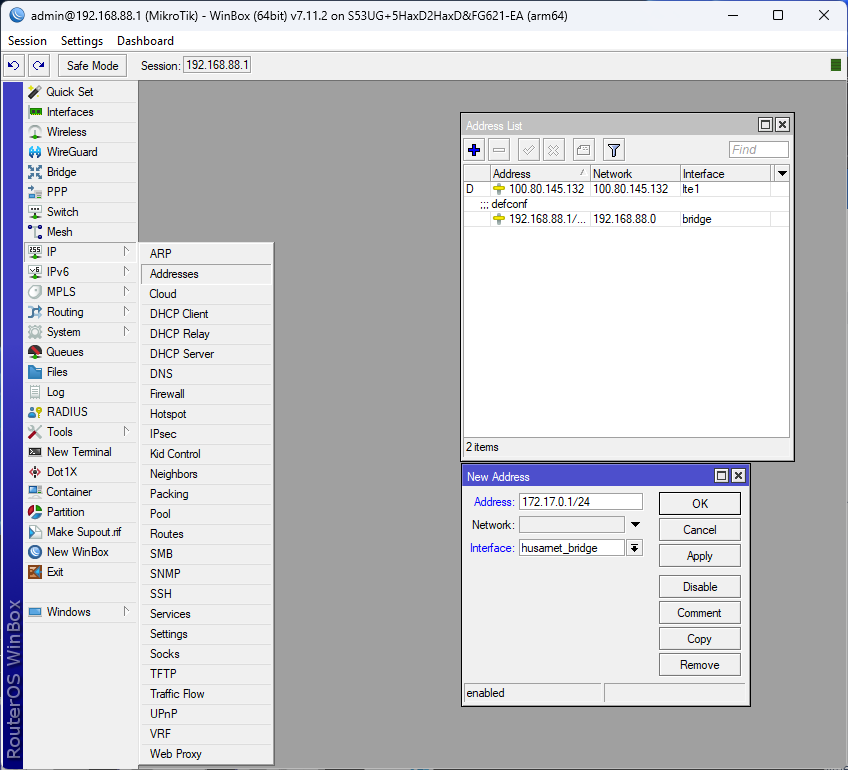
-
Now we need to Assign IP address to previously created Bridge. On the left toolbar select IP then Addresses. In the Address List window click the + Button.
-
Then in the New Address window fill options as following:
- Address:
172.17.0.1/24 - Interface:
husarnet_bridge
Click the Apply, then OK buttons. Now our bridge has IP
172.17.0.1, with the Subnet Mask255.255.255.0. - Address:
-
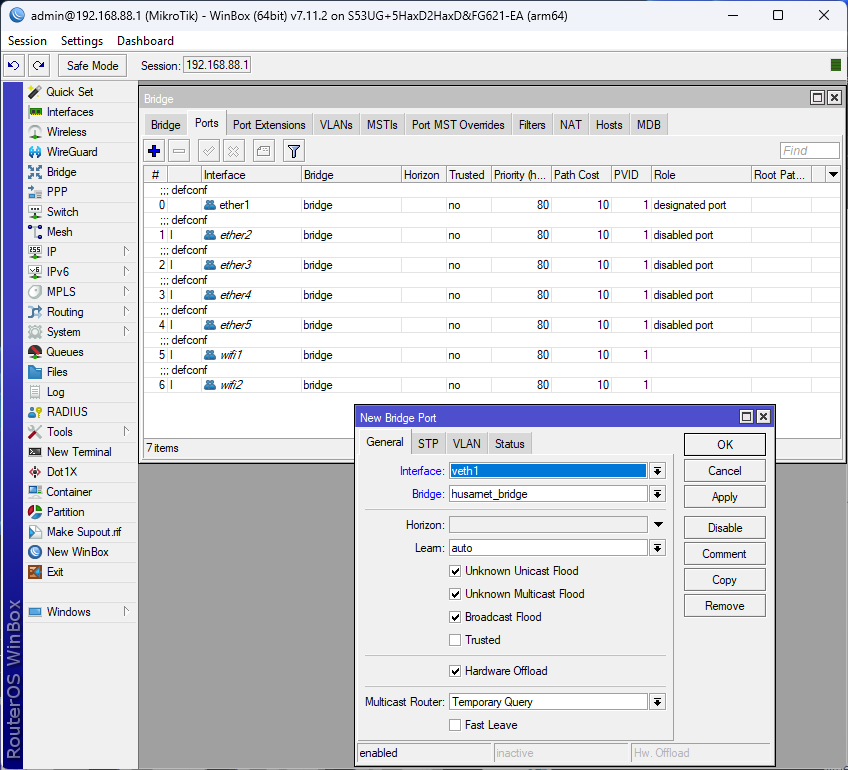
Now we need to add the
veth1to ourhusarnet_bridge. Click the Bridge button (left toolbar), then in a new window select the Ports tab and click the + button. Fill details as follows:- Interface:
veth1 - Bridge:
husarnet_bridge
Leave everything else on defaults, apply+ok and go to next step.
- Interface:
6. Setting up NAT
- Navigate to IP -> Firewall, select the NAT tab, and add a new rule with the + button.
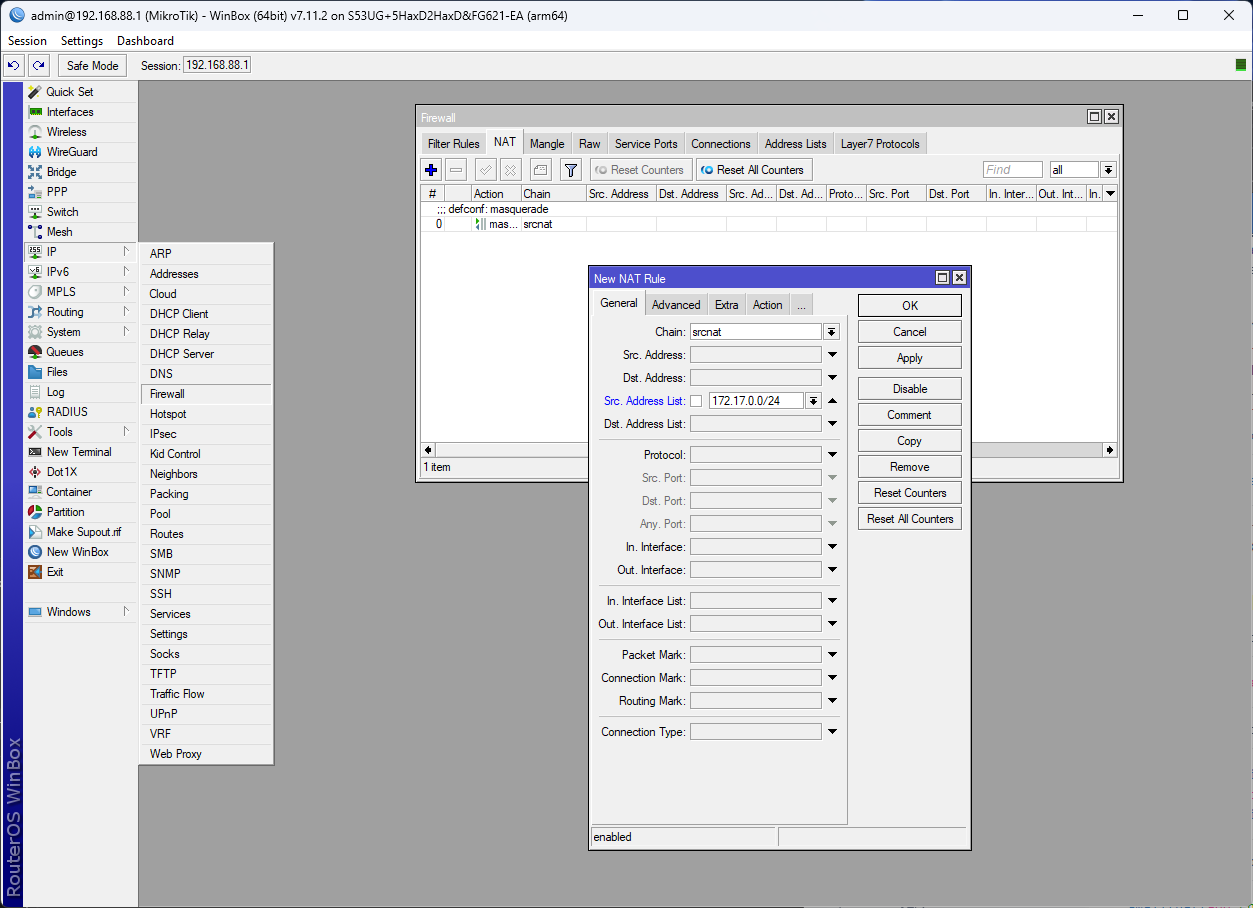
- Ensure the Chain is set to
srcnatand the Src. Address list includes172.17.0.0/24.
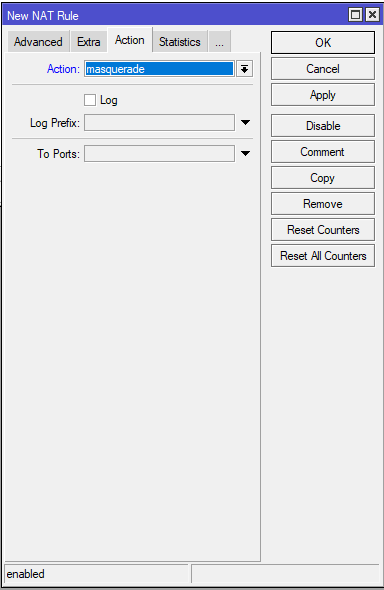
- Now change the tab from General to Action and in the Action field select
masquerade. Then Apply and OK.
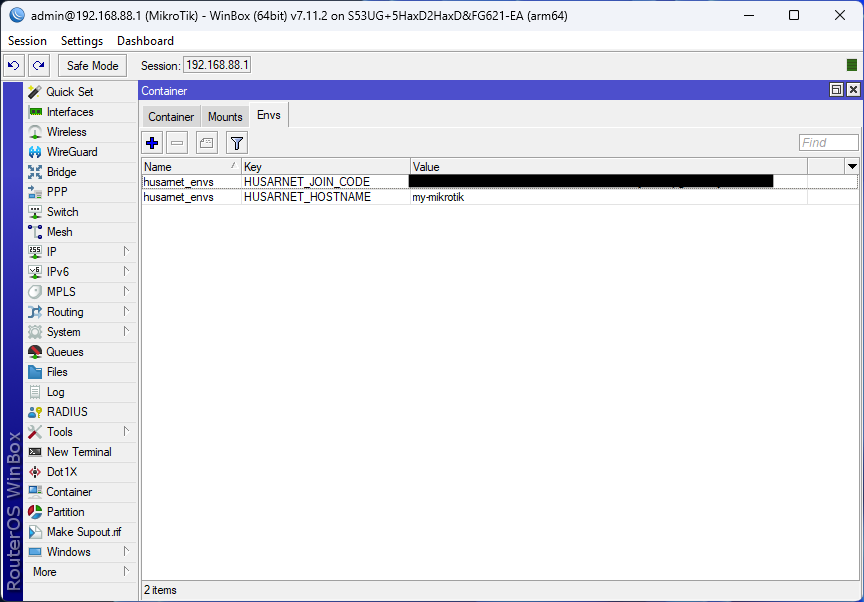
7. Setting up Environment Variables for Husarnet
Add enviroment variables for Husarnet container (Refer to the list of valid variables:
HUSARNET_JOIN_CODE(paste the Join Code from one of the previous steps)HUSARNET_HOSTNAME
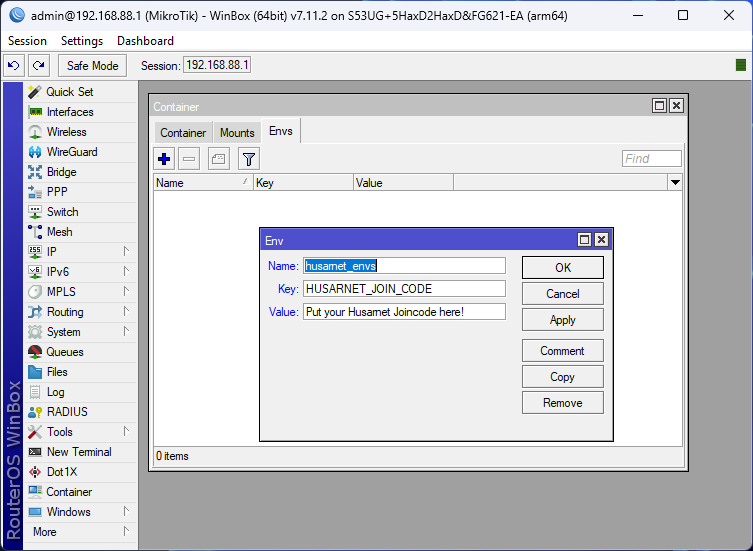
The Name field should be the same for all variables, which you want to use with Husarnet container.
8. Setting up Volumes for Husarnet Container
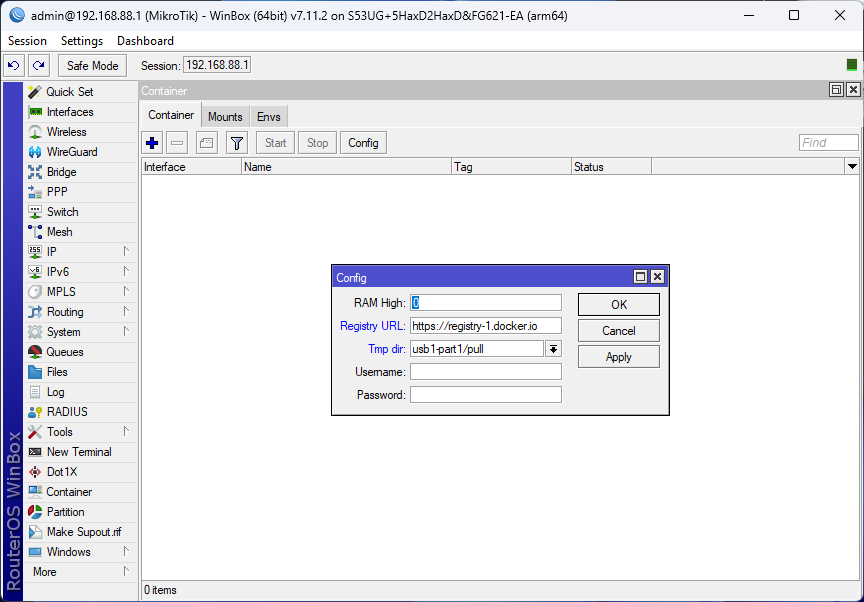
9. Configuring and Running the Container
- Go to the configuration section and set the Tmp dir (e.g.,
usb1-part1/pull) and the Registry URL (as of October 16, 2023, it's https://registry-1.docker.io).
- Add the container with the following details:
- Remote Image:
husarnet/husarnet:latest - Interface:
veth1 - Envlist:
husarnet_envs - Root Dir: In my case it was
usb1-part1/husarnet_root_dir - Mounts:
husarnet_mount
- Remote Image:
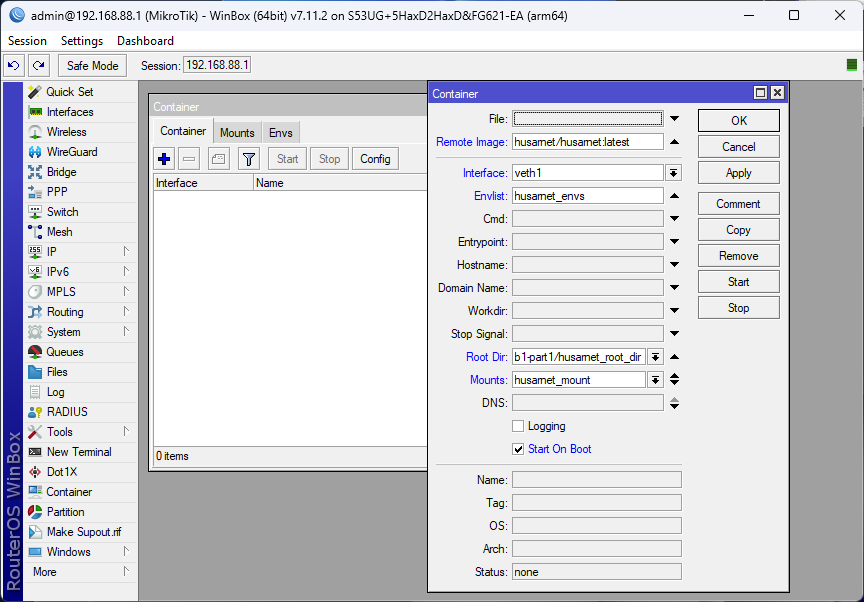
- Also check the
Start On Bootcheckbox, then click the Apply and OK buttons.
Now Husarnet container should start, and you should see a new device in your Husarnet online dashboard.
Accessing Mikrotik Router via Husarnet VPN (Winbox/Webfig/SSH)
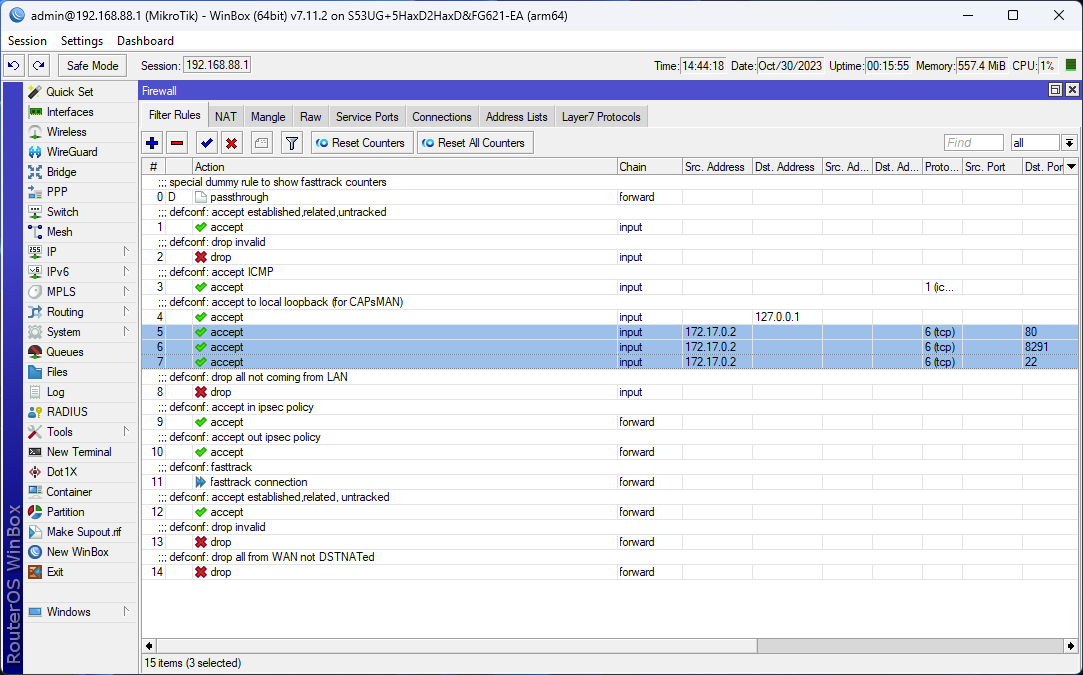
1. Firewall Configuration on Mikrotik Router
-
Navigate to IP -> Firewall and select the Filter Rules tab.
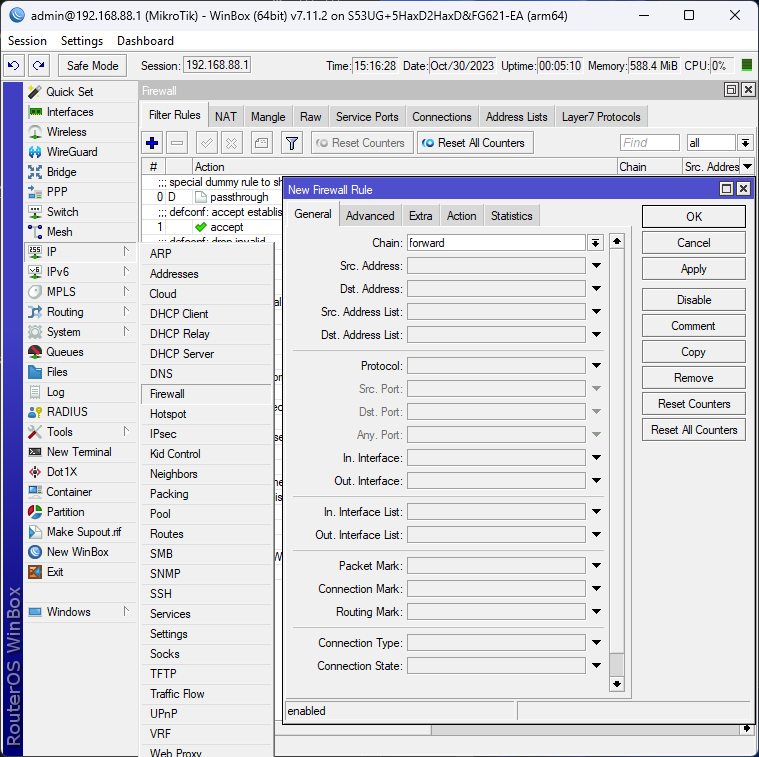
-
Click on the + button to add new rules for WinBox, SSH and WebFig:
- WinBox
- SSH
- WebFig
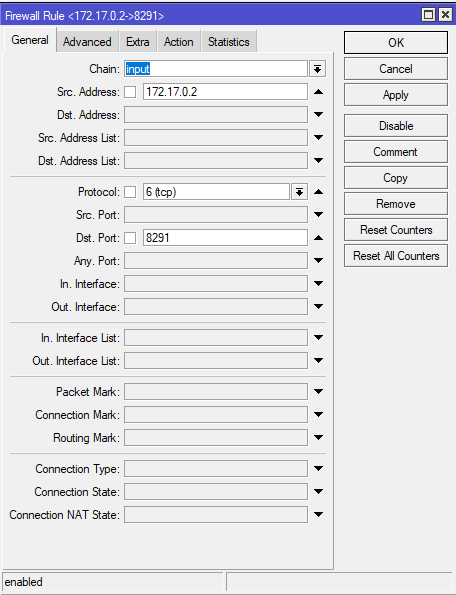
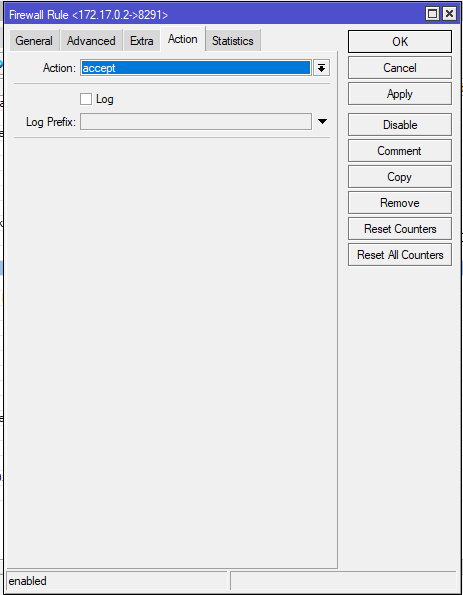
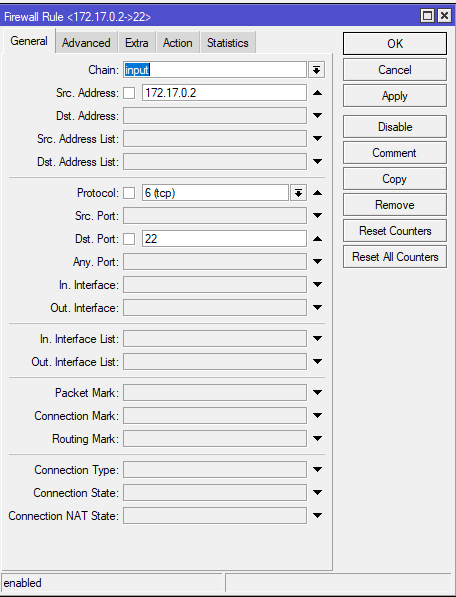
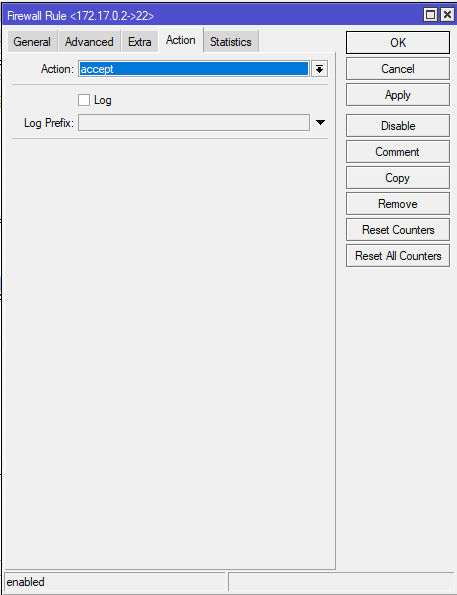

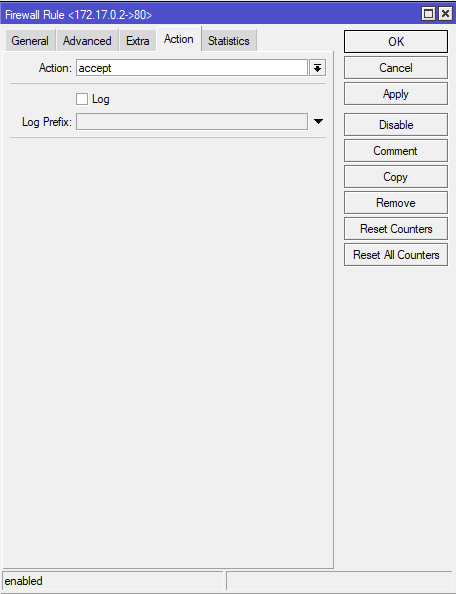
- A screenshot is provided to show how these rules should appear, including the default Mikrotik firewall rules with the new rules highlighted.
- Ensure that under IP -> Services, the desired access methods are enabled (default Mikrotik configuration is typically sufficient).
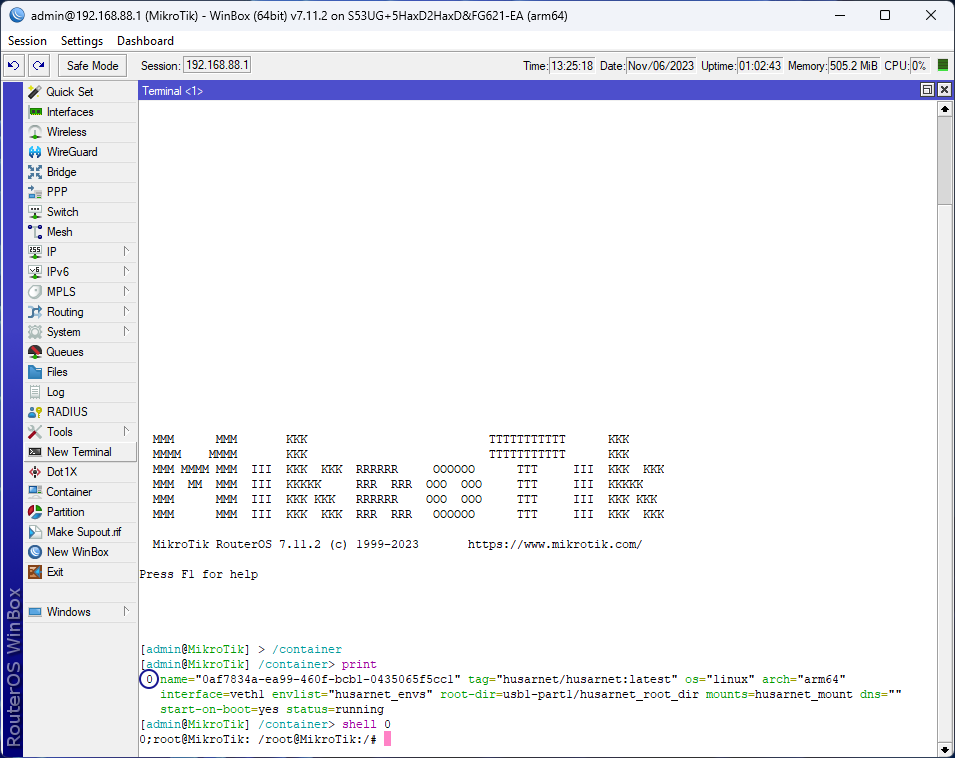
2. Setting Up a Reverse Proxy
- Click the New Terminal button on the left sidebar. Now type
/containerandprint. This will list all containers installed, with their details. Now we need a container ID (It's marked on screenshot with the blue circle). Moving on typeshell <container-id>(It was0in my case).
-
In the Husarnet Container shell, execute the following commands:
apt update && apt install nginx wget -y
wget https://raw.githubusercontent.com/husarnet/blog-examples/main/mikrotik-remote-access/nginx.conf -O /etc/nginx/nginx.conf
service nginx start -
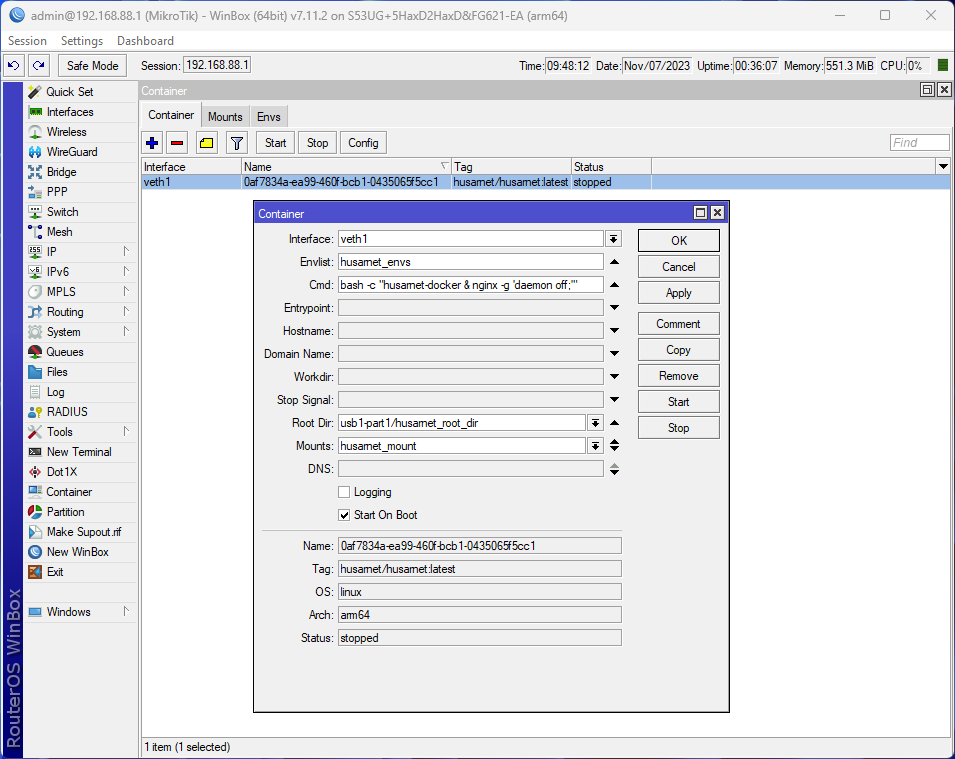
Modify the Husarnet container setup in Winbox:
- Go to Container, select the Husarnet container, and open its settings (with double-click).
- Stop the container, and in the Cmd field, enter:
bash -c "husarnet-docker & nginx -g 'daemon off;'"- Apply the changes, Start the container, and click OK.
Now Husarnet is set up successfully, both Husarnet VPN and Nginx will start on RouterOS boot.
Alternative Method: Building Docker Image with Nginx Included
For this method, Docker needs to be installed on your PC. If using Windows, proceed within the WSL2 environment.
Steps:
- Clone the repository and navigate to the
mikrotik-remote-accessdirectory:
git clone https://github.com/husarnet/blog-examples
cd blog-examples/setting-up-mikrotik-with-husarnet
- Set the ARCH variable to match your device's architecture (
arm/v7,arm64,amd64). Check your device's architecture on the Mikrotik website.
export ARCH=<YOUR-ARCH>
- Build the Docker image:
docker buildx build  --no-cache --platform $ARCH --output=type=docker -t hnet$ARCH . --build-arg ARCH=$ARCH
docker save hnet$ARCH > hnet$ARCH.tar
Transfer the hnet<YOUR-ARCH>.tar file to your Mikrotik device. For step 6, instead of Remote Image use the path to your hnet<YOUR-ARCH>.tar file, and skip step 2 of Setting up Reverse Proxy if using this self-built image.
Conclusion: Following these steps, you should be able to access your Mikrotik device over Husarnet VPN. For IPv6 connections, remember to use square brackets [].
Summary
This comprehensive guide details the process of setting up Husarnet VPN on a Mikrotik router, enabling secure remote access without the need for a public IP address or port forwarding. Key requirements include a Mikrotik device with specific CPU types, RouterOS v7.12 or higher, additional storage, and access to Winbox and Netinstall tools.
The tutorial covers several crucial steps, starting from obtaining a Husarnet join code to configuring your Mikrotik router for remote access. It includes installing the "Containers" package, enabling container mode, setting up storage, creating a virtual Ethernet, establishing a bridge for the Husarnet container, and configuring NAT and environment variables for the Husarnet container. The guide also explains how to set up and run the container, detailing firewall setup for various access methods like Winbox, SSH, and WebFig.
Additionally, it provides instructions for setting up a reverse proxy using Nginx within the Husarnet container, offering an alternative method for those who prefer building a Docker image with Nginx pre-included.
This post is essential for network professionals seeking a reliable and secure method to remotely access and manage Mikrotik routers over the Internet.