Raspberry Pi Remotely Right Away

In one of the previous blog posts I presented how to configure a Raspberry Pi to access it from anywhere without public IP or port forwarding on your router. It's quite easy, but still you need to make a few steps manually, like providing your Wi-Fi credentials, installing the Husarnet VPN Client (recently open sourced), and typing commands in the terminal to connect the board to your Husarnet VPN network.
If you have to confiture a single Raspberry Pi that might be a fun way of spending a time, but what if you would like to connect a dozen(s) of them? My math teacher in elementary school often said that "a good mathematician should be lazy". That's also a true sentence for engineers - if you can automate something that is repetitive and boring - do it.
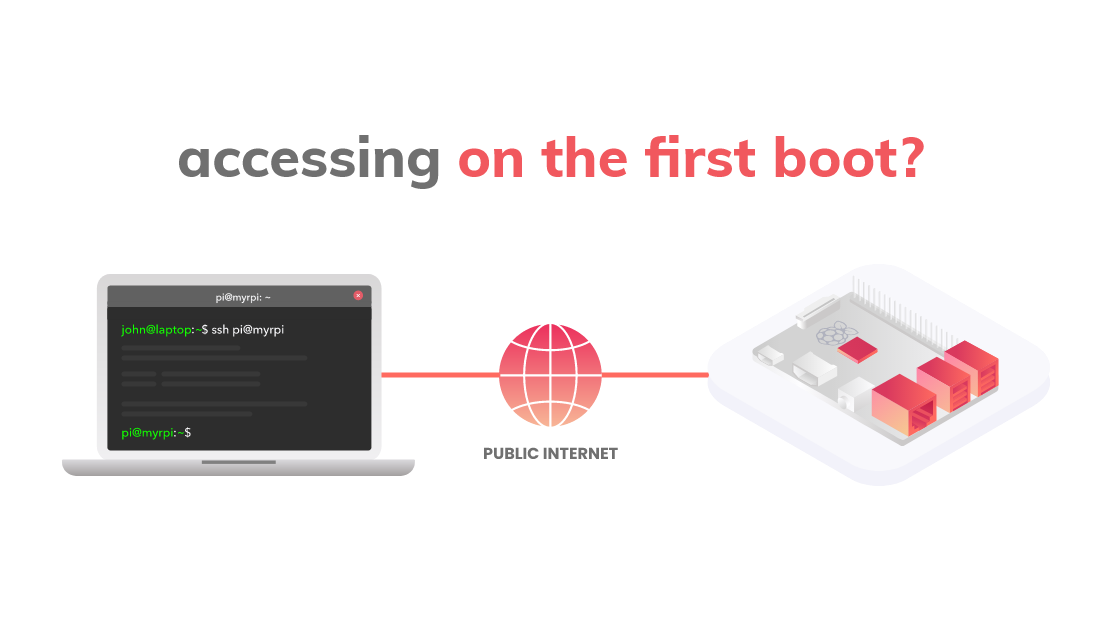
In this blog post I'll show you how to create your own, customized system image to be burned on the SD card of your Pi, so that after you power on your board, it will be available via SSH over the Internet on the 1st boot! In the same way you can generate hundreds of similar images, without wasting your time to manually setup each board.
Quick Start
Here's a quick summary of what to do in order to prepare and access your RPi on 1st boot...
-
💾 Go to https://github.com/husarnet/rpi-remotely-img template project and click [Use this template] button to make it available on your own GitHub profile. Remember to make your repo based on this template private!
-
🔐 Choose whether you would like to build a system image using GitHub Actions workflow or on your laptop. If you have chosen GitHub Actions, just define the following repository secrets:
HUSARNET_HOSTNAME
HUSARNET_JOINCODE
WIFI_PASS
WIFI_SSID -
🚀 Trigger the GitHub Actions workflow and find a ready to use image in build artifacts.
-
🔥 Now burn the image on SD card the same way as with any other images for Raspberry Pi (by using tools like Etcher or Raspberry Pi Imager (rpi-imager))
-
🔌 Insert an SD card into your Raspberry Pi and power it on.
-
🌎 In under a minute you should be able to access your Pi from anywhere, by using it's hostname:
ssh ubuntu@my-raspi
...but if you want to learn more, continue reading :)
Tools
I have created a boilerplate GitHub repository that automatically builds the system image based on the official Ubuntu 20.04 Server image for Raspberry Pi. This is a template repository, so you can copy that template directly to your own GitHub profile and customize anything you want.
The project utilises Hashicorp Packer and packer-builder-arm plugin. That software suite allows you to customize existing system images for different cloud vendors, virtual machines etc. Building custom images for ARM64 is supported by the 3rd party plugin for Packer.
What the Template Contains
In the project template the following customizations are made based on the official Ubuntu 20.04 Server image:
-
Setting up Netplan config for the most common use case - connecting to WPA secured Wi-Fi hotspot.
-
Providing Wi-Fi credentials through environment variables.
-
Installing Husarnet VPN Client.
-
Creating a systemd service to connect your board to the VPN network as soon as it has internet access (by using
husarnet join $JOINCODE $HOSTNAME). -
Installing Docker & Docker-Compose - as an extra step and only to demonstrate you how easily you can install whatever you want before even booting your Pi the first time.
OK, what to do next?
Using the Template
Go to the project repo on GitHub: https://github.com/husarnet/rpi-remotely-img and click the [ Use this template ] button.
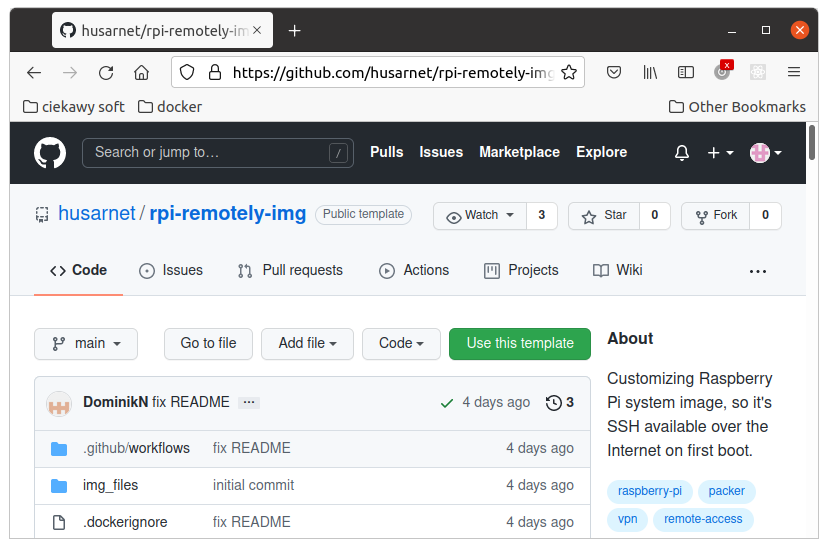
In the next window choose a name of your own repository (eg. my-own-pi-img) based on the template. In most cases it's better to make this repository Private, because inside it's "build artifacts" tab you will have your own system image ready to be downloaded with Wi-Fi and Husarnet credentials, which are sensitive information.
Finally click the [Create repository from template] button. After a few seconds you will have a new repository ready on your GitHub profile.
Building the Image...
...on Your Local Machine
The project is based on Docker, so if you want to build the project locally, you need to install Docker and Docker Compose first. Clone the repo, find configs.pkrvars.hcl.template file and rename it to configs.pkrvars.hcl.
# Place your Husarnet JoinCode and your hostname here
# You will find your JoinCode at https://app.husarnet.com
#  -> Click on the desired network
#  -> [Add element] button
#  -> [Join code] tab

husarnet_hostname = "my-remote-rpi"
husarnet_joincode = "fc94:b01d:1803:8dd8:b293:5c7d:7639:932a/xxxxxxxxxxxxxxxxxxxxxx"

wifi_ssid = "my-wifi-network"
wifi_pass = "password-to-my-wifi"
Place your Husarnet Join Code and Wi-Fi credentials here, and run:
docker-compose up --build
After a few minutes, your repo file structure will look more or less like this:
arnold@my-cool-laptop:~/my-own-pi-img$ tree
.
├── configs.pkrvars.hcl
├── docker-compose.yml
├── Dockerfile
├── img_files
│   ├── 01-netcfg.yaml
│   ├── 99-disable-network-config.cfg
│   ├── install_docker.sh
│   ├── join-husarnet.service
│   └── join_husarnet.sh
├── LICENSE
├── output
│   ├── rpi-ubuntu-20.04-server-20210919163734.img
│   ├── rpi-ubuntu-20.04-server-20210919163734.img.tar.gz
│   └── rpi-ubuntu-20.04-server-20210919163734-sha256.checksum
├── packer_cache
│   ├── 7150b8f499be6e49dd9be40ebf9ebc358f61ab59.xz
│   └── 7150b8f499be6e49dd9be40ebf9ebc358f61ab59.xz.lock
├── README.md
├── report.xml
└── ubuntu_server_20.04_arm64.pkr.hcl

3 directories, 17 files
There are two new folders:
output- with your customized system image (~3.4GB*.imgfile), compressed version (~1.1GB*.img.tar.gzfile) and a checksum file.packer_cache- thanks to that folder, the following image builds will be ready much faster (eg. after modifying the template)
You can now skip the section about using GitHub Actions to build the image and go directly to the next section.
By default output and packer_cache folders are owned by root user (even if you run docker-compose up --build as a normal user). So before re-running the build, change ownership of those folders:
sudo chown $USER:$USER output/ packer_cache/
If you prefer docker run ..., you will find a copy & paste ready commands for that in the repo's README
...using GitHub Actions
The template contains the ready to use workflow that allows you to build your customized Raspberry Pi image using GitHub Actions.
By default the workflow can be triggered manually or by git push event. Modify .github/workflows/build_rpi_image.yaml to change that behaviour.
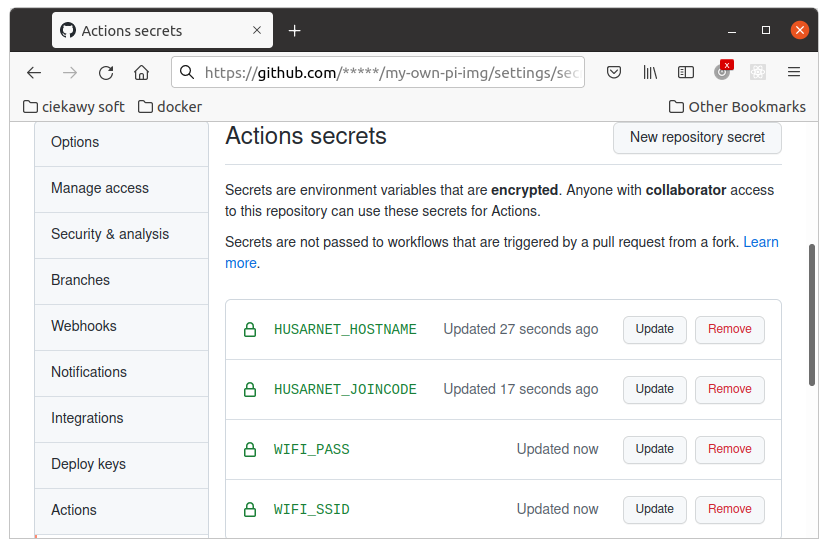
Start by defining the following repository secrets for your repo (please go to [Settings menu -> Secrets tab -> [ New repository secret ] button] ):
HUSARNET_HOSTNAME
HUSARNET_JOINCODE
WIFI_PASS
WIFI_SSID
After you finish it should look like that:
Now go to Actions menu in your repo, click the [Select workflow] button and select Build custom RPi images option. You should be able to trigger the workflow with a [Run workflow] button:
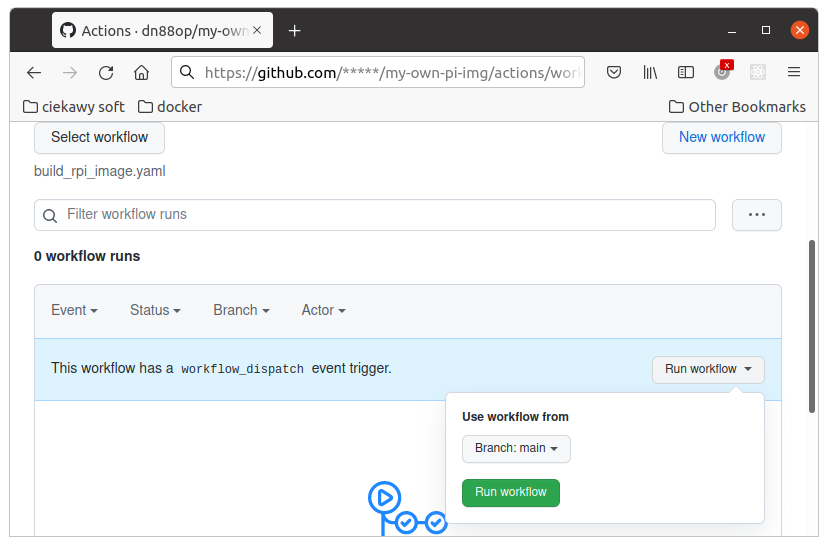
When the process is finished, you should be able to find the compressed image for your Raspberry Pi in the Build artifacts under Actions menu. Download it for the next steps.
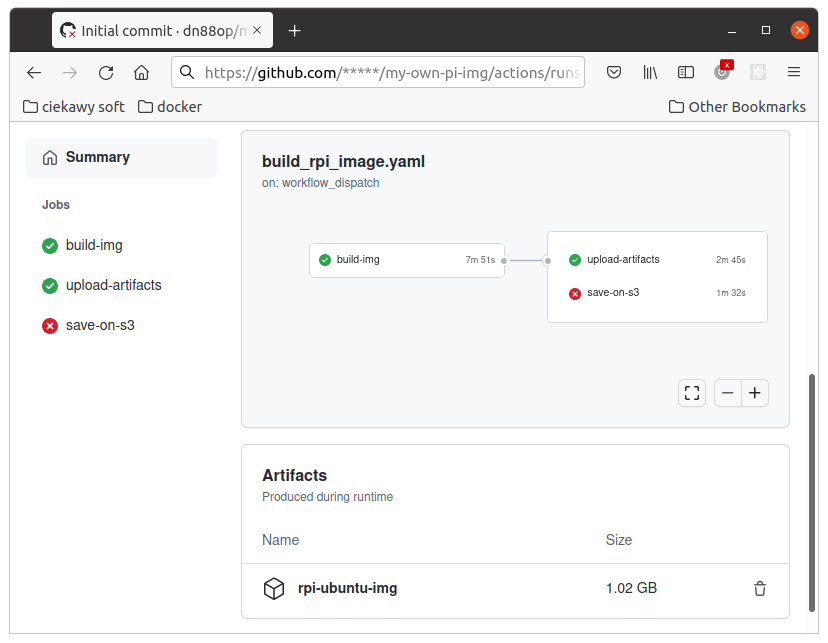
The workflow allows you also to save the newly built image on Amazon S3 bucket. To enable that feature, just define 3 new repository secrets:
AWS_ACCESS_KEY_ID
AWS_S3_BUCKET
AWS_SECRET_ACCESS_KEY
Read more in README.
Burning the Image on SD Card
-
Format the SD card (with
ext4) -
Extract
*.img.tar.gzto*.img, eg.:sudo tar -xf rpi-ubuntu-20.04-server-<timestamp>.img.tar.gz -
Now burn that
rpi-ubuntu-20.04-server-<timestamp>.imgimage file on SD card using tools like Etcher or Raspberry Pi Imager (rpi-imager)
Booting & Accessing your Raspberry Pi
Place the SD card in the SD slot of your Pi and power it on. After a while you should be able to see your Raspberry Pi available in your Husarnet VPN network dashboard at https://app.husarnet.com.
You can now access your Raspberry Pi over the internet from any device that is in the same Husarnet network by using:
ssh ubuntu@my-remote-rpi
How Does It Work
The magic happens in the ubuntu_server_20.04_arm64.pkr.hcl file, which is an input for Hashicorp Packer.
locals {
  my_timestamp = regex_replace(timestamp(), "[- TZ:]","")
  image_name = "rpi-ubuntu-20.04-server"
  output_path = "./output"
}

variable "husarnet_hostname" {
  type = string
  default = "packer-test"
}
...
source "arm" "ubuntu" {
  file_urls             = ["http://cdimage.ubuntu.com/releases/20.04/release/ubuntu-20.04.3-preinstalled-server-arm64+raspi.img.xz"]
  file_checksum_url     = "http://cdimage.ubuntu.com/releases/20.04/release/SHA256SUMS"
  ...
}

build {
  sources = ["source.arm.ubuntu"]
  ...
  provisioner "shell" {
    inline = [
      ...
      # Installing Husarnet
      "curl https://install.husarnet.com/install.sh | sudo bash",

      # Join Husarnet network with a Join Code on system boot
      "sudo touch /etc/husarnet-credentials",
      "echo 'HUSARNET_HOSTNAME=${var.husarnet_hostname}' >> /etc/husarnet-credentials",
      "echo 'HUSARNET_JOINCODE=${var.husarnet_joincode}' >> /etc/husarnet-credentials",
      "chmod +xr /usr/local/bin/join_husarnet.sh",
      "sudo systemctl enable join-husarnet.service",
      ...
    ]
  }

  post-processor "compress" {
    output = "${local.output_path}/${local.image_name}-${local.my_timestamp}.img.tar.gz"
  }
  ...
}
We specify here a link to the official Ubuntu 20.04 Server image for Raspberry Pi and then, in build section we use so-called provisioners to perform system modifications like: executing shell commands, copying files etc. Basically you type commands here that you would normally type in the Linux terminal. *.pkr.hcl is like Dockerfile, but for bare metal system images instead of Docker images.
Adding your own software or configuration to the system image is simple. Thanks to this template you don't even need to learn Packer - just do your own configurations by analogy to mine.
Summary
Hashicorp Packer is a great tool allowing you to save a lot of time on boring tasks like 1st configuration of Raspberry Pi.
In the article I introduced a GitHub template project to build your own system image in minutes and make it available over the Internet on first boot!
Raspberry Pi headless setup is now extremely easy and you can access it remotely right away after powering it up!