Scalable Distributed Robot Fleet With Fast DDS Discovery Server

ROS 2 is rapidly increasing its share in new projects in the AMR (Autonomous Mobile Robots) sector. While the amount of autonomous mobile robots is growing, the robotic fleet becomes less and less efficient. To overcome that, the next gen robots need to operate not as a group of individual devices, but as one, decentralized robotic system. That leads to connectivity challenges.
Classical approach with a standard DDS service discovery mechanism, relying on multicast messages being sent in a single LAN network, becomes a factor limiting a system's scalability.
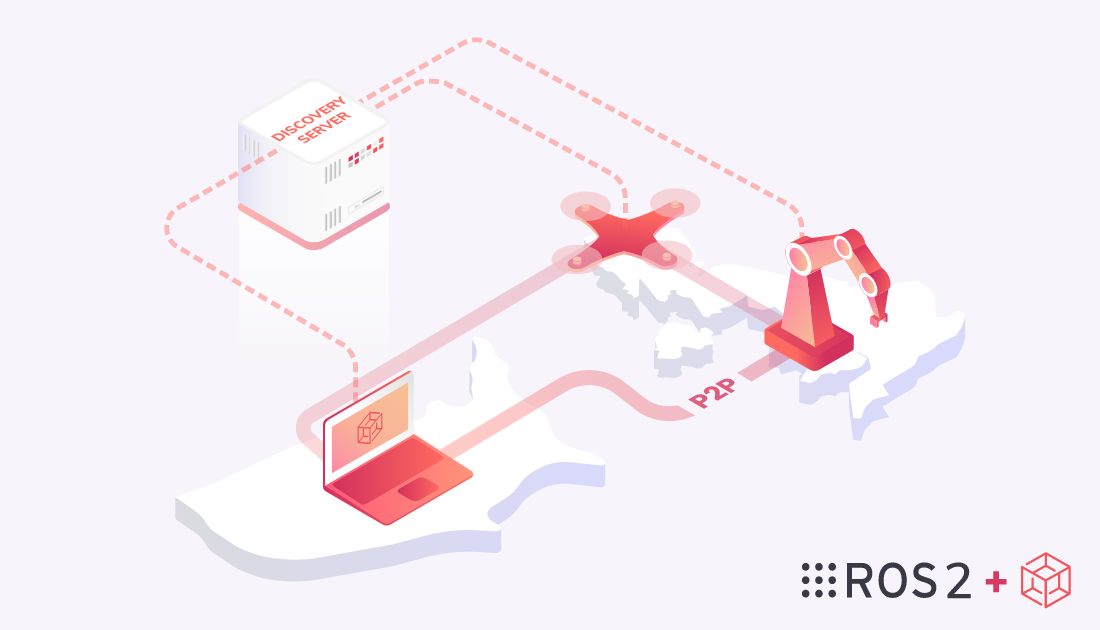
Fortunately the eProsima Fast DDS Discovery Server combined with Husarnet peer-to-peer SDN solved all those issues by providing efficient way of service discovery and message exchange across devices connected to multiple physical networks.
The Problem of ROS 2 System Scaling
In one of the previous blog posts - Connecting Remote Robots Using ROS2, Docker & VPN - I presented how to make ROS 2 nodes talk to each other not only in LAN, but also over the Internet.
It worked fine, but there was a drawback: adding a new ROS 2 powered robot to the network requires modifying the XML DDS configuration file (configured with environment variables FASTRTPS_DEFAULT_PROFILES_FILE for Fast DDS, and CYCLONEDDS_URI for Cyclone DDS), by adding a new record in the known peers section.
Let's imagine that we have a network that contains 3 AMRs with the hostnames robot-cart-*. The XML DDS configuration file on each robot might look like this:
<Discovery>
    <Peers>
        <Peer address="robot-cart-1"/>
        <Peer address="robot-cart-2"/>
        <Peer address="robot-cart-3"/>
    </Peers>
    <ParticipantIndex>auto</ParticipantIndex>
</Discovery>
Now if we would like to add 2 more AMRs to that network, we would need to perform the following steps:
- Modify the
.xmlfile in each of those 5 (3 + 2) devices:<Discovery>
<Peers>
<Peer address="robot-cart-1"/>
<Peer address="robot-cart-2"/>
<Peer address="robot-cart-3"/>
<Peer address="robot-cart-4"/>
<Peer address="robot-cart-5"/>
</Peers>
<ParticipantIndex>auto</ParticipantIndex>
</Discovery>
- Re-run the ROS 2 nodes on each robot (not only the newly added) to apply the new XML config.
Doable, even possible to automate, but still you will not be able to add new robots to the network without stopping the existing ones.
The main issue is the need to modify XML DDS configuration files on each robot. We need a solution allowing us to dynamically add new robots to the VPN network, and make them automatically discoverable by existing ones.
Two solutions to overcome the issue come to mind:
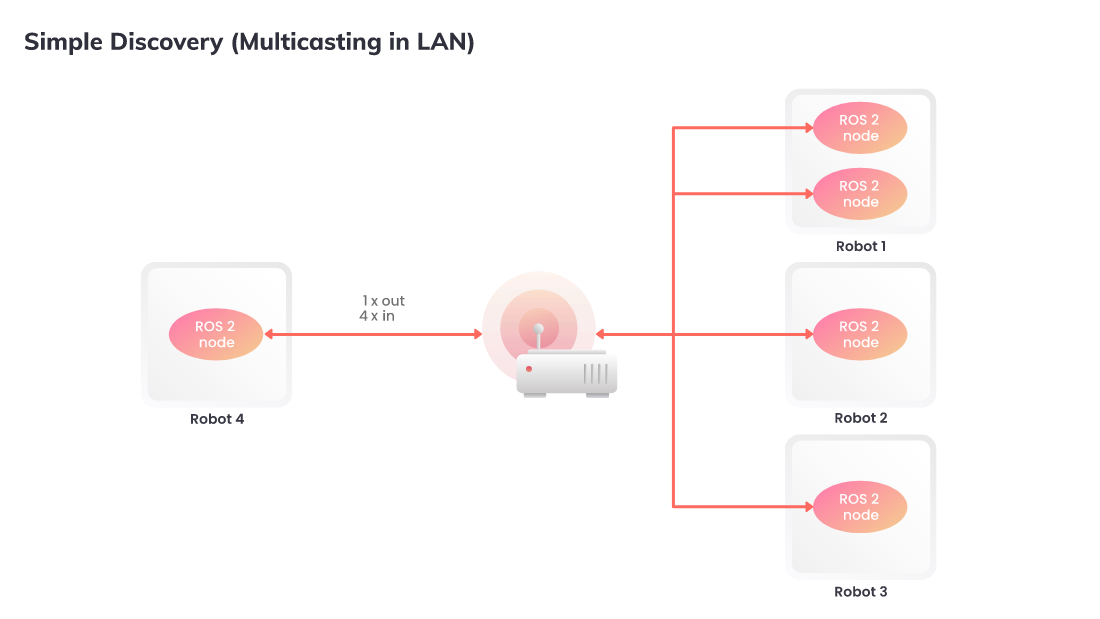
Using Multicasting Based DDS Simple Discovery
Multicasting for simple networks where all devices are connected to the same WiFi router is OK for relatively small fleets. When we add a new device to an existing network, it sends one multicast service discovery message, and this message is further forwarded by a router to all ROS 2 nodes in the LAN network. As a response, these nodes send their own service discovery messages back to the newly added device. The process is presented here (maybe in a bit over-simplified way):
But if we need to make multicast working not in LAN, but over WAN (a public Internet) using a peer-to-peer VPN network like Husarnet, each packet would need to be multiplied in the source by the factor of the number of elements in a VPN network.
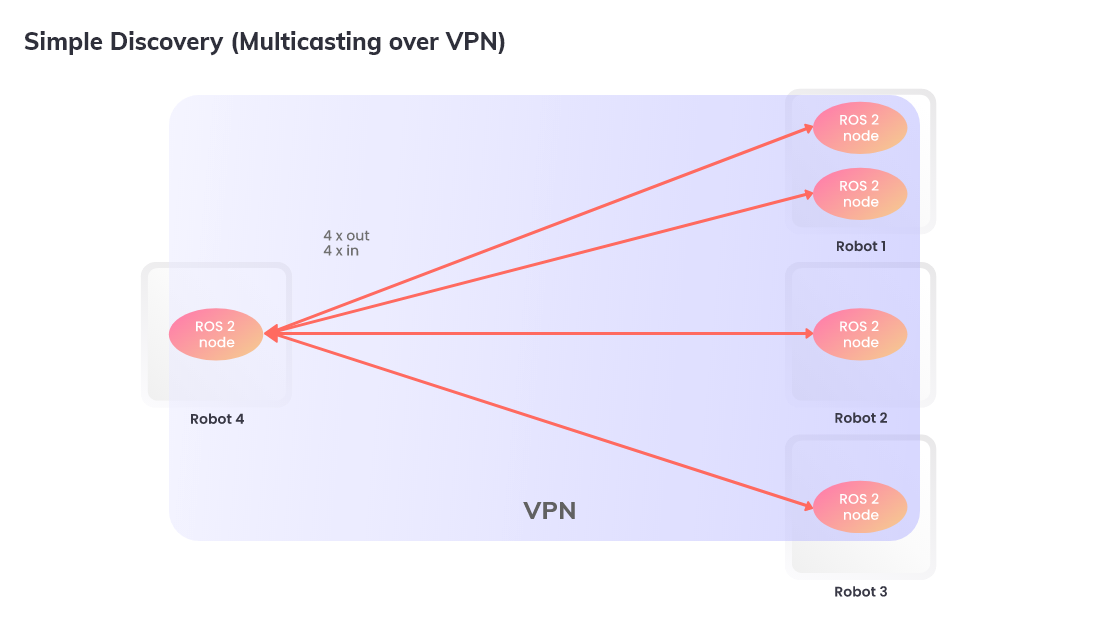
In the diagrams above we have only 4 robots and 5 nodes. For larger fleets the generated traffic will be significantly larger - especially if service discovery needs to be done more frequently.
Using the Fast DDS Discovery Server
A traffic generated by a decentralized service discovery messages over peer-to-peer VPN will scale proportionally to square of the number of connected devices. The complete opposite solution would be a centralized system, where the scaling is linear, and this is what Fast DDS Discovery Server does.
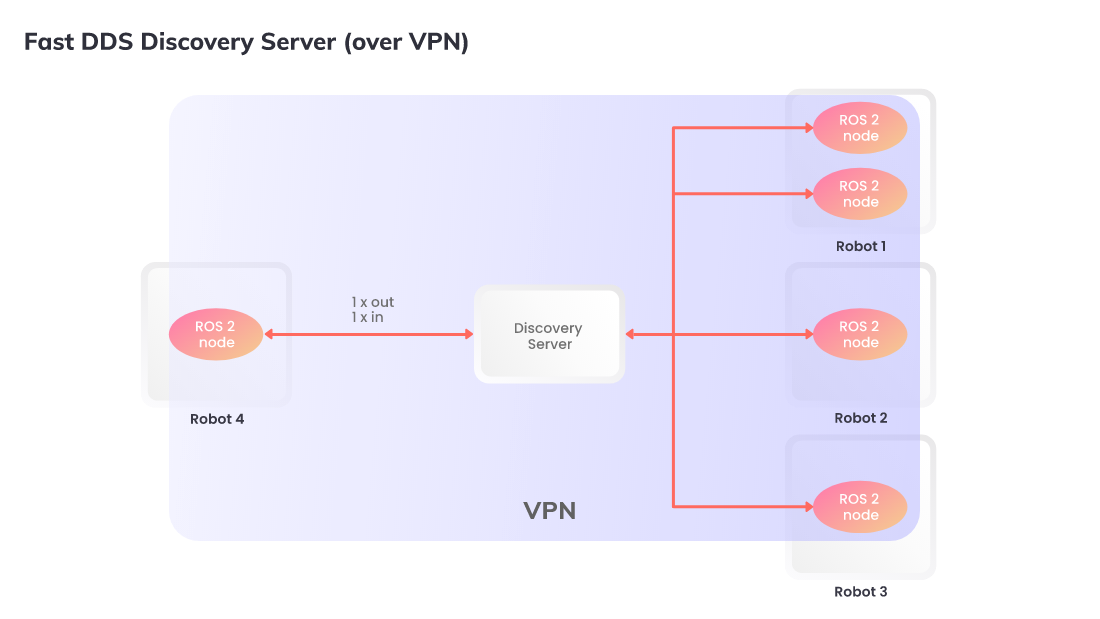
According to the Fast DDS docs: the Fast DDS Discovery Server protocol is a feature that offers a centralized dynamic discovery mechanism, as opposed to the distributed mechanism used in DDS by default.
We do not need to modify XML configuration for participants while adding a new device to the network, because we only need to hardcode the address of one (or multiple, but well known) Discovery Servers there. So for the 1st and 1000th robot in the network the XML config will be the same and the number of discovery packages is drastically lower than in case of decentralized approach.
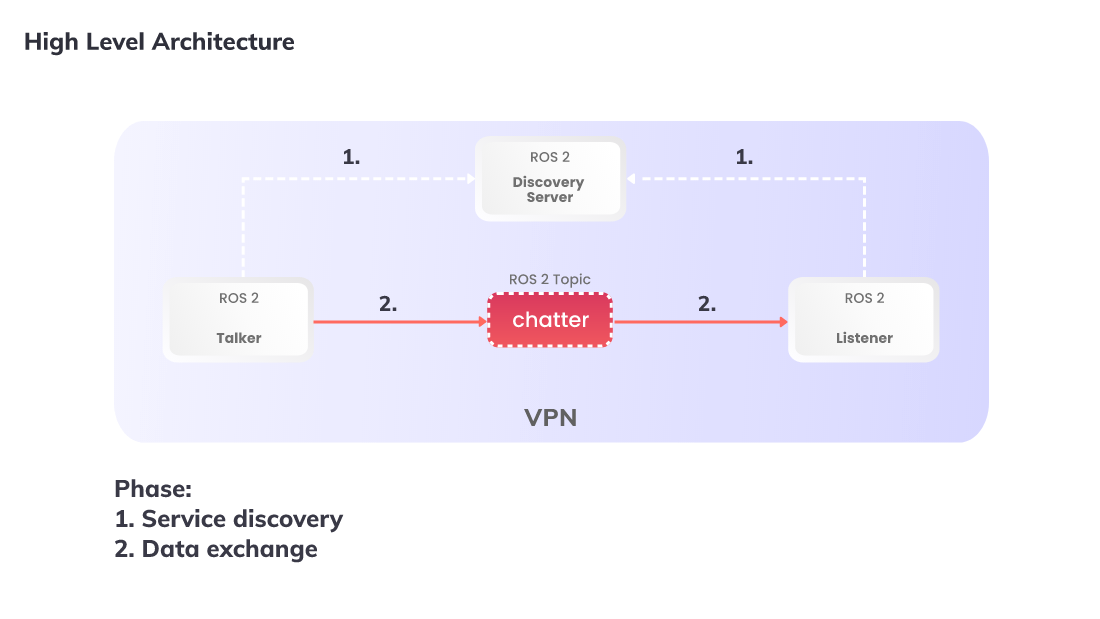
Fast DDS Discovery Server is used only during a service discovery phase - for example to let other devices in the ROS 2 network know that a newly added drone provides topic publishing information about intruders in the patrolled zone. That information will be sent only to the Discovery Server.
The actual messages exchanged between "publishers/subscribers" goes peer-to-peer (in case of using Husarnet VPN) between devices in the network, without passing it over the Discovery Server - so in our example information that a new intruder approached a zone is sent directly to a mobile ground guard robot. Not to the Discovery Server.
Preparing XML Configuration For Participants
In order to use a Discovery Server with Husarnet VPN we need to create 2 .xml files with configuration both for a Discovery Server and for Clients:
- Discovery Server
- Client
<?xml version="1.0" encoding="UTF-8" ?>
<dds>
    <profiles xmlns="http://www.eprosima.com/XMLSchemas/fastRTPS_Profiles">

        <transport_descriptors>
            <transport_descriptor>
                <transport_id>udpv6_transport</transport_id>
                <type>UDPv6</type>
            </transport_descriptor>
        </transport_descriptors>

        <participant profile_name="server_profile" is_default_profile="true">
            <rtps>
                <userTransports>
                    <transport_id>udpv6_transport</transport_id>
                </userTransports>
                <useBuiltinTransports>false</useBuiltinTransports>
                <prefix>44.49.53.43.53.45.52.56.45.52.5F.31</prefix>
                <builtin>
                    <discovery_config>
                        <discoveryProtocol>SERVER</discoveryProtocol>
                    </discovery_config>
                    <metatrafficUnicastLocatorList>
                        <locator>
                            <udpv6>
                                <address>dds-discovery-server</address>
                                <port>11811</port>
                            </udpv6>
                        </locator>
                    </metatrafficUnicastLocatorList>
                </builtin>
            </rtps>
        </participant>
    </profiles>
</dds>
<?xml version="1.0" encoding="UTF-8" ?>
<dds>
    <profiles xmlns="http://www.eprosima.com/XMLSchemas/fastRTPS_Profiles">

        <transport_descriptors>
            <transport_descriptor>
                <transport_id>udpv6_transport</transport_id>
                <type>UDPv6</type>
            </transport_descriptor>
        </transport_descriptors>

        <participant profile_name="client_profile" is_default_profile="true" >
            <rtps>
                <userTransports>
                    <transport_id>udpv6_transport</transport_id>
                </userTransports>
                <useBuiltinTransports>false</useBuiltinTransports>
                <builtin>
                    <discovery_config>
                        <discoveryProtocol>CLIENT</discoveryProtocol>
                        <discoveryServersList>
                            <RemoteServer prefix="44.49.53.43.53.45.52.56.45.52.5F.31">
                                <metatrafficUnicastLocatorList>
                                    <locator>
                                        <udpv6>
                                            <address>dds-discovery-server</address>
                                            <port>11811</port>
                                        </udpv6>
                                    </locator>
                                </metatrafficUnicastLocatorList>
                            </RemoteServer>
                        </discoveryServersList>
                    </discovery_config>
                </builtin>
            </rtps>
        </participant>
    </profiles>
</dds>
In those XML files we specify the transport layer description (Husarnet overlay network provides IPv6 addressing, so we need to configure udpv6_transport) and an address of the Discovery Server.
Instead of using a virtual IPv6 address provided by Husarnet SDN, you can use a hostname assigned for your Discovery Server as shown in examples above - dds-discovery-server.
Demo
Talker + Listener + DDS Discovery Server
Using Fast DDS Discovery Server with multiple hosts connected over the Internet with Husarnet p2p VPN:
https://github.com/dominikn/fastdds-discovery-server-demo
![]()
![]()
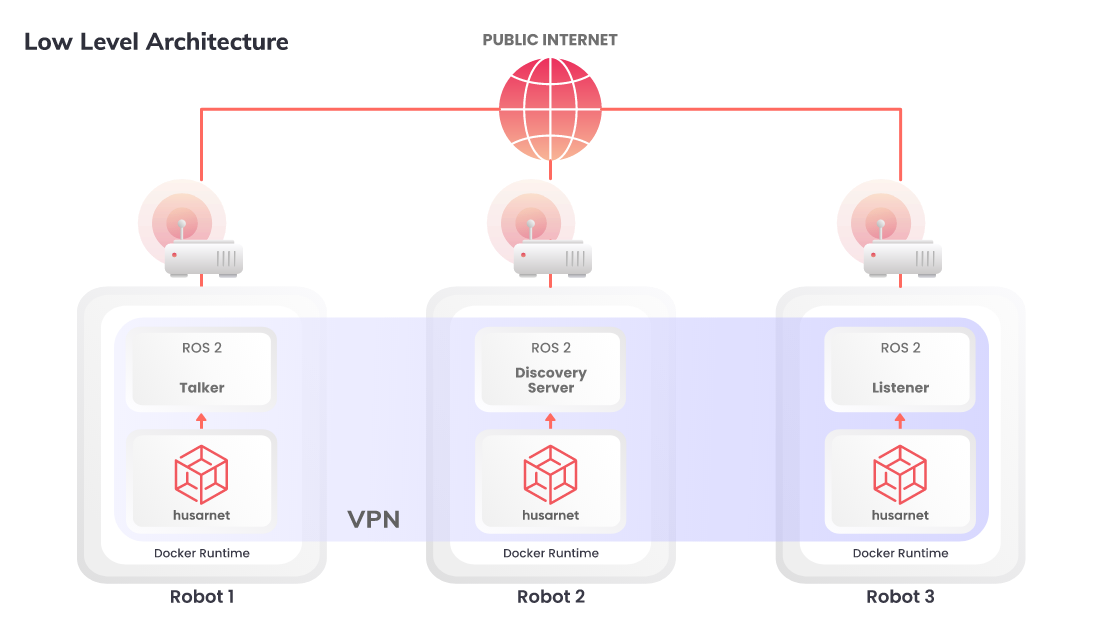
I have created a GitHub repository where there is a complete, Docker based system for 3 physical devices:
- Listener subscribing the
chattertopic - Talker publishing to the
chattertopic - Discovery-Server making service discovery between Listener and Talker possible
All these devices can be in the same LAN network but can be connected over WAN as well. The system works without public IP addresses, behind NATs, and without port forwarding on routers because of the connectivity layer provided by Husarnet. And the connection doesn't go through Husarnet servers - it's totally peer-to-peer.
If peer-to-peer is not possible for some reason, the traffic will be forwarded over a fail-over path provided by Husarnet Base Servers. This is however fail-over and not desirable behavior due to larger latency. In most cases it should just work but in case of any peer-to-peer connectivity issues read a troubleshooting guide.
🚀 Launching the Docker Compose Deployments
On each device open their Linux terminal and execute:
git clone https://github.com/dominikn/fastdds-discovery-server-demo.git
cd fastdds-discovery-server-demo.git
cp .evn.template .env
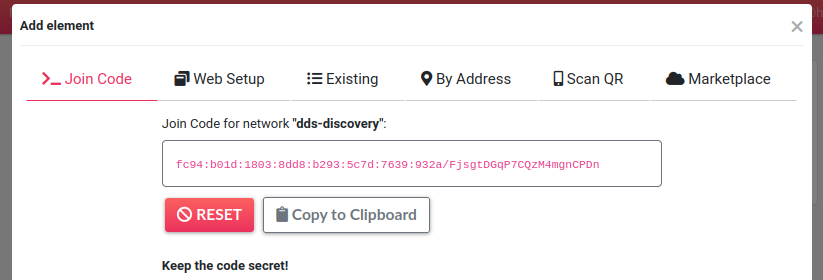
Please paste your own Husarnet Join Code in the .env file:
JOINCODE=fc94:b01d:1803:8dd8:b293:5c7d:7639:932a/xxxxxxxxxxxxxxxxxxxxxxxxxxxxxxx
You will find your Husarnet Join Code on your account at Husarnet Dashboard:
- Log in to https://app.husarnet.com/
- Select or create a network
- Click [Add element] button and select a Join Code tab:
And launch the appropriate docker-compose.*.yml file:
Discovery-Server
docker-compose -f docker-compose.discovery-server.yml up
Listener
docker-compose -f docker-compose.listener.yml up
Talker
docker-compose -f docker-compose.talker.yml up
📃 The Results
After launching the Listener you should see the following output:
fastdds-discovery-server-demo$ docker-compose -f docker-compose.listener.yml up
Creating fastdds-discovery-server-demo_husarnet-listener_1 ... done
Creating fastdds-discovery-server-demo_listener_1          ... done
Attaching to fastdds-discovery-server-demo_husarnet-listener_1, fastdds-discovery-server-demo_listener_1
husarnet-listener_1  | [step 1/3] Waiting for Husarnet daemon to start
husarnet-listener_1  | ...
listener_1           | Waiting for "dds-discovery-server" host to be available in /etc/hosts
husarnet-listener_1  | done
husarnet-listener_1  |
husarnet-listener_1  | [step 2/3] Waiting for Base Server connection
husarnet-listener_1  | ...
husarnet-listener_1  | ...
husarnet-listener_1  | ...
husarnet-listener_1  | done
husarnet-listener_1  |
husarnet-listener_1  | [step 3/3] Joining to Husarnet network
husarnet-listener_1  | [23549085] joining...
husarnet-listener_1  | [23551088] joining...
listener_1           | "dds-discovery-server" present in /etc/hosts:
listener_1           | fc94:7b53:fbf4:2fa6:06ec:eb5d:b5f2:be75 dds-discovery-server # managed by Husarnet
listener_1           | Ready to launch ROS 2 nodes
husarnet-listener_1  | [23553089] done.
husarnet-listener_1  | Husarnet IP address: fc94:13c5:0ee4:7c92:be70:65fc:a4a0:8dc1
listener_1           | [INFO] [1639673482.147619545] [listener]: I heard: [Hello World: 1]
listener_1           | [INFO] [1639673483.147187142] [listener]: I heard: [Hello World: 2]
listener_1           | [INFO] [1639673484.147233801] [listener]: I heard: [Hello World: 3]
listener_1           | [INFO] [1639673485.147441533] [listener]: I heard: [Hello World: 4]
listener_1           | [INFO] [1639673486.147317496] [listener]: I heard: [Hello World: 5]
At first Husarnet is trying to connect to a network with a corresponding Join Code. Then we wait until a dds-discovery-server host is available in the /etc/hosts file (this is managed by Husarnet), and if so, start the listener ROS 2 node from demo_nodes_cpp package.
Listener is notified by a Discovery Server when Talker node is launched.
After a discovery phase is completed, you can even stop a Discovery Server and see that a Talker ⬄ Listener communication stays uninterrupted.
🐋 Docker Compose Files Description
The demo project we have just launched contains 3, separate docker-compose.*.yml files:
- Discovery Server
- Talker
- Listener
# TL;DR
# docker-compose -f docker-compose.discovery-server.yml up

version: '2.3'

services:

  discovery-server:
    image: ghcr.io/dominikn/ros-galactic-fastdds:latest
    restart: unless-stopped
    network_mode: service:husarnet-discovery-server
    volumes:
      - ./fastdds_server.xml:/fastdds_server.xml
    environment:
      - RMW_IMPLEMENTATION=rmw_fastrtps_cpp
      - FASTRTPS_DEFAULT_PROFILES_FILE=/fastdds_server.xml
    command:
      - bash
      - -c
      - |
          source /fastdds_overlay/install/setup.bash
          /wait_for_discovery_server.sh
          ros2 run demo_nodes_cpp listener

  husarnet-discovery-server:
    image: husarnet/husarnet
    restart: unless-stopped
    volumes:
      - /var/lib/husarnet  # This will persist your Husarnet Client keys, thus IP of the container will be stable/the same between (re)boots
    sysctls:
      - net.ipv6.conf.all.disable_ipv6=0  # Husarnet is using IPv6 for the internal connections
    cap_add:
      - NET_ADMIN
    devices:
      - /dev/net/tun
    environment:
      - HOSTNAME=dds-discovery-server
    env_file:
      - ./.env  # create .env file in the same folder
# TL;DR
# docker-compose -f docker-compose.talker.yml up

version: '2.3'

services:

  talker:
    image: ghcr.io/dominikn/ros-galactic-fastdds:latest
    restart: unless-stopped
    network_mode: service:husarnet-talker
    volumes:
      - ./fastdds_client.xml:/fastdds_client.xml
    environment:
      - RMW_IMPLEMENTATION=rmw_fastrtps_cpp
      - FASTRTPS_DEFAULT_PROFILES_FILE=/fastdds_client.xml
    command:
      - bash
      - -c
      - |
          source /fastdds_overlay/install/setup.bash
          /wait_for_discovery_server.sh
          ros2 run demo_nodes_cpp talker

  husarnet-talker:
    image: husarnet/husarnet
    restart: unless-stopped
    volumes:
      - /var/lib/husarnet  # This will persist your Husarnet Client keys, thus IP of the container will be stable/the same between (re)boots
    sysctls:
      - net.ipv6.conf.all.disable_ipv6=0  # Husarnet is using IPv6 for the internal connections
    cap_add:
      - NET_ADMIN
    devices:
      - /dev/net/tun
    environment:
      - HOSTNAME=talker
    env_file:
      - ./.env  # create .env file in the same folder
# TL;DR
# docker-compose -f docker-compose.listener.yml up

version: '2.3'

services:

  listener:
    image: ghcr.io/dominikn/ros-galactic-fastdds:latest
    restart: unless-stopped
    network_mode: service:husarnet-listener
    volumes:
      - ./fastdds_client.xml:/fastdds_client.xml
    environment:
      - RMW_IMPLEMENTATION=rmw_fastrtps_cpp
      - FASTRTPS_DEFAULT_PROFILES_FILE=/fastdds_client.xml
    command:
      - bash
      - -c
      - |
          source /fastdds_overlay/install/setup.bash
          /wait_for_discovery_server.sh
          ros2 run demo_nodes_cpp listener

  husarnet-listener:
    image: husarnet/husarnet
    restart: unless-stopped
    volumes:
      - /var/lib/husarnet  # This will persist your Husarnet Client keys, thus IP of the container will be stable/the same between (re)boots
    sysctls:
      - net.ipv6.conf.all.disable_ipv6=0  # Husarnet is using IPv6 for the internal connections
    cap_add:
      - NET_ADMIN
    devices:
      - /dev/net/tun
    environment:
      - HOSTNAME=listener
    env_file:
      - ./.env  # create .env file in the same folder
Each docker-compose.*.yml file contains 2 services (containers) definitions:
- application container (Talker/Listener/Discovery Server)
- Husarnet Sidecar container
Application container is based on official ros:galactic image from Docker Hub with the following things added:
- Installation of Fast DDS v2.4.0+. Cyclone DDS is a default RMW in ROS Galactic, so we need to install Fast DDS on our own. We do that here from source, because
apt-get install ros-${ROS_DISTRO}-rmw-fastrtps-cppinstalls older versions of Fast DDS without a support for hostnames in XML configuration for Fast DDS. - Adding XML configuration files:
- for Discovery Server -
fastdds_server.xml - for Clients (in the demo: talker and listener) -
fastdds_client.xml.
- for Discovery Server -
- Adding
wait_for_discovery_server.shscript that is used to wait until Discovery Server is available before launching ROS nodes.
Husarnet container provides it's hnet0 network interface to an application container by using network_mode: service:husarnet-discovery-server. In a service definition we define HOSTNAME environment variable that will be a handy way to access that system from a level of other elements in the same Husarnet network. The Husarnet Join Code is provided in the .env file.
Testing Automation With GitHub Actions
If you don't have 3 free devices to test the docker deployment without possibility to connect each of them to a different LAN, you can test it using provided GitHub Actions workflow:
name: Test a Docker Deployment

on:
  push:
    branches:
      - 'main'

jobs:
  test-discovery-server:
    runs-on: ubuntu-20.04
    strategy:
      matrix:
        device-id:
        - 'discovery-server'
        - 'listener'
        - 'talker'

    steps:
    - name: Checkout
      uses: actions/checkout@v1

    - name: Deploy ${{ matrix.device-id }}
      continue-on-error: true
      timeout-minutes: 1
      run: |
        echo JOINCODE=${{ secrets.HUSARNET_JOINCODE }} > .env
        docker-compose -f docker-compose.${{ matrix.device-id }}.yml up | tee output.txt

    - name: Check if the log contains "Hello World" string
      run: if [[ $(grep 'Hello World' output.txt | wc -l) -eq 0 ]]; then exit 1; fi
It launches 3 GitHub hosted runners, each running talker, listener or discovery-server in a separate virtual machine. To run each Docker Compose deployment we need to perform the same steps, with different files. It is handy to use matrix build, making the test script very short.
After ~1 minute the given Docker deployment is killed (with SIGTERM) and in the last step we check whether the output log from a listener node contains a "Hello World" string.
Q&A About Fast DDS Discovery Server
When I first found the Fast DDS Discovery Server (quite a long name, so let's name it DS in the following part), I had a few doubts how it works. Here are questions that I had, and my answers to them:
🤔 Q: Where can I host the DS?
A: If deployed together with Husarnet VPN, the Discovery Server doesn't need to be hosted on a regular server with a public IP (like VPS). It can be any Husarnet connected device, even sitting behind NAT or firewall (like your laptop). Any ROS 2 node can act as a Discovery Server (in our example we run it next to
listenernode). This refers to the fact that Discovery Server is not a separate application, so that any node can function as the server. You can deploy the DS even on robots in your fleet!
🤔 Q: What if the DS is broken/unavailable?
A: It is possible to run multiple, redundant Discovery Servers in the same time.
🤔 Q: How to use DS in my docker deployment?
A: In the demo project there is a complete example showing how to run the Discovery Server in Docker and how to make it available over Husarnet VPN (highlighted lines):
docker-compose.discovery-server.ymlversion: '2.3'
services:
discovery-server:
image: ghcr.io/dominikn/ros-galactic-fastdds:latest
restart: unless-stopped
network_mode: service:husarnet-discovery-server
volumes:
- ./fastdds_server.xml:/fastdds_server.xml
environment:
- RMW_IMPLEMENTATION=rmw_fastrtps_cpp
- FASTRTPS_DEFAULT_PROFILES_FILE=/fastdds_server.xml
command:
- bash
- -c
- |
source /fastdds_overlay/install/setup.bash
/wait_for_discovery_server.sh
ros2 run demo_nodes_cpp listener
husarnet-discovery-server:
image: husarnet/husarnet
restart: unless-stopped
volumes:
- /var/lib/husarnet # This will persist your Husarnet Client keys, thus IP of the container will be stable/the same between (re)boots
sysctls:
- net.ipv6.conf.all.disable_ipv6=0 # Husarnet is using IPv6 for the internal connections
cap_add:
- NET_ADMIN
devices:
- /dev/net/tun
environment:
- HOSTNAME=dds-discovery-server
env_file:
- ./.env # create .env file in the same folder
Summary
Advantages of using Fast DDS Discovery Server:
- Significant reduction of a DDS discovery traffic
- Easy configuration - the same XML configuration file for each newly added robot
- No need of re-running all nodes after launching new ROS 2 nodes in the network (eg. adding new robots to the fleet)
This feature is especially important for ROS 2 devices that are not connected to the same WiFi router, and thus multicasting (used for a standard DDS discovery) is not efficient enough, not convenient or even is not possible.
Fast DDS Discovery Server combined with Husarnet peer-to-peer VPN/SDN is a right toolset for building scalable, distributed and secure fleets of autonomous mobile robots.
If you have any questions or want to discuss something related to this blog post, let's do it at Husarnet Community Forum.