Connecting Remote IoT Devices Powered by Micro-ROS

Micro-ROS is an embedded framework allowing you to connect low-power, cheap IoT devices into a ROS 2 system. By using Micro-ROS together with Husarnet peer-to-peer VPN your robot doesn't need to be in the same LAN as an IoT sensor.
Thanks to that your robot can be mobile/5G connected and talk directly with IoT sensors or actuators connected over Wi-Fi. Without any proxy server in between.
In this article I present a ready to use GitHub template for ESP32 Wi-Fi microcontroller allowing you to bring your ROS 2 powered IoT sensors to life in minutes.
Why Micro-ROS?
In a typical ROS 2 application a robot contains:
- a single board computer (SBC) like Intel NUC, Nvidia Jetson, or Raspberry Pi running ROS / ROS 2 directly.
- a low-level microcontroller board for real-time functionalities (like PID regulator for motors) that is connected with SBC over CAN, RS484, Ethernet or even just a serial connection over UART.
Thanks to Micro-ROS you can work directly on the ROS 2 abstraction layer in your embedded code running on the microcontroller. That means you can define ROS 2 nodes, subscribe or publish to topics and so on. Running Micro-ROS on a microcontroller is not enough. You also need to run a Micro-ROS Agent that acts like a proxy between your "standard ROS 2" nodes and the ones working on microcontrollers.
Micro-ROS is an open source project.
What is the alternative solution to Micro-ROS?
Creating your own ROS 2 node running on Linux, and talking with a microcontroller by using a custom protocol.
This solution however in case of changing something in the code required modification of not only a microcontroller code, but also the one running on Linux (your custom Proxy to IoT device). So basically a lot more work to do.
Thanks to Micro-ROS you work on the ROS 2 abstraction layer directly in your embedded code, making it more transparent and easier to maintain. You do not need to write your own proxy node, because Micro-ROS Agent does everything for you.
Using Micro-ROS With IoT
ROS 2 system doesn't need to be limited by the robot's chassis. You can connect Wi-Fi connected sensors from the same LAN network as well. In this case you need to figure out what is the best place to run a Micro-ROS agent.
Micro-ROS Agent can work on a server, on your laptop or directly on the robot depending on the use case and number of robots that need to consume messages from a given IoT sensor.
In the next article I will show how to use a DDS Router to forward data from a Micro-ROS agent to remote hosts.
Multiple Micro-ROS powered microcontrollers can be connected to the same Micro-ROS Agent, so you can easily scale the solution not only in the number of robots in the fleet but also in the number of IoT devices.
The Sample System Architecture
ESP32 + Micro-ROS + Husarnet + Arduino framework + PlatformIO
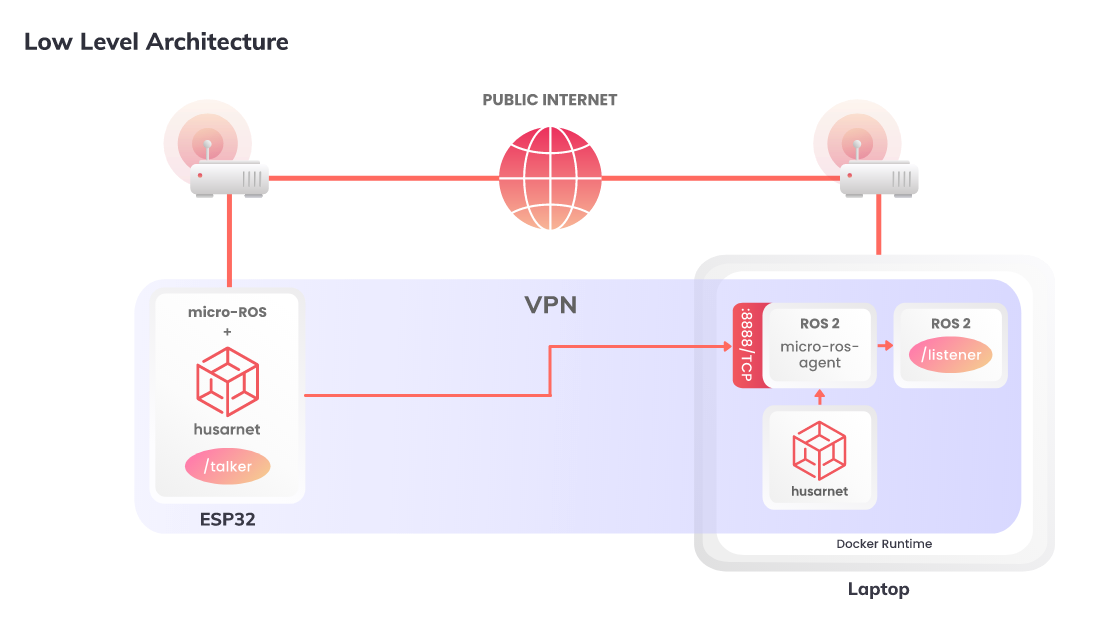
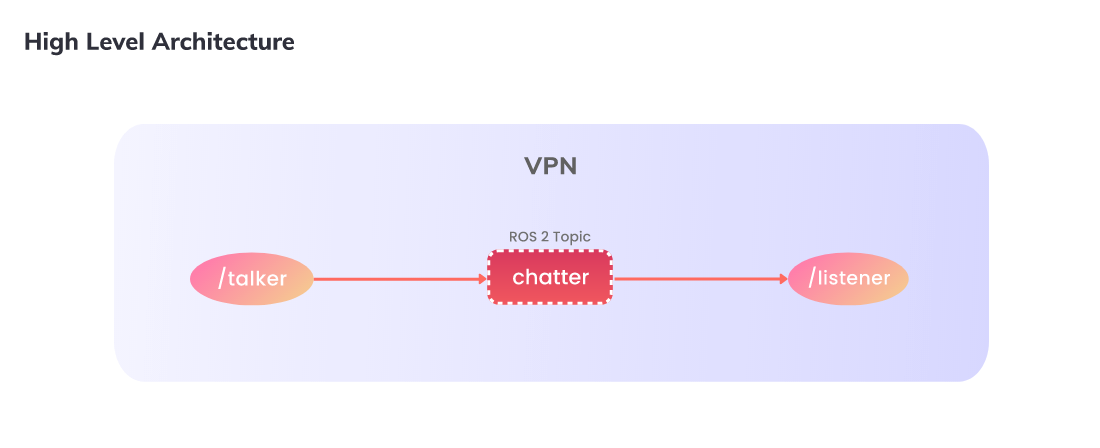
A ROS 2 talker (ESP32) is publishing messages to a /chatter topic. Micro-ROS Agent and listener (subscribing to /chatter topic) nodes are running in Docker on your laptop.
https://github.com/DominikN/esp32-microros-husarnet
![]()
I have created this GitHub template repository to help you start with Micro-ROS on an ESP32 microcontroller easily.
Just click [Use this template] button and create your own public or private copy of the repo.
The best description of what the demo presented in the repo does is the following diagram:
To run the demo all you need to have is your laptop and ESP32 dev board.
Your laptop and ESP32 can be connected to the same Wi-Fi router, but also can be in totally different networks on different continents. The over the Internet connection is handled by Husarnet peer-to-peer VPN, that is as lightweight, as it works even on ESP32 microcontroller directly. Peer-to-peer means that ESP32 and laptop can be connected directly, without any central server even if they are behind NATs, firewalls and without public IP. Thanks to that latency between devices is minimized. Husarnet proxy server (tunneling over Husarner Base servers) acts like a failover solution and is activated only if peer-to-peer is not possible (most common reasons: blocked ports, too many NATs etc).
ESP32 is connected to the port :8888 of Micro-ROS Agent working on your laptop by using a device hostname (can be used alternatively to the Husarnet IPv6 address). Micro-ROS Agent is connected to the Husarnet network over the Husarnet Sidecar Container so your host system is isolated from the code running in containers. This is a direct connection between an ESP32 board and a Docker container running on your host with minimal capabilities provided to the container.
While low-level layers are handled by Micro-ROS Agent and Husarnet, we can focus on the application layer, that is simply a talker node (ESP32) publishing Hello World: ... messages to a /chatter topic. The most basic ROS 2 demo is a talker/listener from demo_nodes_cpp. We do the same here but with a talker on a remote ESP32 microcontroller.
Running the Demo
The Husarnet + Micro-ROS demo project was presented during the ROS 2 Embedded Working Group on Jan. 25th. In this recording from EWG I present all steps needed to run the project:
Before you start, make sure you have the following software installed on your host:
Prerequisites
- Visual Studio Code with PlatformIO extension.
- Docker - tested on version 20.10
- Docker Compose - tested on version 1.29.2
Clone
Create a new repo based on the template(just [Use this template] button) and clone it:
git clone git@github.com:<YOUR-GITHUB-USERNAME>/esp32-microros-husarnet.git
Now open the project in Visual Studio Code.
Husarnet Join Code
You will need to connect both ESP32 and Micro-ROS agent to the same VPN network.
You will find your Husarnet Join Code on your account at Husarnet Dashboard:
- Log in to https://app.husarnet.com/
- Select or create a network
- Click [Add element] button and select a Join Code tab:
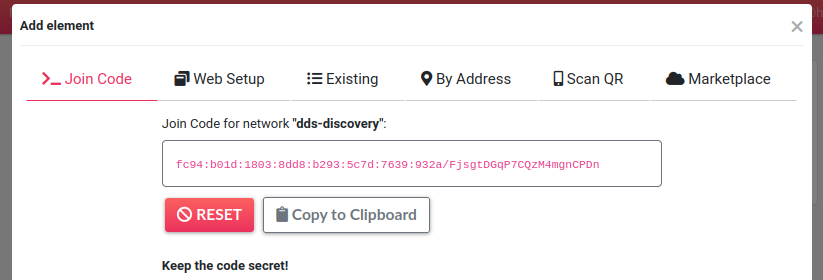
Save it for next steps.
ESP32 Wi-Fi + Husarnet Credentials
Rename credentials-template.h file in src/ folder to credentials.h and paste you Wi-Fi SSID, Wi-Fi PASS, and Husarnet Join Code here:
// WiFi credentials
const char *ssid = "FreeWifi";
const char *password = "hardtoguess";

// Husarnet credentials
const char *hostName = "esp32-talker";  // choose an easy to remember name for your device
const char *husarnetJoinCode = "fc94:b01d:1803:8dd8:b293:5c7d:7639:932a/xhfqwPxxxetyCExsSPRPn9"; // find at app.husarnet.com
Save the credentials.h file.
Micro-ROS Agent Husarnet Credentials
Rename .env.template file in demo/ folder to .env and place here the same Husarnet Join Code as used for ESP32 config:
JOINCODE=fc94:b01d:1803:8dd8:b293:5c7d:7639:932a/xhfqwPxxxetyCExsSPRPn9
Save the .env file.
Launching Micro-ROS Agent
Just execute in the Linux terminal on your host:
cd demo
docker-compose up
You should see the similar output:
$ docker-compose up
Starting demo_listener_1       ... done
Starting demo_husarnet-agent_1 ... done
Starting demo_agent_1          ... done
Attaching to demo_listener_1, demo_husarnet-agent_1, demo_agent_1
husarnet-agent_1  | [step 1/3] Waiting for Husarnet daemon to start
husarnet-agent_1  | ...
agent_1           | [1642852366.069729] info     | TCPv6AgentLinux.cpp | init                     | running...             | port: 8888
agent_1           | [1642852366.069878] info     | Root.cpp           | set_verbose_level        | logger setup           | verbose_level: 4
husarnet-agent_1  | done
husarnet-agent_1  |
husarnet-agent_1  | [step 2/3] Waiting for Base Server connection
husarnet-agent_1  | ...
husarnet-agent_1  | ...
husarnet-agent_1  | ...
husarnet-agent_1  | done
husarnet-agent_1  |
husarnet-agent_1  | [step 3/3] Joining to Husarnet network
husarnet-agent_1  | [237863830] joining...
husarnet-agent_1  | [237865832] joining...
husarnet-agent_1  | [237867833] done.
husarnet-agent_1  | Husarnet IP address: fc94:551f:be24:d722:83c3:abcd:018a:0fe0
Now your Micro-ROS agent is listening for a connection from ESP32.
Programming ESP32 Board
Plug your ESP32 to a laptop using USB cable and click the [PlatformIO: Upload] button in Visual Studio Code.
PlatformIO will install all project dependencies listed in the platformio.ini file and flash a new firmware to your ESP32 board.
Open a serial monitor, to see the output log from your ESP32 board:
rst:0x1 (POWERON_RESET),boot:0x13 (SPI_FAST_FLASH_BOOT)
configsip: 0, SPIWP:0xee
clk_drv:0x00,q_drv:0x00,d_drv:0x00,cs0_drv:0x00,hd_drv:0x00,wp_drv:0x00
mode:DIO, clock div:2
load:0x3fff0018,len:4
load:0x3fff001c,len:1044
load:0x40078000,len:10044
load:0x40080400,len:5872
entry 0x400806ac

**************************************
micro-ROS + Husarnet example
**************************************

📻 1. Connecting to: UPC5C2DB59 Wi-Fi network ...done

⌛ 2. Waiting for Husarnet to be ready ......done

Known hosts:
microros-agent (fc94:551f:be24:d722:83c3:abcd:018a:0fe0)
esp32-talker (fc94:6248:abcd:c395:c309:abcd:abcd:6653)
master (fc94:6248:abb6:c395:abcd:c106:abcd:6413)
my-laptop (fc94:a48f:89f9:abcd:abcd:abcd:9216:efc3)

⌛ 3. Launching Micro-ROS ....done, sys time = -2091957266
Publishing: "Hello World: 0" [free heap: 118088]
Publishing: "Hello World: 1" [free heap: 118980]
Publishing: "Hello World: 2" [free heap: 118980]
OK, ESP32 is publishing messages to a /chatter topic. Now let's got back to the terminal window when we have launched docker-compose up before:
agent_1           | [1642880515.669980] info     | Root.cpp           | create_client            | create                 | client_key: 0x3FE174C0, session_id: 0x81
agent_1           | [1642880515.670055] info     | SessionManager.hpp | establish_session        | session established    | client_key: 0x3FE174C0, address: fc94:6248:abb6:c395:c309:c106:3183:6413:4ac4
agent_1           | [1642880516.079676] info     | ProxyClient.cpp    | create_participant       | participant created    | client_key: 0x3FE174C0, participant_id: 0x000(1)
agent_1           | [1642880516.257081] info     | ProxyClient.cpp    | create_topic             | topic created          | client_key: 0x3FE174C0, topic_id: 0x000(2), participant_id: 0x000(1)
agent_1           | [1642880516.684335] info     | ProxyClient.cpp    | create_publisher         | publisher created      | client_key: 0x3FE174C0, publisher_id: 0x000(3), participant_id: 0x000(1)
agent_1           | [1642880516.874593] info     | ProxyClient.cpp    | create_datawriter        | datawriter created     | client_key: 0x3FE174C0, datawriter_id: 0x000(5), publisher_id: 0x000(3)
listener_1        | [INFO] [1642880517.246955354] [listener]: I heard: [Hello World: 0]
listener_1        | [INFO] [1642880518.507746321] [listener]: I heard: [Hello World: 1]
listener_1        | [INFO] [1642880519.429212755] [listener]: I heard: [Hello World: 2]
listener_1        | [INFO] [1642880520.268485215] [listener]: I heard: [Hello World: 3]
listener_1        | [INFO] [1642880521.376689623] [listener]: I heard: [Hello World: 4]
As you can see Micro-ROS agent container has regitered new nodes, and after that it is totally transparent and from a listener container point of view where we can read messages from a /chatter topic.
Summary
The provided ESP32 + Micro-ROS + Husarnet + Arduino + PlatformIO boilerplate project allows you to start working on your own Internet connected ROS 2 nodes running on microcontrollers in minutes.
If you have any questions or want to discuss something related to this blog post, let's do it at Husarnet Community Forum.