How To Access A Local Web Server From The Internet

In one of the previous blog posts we presented how to configure a reverse proxy in NGINX to provide public access to services hosted by Husarnet connected devices.
Today I will share my notes on how to do something similar, but using a nice user interface provided by Nginx Proxy Manager and your own custom domain with SSL certificates.
By combining two open source projects: Husarnet & Nginx Proxy Manager you can create your own, self-hosted secure tunnel service for localhosts, similar to ngrok.
🚀 I will show you also how to deploy the service in seconds, with the Infrastructure as Code approach powered by Ansible and GitHub Actions.
Let's go!
What is Nginx Proxy Manager?
Nginx Proxy Manager is an open source project allowing you to manage NGINX proxy hosts with a simple, powerful interface. It runs in Docker, so to start it you just need to launch the following docker-compose.yml:
version: '3'

services:
  app:
    image: 'jc21/nginx-proxy-manager:latest'
    restart: unless-stopped
    ports:
      - '80:80'
      - '81:81'
      - '443:443'
    environment:
      DB_MYSQL_HOST: "db"
      DB_MYSQL_PORT: 3306
      DB_MYSQL_USER: "npm"
      DB_MYSQL_PASSWORD: "npm"
      DB_MYSQL_NAME: "npm"
    volumes:
      - ./data:/data
      - ./letsencrypt:/etc/letsencrypt

  db:
    image: 'jc21/mariadb-aria:latest'
    restart: unless-stopped
    environment:
      MYSQL_ROOT_PASSWORD: 'npm'
      MYSQL_DATABASE: 'npm'
      MYSQL_USER: 'npm'
      MYSQL_PASSWORD: 'npm'
    volumes:
      - ./data/mysql:/var/lib/mysql
When you execute docker-compose up, under http://<my-vps-ip>:81 URL you will have access to a nice looking UI for reverse proxy managment:
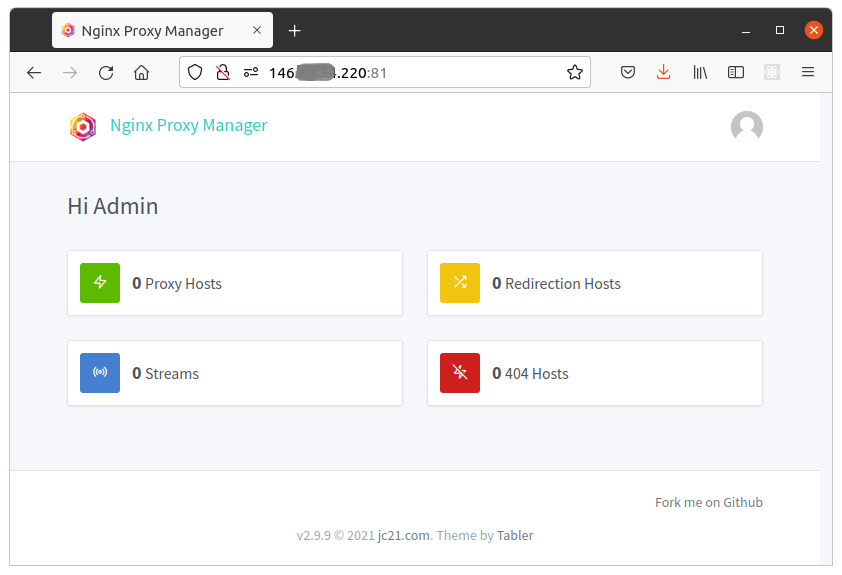
Modyfing NGINX config files requires at least basic knowledge of NGINX, and it's easy to break something in the config for other proxy rules. Thanks to an intuitive web dashboard provided by Nginx Proxy Manager, even someone with no coding background can easily define what service should run on what URL.
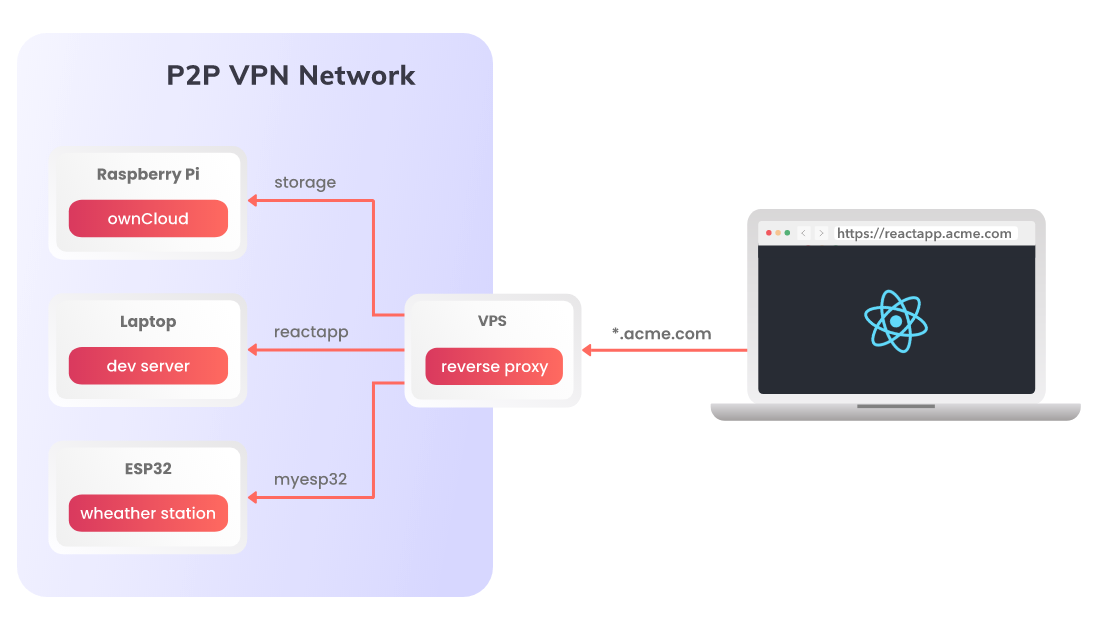
NPM on steroids with Husarnet container
By adding a Husarnet Sidecar service definition to the docker-compose.yml above, (and running it on the server with a public IP) we can expose services running on TCP/UDP ports of Husarnet connected devices making them available via public IP of the proxy server.
If you think about how to access a website hosted in localhost from the internet, you have the answer! Self-hosted NPM + Husarnet service is a great way to publically expose websites or APIs that run behind NATs, firewalls, without a need to have public IP on those devices at all.
That means you can easily give someone access for example to OwnCloud running on your Raspberry Pi, or your development server with a React frontend that you develop for your customer. Everything with no coding, with intuitive graphical user interface.
So let's upgrade the compose file to include the Husarnet Sidecar:
version: '3'

services:
  app:
    image: 'jc21/nginx-proxy-manager:latest'
    restart: unless-stopped
    # ports:    # port definitions moved to the 'husarnet' service
    #   - '80:80'
    #   - '81:81'
    #   - '443:443'
    network_mode: service:husarnet
    environment:
      DB_MYSQL_HOST: "db"
      DB_MYSQL_PORT: 3306
      DB_MYSQL_USER: "npm"
      DB_MYSQL_PASSWORD: "npm"
      DB_MYSQL_NAME: "npm"
    volumes:
      - ./data:/data
      - ./letsencrypt:/etc/letsencrypt

  db:
    image: 'jc21/mariadb-aria:latest'
    restart: unless-stopped
    environment:
      MYSQL_ROOT_PASSWORD: 'npm'
      MYSQL_DATABASE: 'npm'
      MYSQL_USER: 'npm'
      MYSQL_PASSWORD: 'npm'
    volumes:
      - ./data/mysql:/var/lib/mysql

  husarnet:
    image: husarnet/husarnet:latest

    restart: unless-stopped
    volumes:
      - /var/lib/husarnet
    sysctls:
      - net.ipv6.conf.all.disable_ipv6=0
    cap_add:
      - NET_ADMIN
    devices:
      - /dev/net/tun
    environment:
      HOSTNAME: my-reverse-proxy
      JOINCODE: ${HUSARNET_JOINCODE}
    ports:  # moved from the 'app' service
      - '80:80'
      - '81:81'
      - '443:443'
Note that you need to move exposed ports definitions from app service to husarnet service and set network_mode: service:husarnet. Pretty simple.
That could be basically everything. Just execute:
docker-compose up
And after visiting http://<my-vps-ip>:81 in your web browser and login with default username (admin@example.com) and password (changeme) you should be able to define reverse proxy rules for your Husarnet devices in an easy way using a nice UI.
Change default login and password for your instance of NPM ASAP!
But ... to make it more production-like setup, it would be nice to implement a few missing things:
- CI/CD pipelines to automatically push changes to the server, when we add something to
docker-compose.yml(eg. starting portainer for containers monitoring). - Saving & restoring backups of our proxy settings.
- Providing a version control.
In the next section I will present to you a GitHub template where everything is already implemented.
Introducing a GitHub template
Go to https://github.com/husarnet/proxy-gui repository that is tagged as a Public template, meaning that you can copy it directly to your own GitHub account and adjust if needed.
Installation
This repo is powered by GitHub Actions and Ansible, so after providing proper GitHub secrets, everything needed to run the Nginx Proxy Manager & Husarnet on your own server will be done automatically.
-
Click Use this template button and create your own public or private copy of this repo.
-
Prepare a new server with public IP address with clear installation of Ubuntu 22.04. It can be VPS, Amazon EC2 instance or your own server rack with public IP.
-
Login to your VPS shell, and setup SSH key pair (with NO passphrase!!!) that will be used by GitHub for CI/CD:
ssh-keygen -t ed25519 -C "user@example.com" -f ./ga-ssh-keyThat command will generate 2 files:
File How to use it? ga-ssh-keyCreate a GitHub repository secret Settings>Secrets>New repository secretand createSSH_PRIVATE_KEYsecret. Copy thega-ssh-keyfile content herega-ssh-key.pubExecute in your VPS: cat ga-ssh-key.pub >> /root/.ssh/authorized_keys -
Create a
PUBLIC_IPrepository secret and place your server's public IPv4 address here. -
Get your Husarnet Join Code from https://app.husarnet.com, and create a new GitHub repository secret
HUSARNET_JOINCODE. -
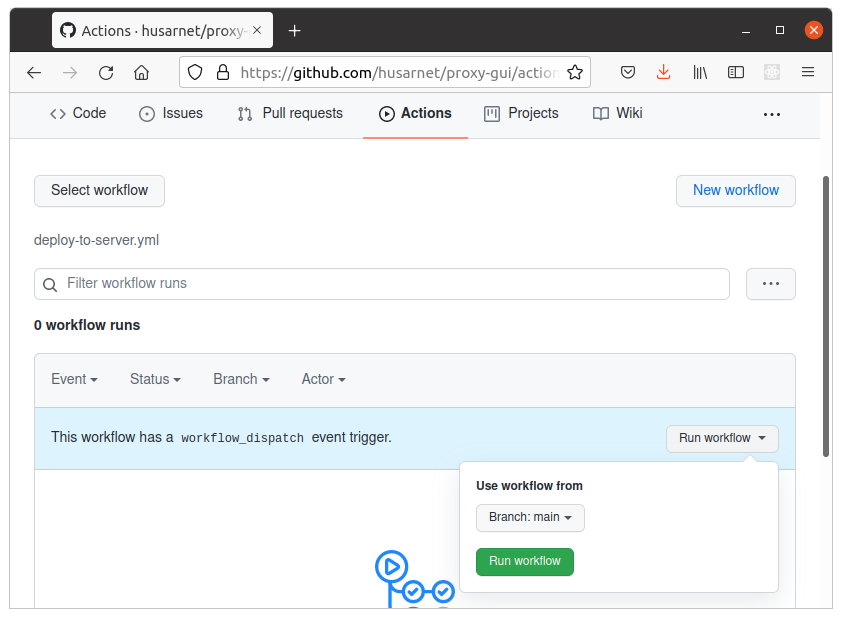
Go to
Actionstab and trigger theDeploy to serverworkflow. After a minute or two, CI/CD workflow powered by Ansible will install Docker and run services described indocker-compose.yml.
GitHub repository secrets summary
| Repository Secret | Description |
|---|---|
PUBLIC_IP | Public IP address of your VPS |
SSH_PRIVATE_KEY | private SSH key (for root at your VPS) |
HUSARNET_JOINCODE | Join Code from https://app.husarnet.com |
Your NPM instance should now be up & running under http://<my-vps-ip>:81 URL. You should also find your service with online status in Husarnet Dashboard:

Setup a domain
Using a pure IP address of your VPS is not very handy. Moreover without setting a domain for your VPS in DNS records you can not generate subdomains (like http://subdomain.maindomain.com), and would need to use just locations settings instead (eg. http://<my-vps-ip>/some-website) in NPM. Nginx Proxy Manager UI is optimized for using domains, so let's set up one.
How to do it exactly depends on where you have your domain registered and how you manage them. In this example however I will show how to configure domains in Cloudflare.
We will need to setup a wildcard DNS record allowing us to generate ad-hoc subdomains for our main domain myproxy.acme4you.com, like:
devserver.myproxy.acme4you.comrpi.myproxy.acme4you.com- ...
just from a level of Nginx Proxy Manager. To do so, select your domain (in Cloudflare), and add the following record to your DNS:

To specify a wildcard DNS record use a * symbol that matches non-existing domain names. Here we create a new DNS Type A record for subdomains *.myproxy for VPS with IP 146.XXX.XXX.220.
At this point you can define custom subdomains for your reverse proxy hosts just from a level of Nginx Proxy Manager!
Everything will work fine, but to enable HTTPS instead of just HTTP protocol, we need to issue a wildcard TLS certificate for all subdomains of myproxy.acme4you.com.
Issuing a wildcard TLS/SSL certificate for a subdomain
In Nginx Proxy Manager dashboard (http://<my-vps-ip>:81) go to [SSL certificates] tab, and make the following settings (of course with your own domain and e-mail address 😉):
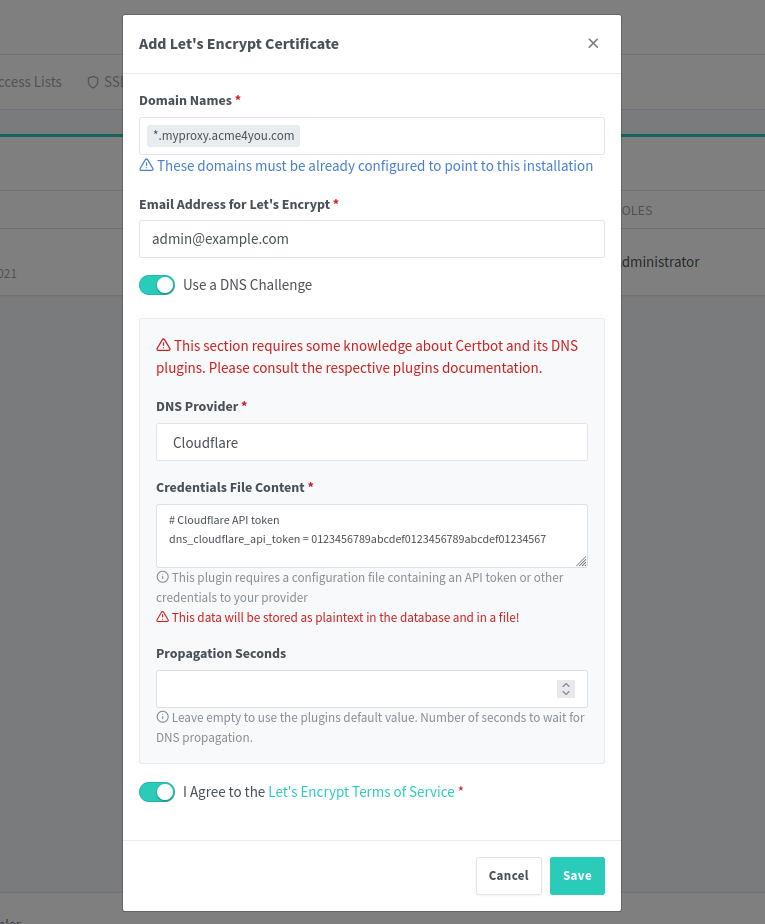
One thing is missing here:
# Cloudflare API token
dns_cloudflare_api_token = 0123456789abcdef0123456789abcdef01234567
To generate an API token, we need to go back to Cloudflare and click Get your API token link in the [Overview] tab of your domain. Then choose Create Custom Token with the following settings:
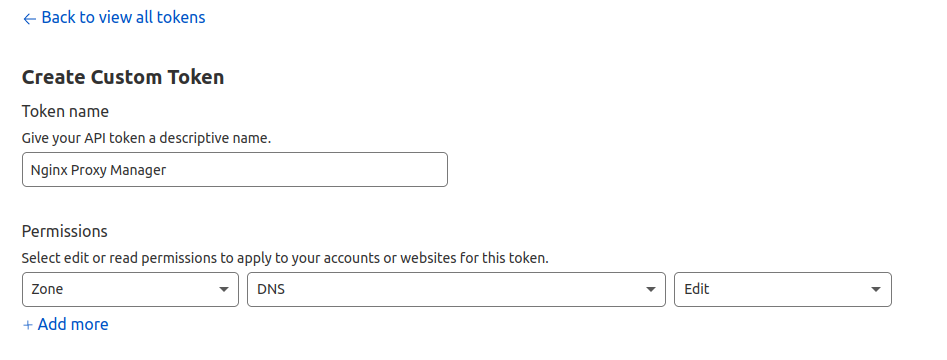
That's all you need to set up on this website, click the [Continue to summary] button.

Finally your token will be ready after you click the [Create Token] button:

So go back to Nginx Proxy Manager dashboard, paste your API token:
# Cloudflare API token
dns_cloudflare_api_token = PASTE_YOUR_API_TOKEN_HERE
and click the [Save] button.
🎉 Congratulations, your Nginx Proxy Manager works on your own server, using your own domain (secured by SSL cert) and allows you to generate ad-hoc subdomains for your Husarnet connected devices if needed. In the next sections I will demonstrate how easy it is to expose what you have available in your LAN, to the public Internet.
But at first let's secure access to the NPM's admin panel, by using SSL cert we have just got.
Secure access to admin panel
Up to this point we logged in to the NPM admin panel using http://<my-vps-ip>:81 URL. It's not secure to keep it this way, because the connection is not encrypted. So the first place where we will use our freshly created SSL cert, will be securing the admin panel.
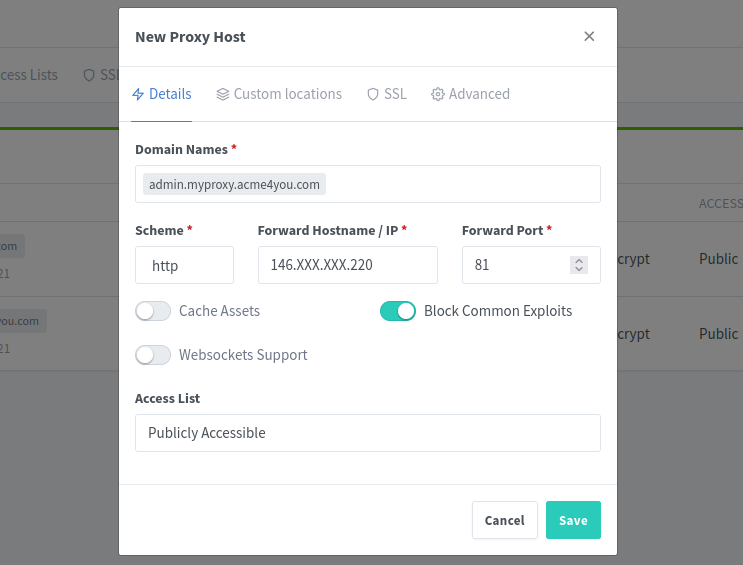
In the NPM click [Add Proxy Host] button and place your domain for admin panel (in my example admin.myproxy.acme4you.com), your VPS IP address, and 81 port number as on screenshot below:
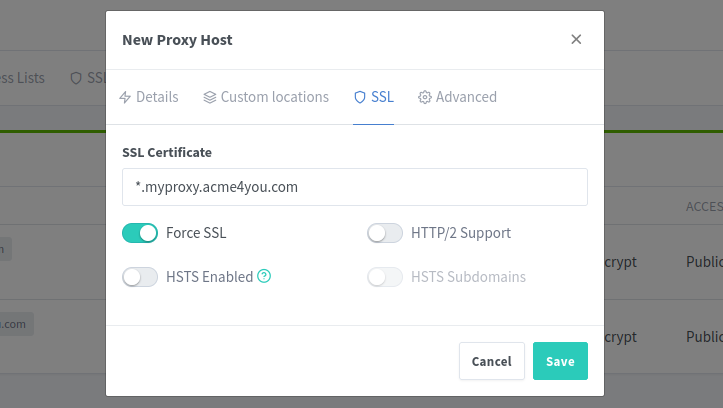
Next, go to the SSL tab and select our newly created SSL cert:
Click the [Save] button and from this point, we will use the admin panel using https://admin.myproxy.acme4you.com. It's good to change your user password again by using this secure domain.
To make access to your admin panel even more secure, you can additionally configure a custom Access List in NPM (currently we used only Publicly Accessible option).
We can further make access to the admin panel more secure by making it possible only for other devices from the same Husarnet VPN network as the running instance of NPM. To do so, just comment this line in docker-compose.yml:
# - '81:81'
We do not need to expose port 81 to the host system on the VPS! We can access the admin panel by using this URL: http://my-reverse-proxy:81 (my-reverse-proxy is a Husarnet hostname defined in docker-compose.yml). Don't worry about HTTP - the connection is encrypted by Husarnet.
Using Nginx Proxy Manager
As NPM is up and running, custom wildcard domain is enabled in DNS records and SSL certs are there, we can enjoy how dead simple it is to expose services from our localhosts just using a nice NPM UI!
Access websites hosted locally
As an example let's assume we have a development server on our localhost with a React app. We want to share real-time online preview to what we are doing locally and expose it under https://reactapp.myproxy.acme4you.com URL. I will show you how to do it in a few easy steps with no coding!
To make this guide all in one, I assume that your local machine is initially not Husarnet connected.
- 1. Launch React app
- 2. Setup Husarnet
- 3. New Proxy Host
- 4. Choose SSL cert
Install nodejs using this tutorial.
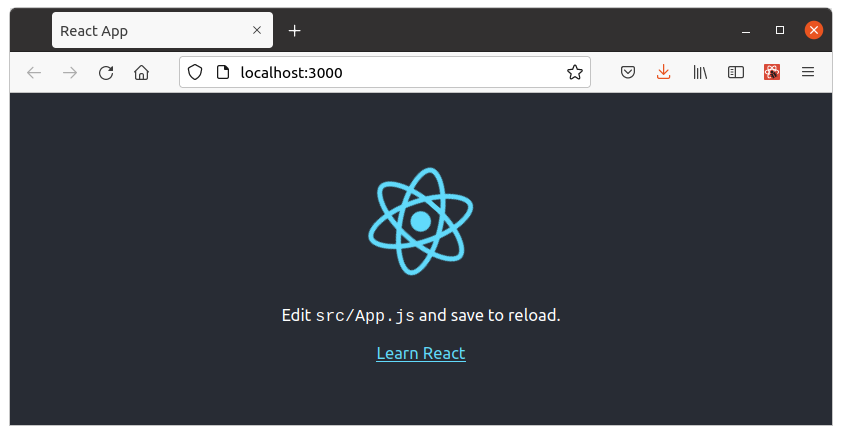
To start a boilerplate react app on your localhost:
npx create-react-app my-app
cd my-app
HOST=:: npm start
HOST=::means use all available interfaces including IPv6
And your react app is now up and running on your localhost, port 3000:
Let's start with connecting your local machine to the same Husarnet network as your Nginx Proxy Manager. To do so:
- Install Husarnet (instructions for other available platforms your will find here)
curl -s https://install.husarnet.com/install.sh | sudo bash
- Connect to the same Husarnet network as your Nginx Proxy Manager instance (Use the same Join Code you used before in point '5.' of NPM installation procedure)
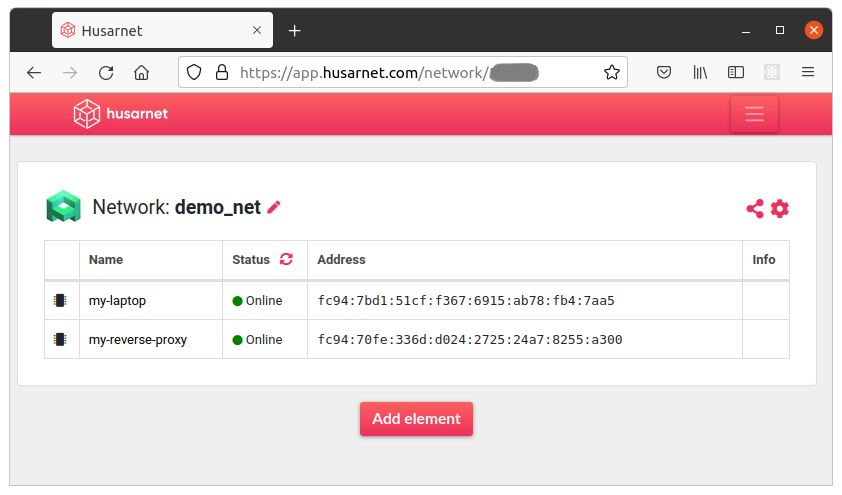
sudo husarnet join fc94:b01d:1803:8dd8:b293:5c7d:7639:932a/XXXXXXXXXXXXXXXXXXXXXX my-laptop
- After a few seconds your local machine should be available in Husarnet Dashboard:
In Nginx Proxy Manager dashboard (http://<my-vps-ip>:81 if you haven't setup a subdomain for that), click [New Proxy Host] button and in Details tab type the following settings:
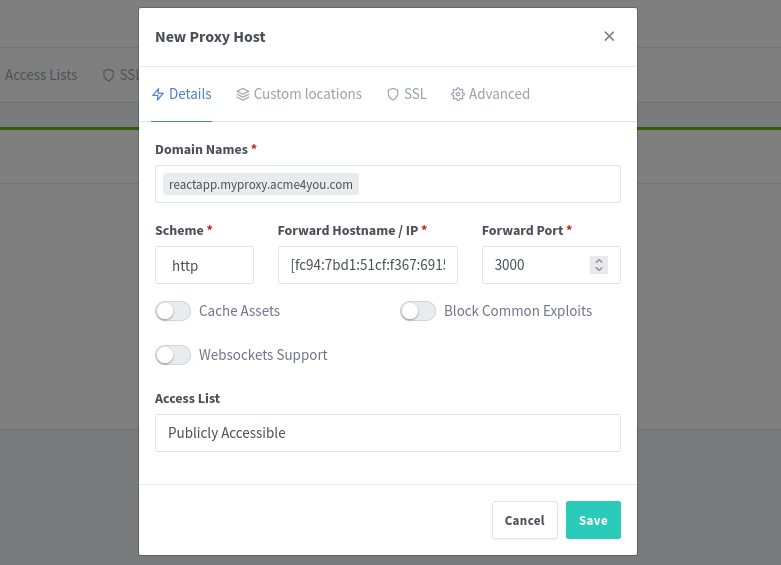
💡 "New Proxy Host" fields explaination
| Field | Value | Comment |
|---|---|---|
| Domain Names | reactapp.myproxy.acme4you.com | reactapp. is a random, ad-hoc subdomain for our React dev server. No need to setup any new DNS record, beacuse in the previous steps we have configured a wildcard subdomaind *.myproxy |
| Scheme | HTTP | This is a protocol between NPM and your Husarnet connected local machine. Don't worry - everything is strongly encrypted even if we use just HTTP |
| Forward Hostname / IP | [fc94:7bd1:...:fb4:7aa5] | Place your local machine's Husarnet IPv6 address here. You can find it in Husarnet Dasbhoard. Remember about [] brackets! |
| Forward Port | 3000 | Because our React development server has been launched on port 3000 on localhost |
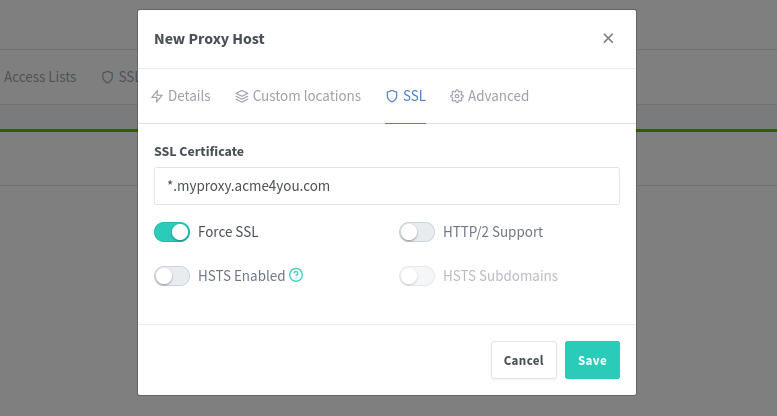
Now go to SSL tab and select the SSL certificate that we have setup in one of previous steps. Also remember to turn on Force SSL slider.
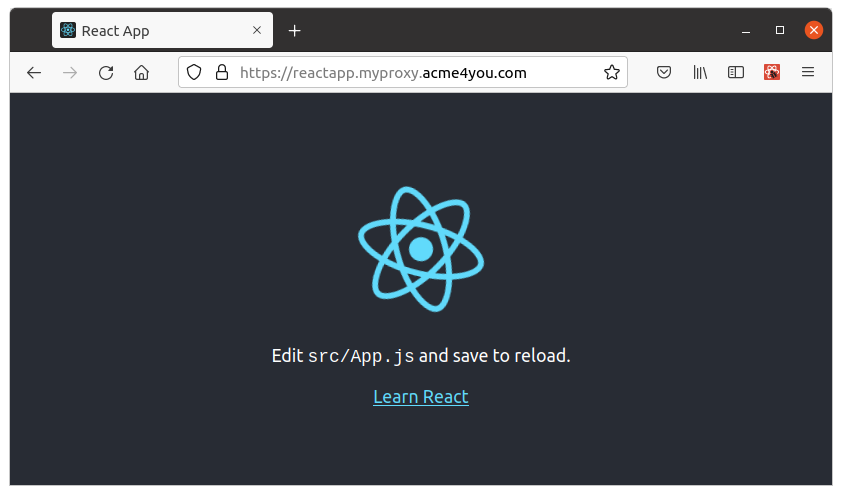
Now everybody can reach your local React dev server by using the https://reactapp.myproxy.acme4you.com URL!
Backup
If you want to save / restore settings of your Nginx Proxy Manager, go to Actions tab in GitHub and manually trigger Save Backup or Restore Backup GitHub workflows. The backup will be stored as .backup.tgz in your GitHub repository.
Summary
In this blog post I presented how to securely give someone access to services hosted by your Husarnet connected devices. Even if your laptop, Raspberry Pi, microcontroller or VM running on your server don't have public IP, or are hidden behind NAT or firewall you can easily give strangers access to them by using the described solution. Now you know how to make a localhost website public!
The presented Nginx Proxy Manager + Husarnet solution can be a nice, self-hosted alternative to ngrok, frp or localtunnel that works with your own custom domains without any time limits.
If you have any questions or want to discuss something related to this blog post, let's do it at Husarnet Community Forum.