Remote Desktop Over The Internet

Remote Desktop Software helps you access your headless (without physical display, mouse or keyboard) computer or server desktop over the network.
There are many different solutions available using RDP, RFB (VNC) or proprietary protocols. Some of them are open source and free to use, but many of them are quite expensive. In this article I will show you how to configure one of them - TigerVNC which works great, is open source, multiplatform and is completely free.
I will also show you how to access remote desktop of your computer over the Internet even if it doesn't have a static IP, or is hidden behind a NAT or a firewall.

Connecting Your Computers Using VPN
In the article I present how to make a remote desktop to a Raspberry Pi (Raspberry Pi OS or Ubuntu 20.04), which is hidden behind a NAT and a firewall, from a level of my laptop (Ubuntu 20.04 OS).
To access a Raspberry Pi over the Internet, we need to configure a VPN service, because our computers don't have static IP addresses. Our choice is Husarnet VPN Client, because it works peer-to-peer so the latency to our VNC server will be minimized in comparison to solutions based on central cloud/server software.
Husarnet Client creates a virtual network interface on the level of your operating system. So from your applications point of view it's like a network adapter with IPv6 (but works over physical IPv4 or IPv6 networks provided by Ethernet, Wi-Fi, LTE or 5G). Husarnet is trying to establish a direct, peer-to-peer connection between your devices (with a fail-over route over Husarnet Base Servers), so latency is minimized and you do not need to worry about configuring a VPN server.
Husarnet infrastructure is used to help your devices find each other over the Internet, even if they do not have a static IP addresses, or are behing NAT's and firewalls.
Husarnet is free to use for up to 5 devices, without any transfer limits. We do not care about how much data your devices transfer bacause the traffic goes directly between them, not through our servers. We don't even know how much data you transfer.
1. Installing Husarnet VPN Client on your Raspberry Pi and laptop:
curl -s https://install.husarnet.com/install.sh | sudo bash
2. Connecting your devices to the same VPN network.
At first you will need to obtain a Husarnet join code for the network you want your devices to be connected to. To find your join code, create an account and log into https://app.husarnet.com . Then create a new network, by clicking [Create network] button, and then click [Add element] button. Your join code will be available under join code tab:
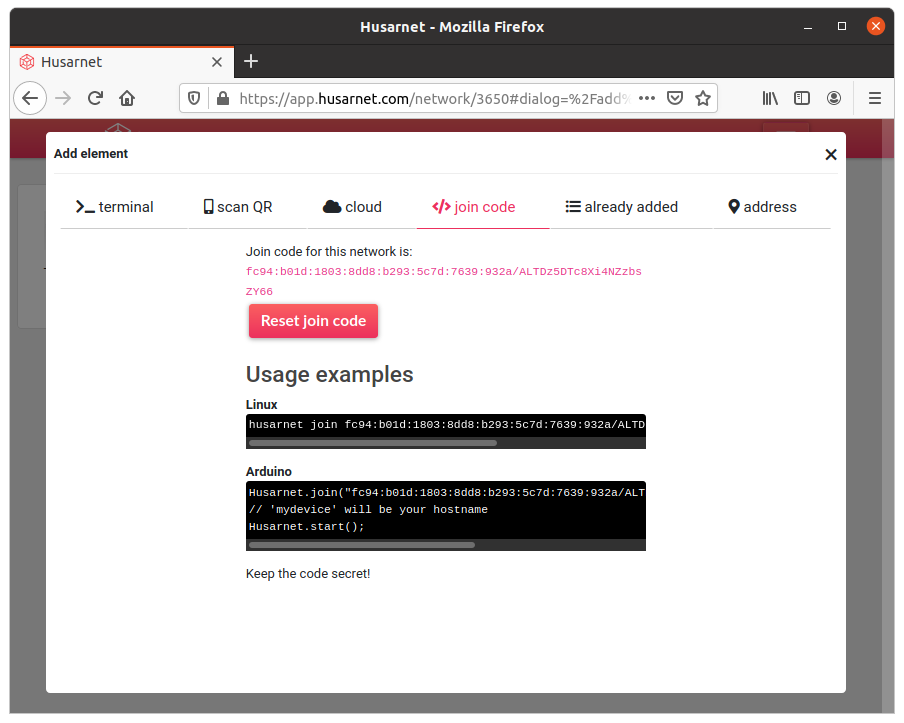 It looks something like this:
 fc94:b01d:1803:8dd8:b293:5c7d:7639:932a/XXXXXXXXXXXXXXXXXXXXX.
Now when you have your join code available all you need to do is to execute the following command:
a) on your Raspberry Pi:
sudo husarnet join fc94:b01d:1803:8dd8:b293:5c7d:7639:932a/XXXXXXXXXXXXXXXXXXXXX myrpi
b) on your laptop:
sudo husarnet join fc94:b01d:1803:8dd8:b293:5c7d:7639:932a/XXXXXXXXXXXXXXXXXXXXX mylaptop
where: myrpi and mylaptop are easy to remember host names under which you will be able to access your devices.
Choosing a Right Remote Desktop Software
I've tested a couple of VNC (Virtual Network Computing) solutions and my favourite one is TigerVNC, for a few reasons:
- works fast
- easy to install and configure
- server versions for Windows, Linux and FreeBSD
- client versions for Windows, Linux, MacOS and FreeBSD
- is open source and actively maintained - https://github.com/TigerVNC/tigervnc
- is distributed under GPL-2.0 license so you can use that even in commercial use cases for free
Running TigerVNC Server
Open your Linux terminal on your Raspberry Pi (eg. SSH to your RaspberryPi over the Internet) and execute the following two steps:
1. Installing TigerVNC:
sudo apt install tigervnc-standalone-server tigervnc-xorg-extension tigervnc-viewer
2. Starting a remote desktop server:
sudo vncserver -localhost no -geometry 1280x720
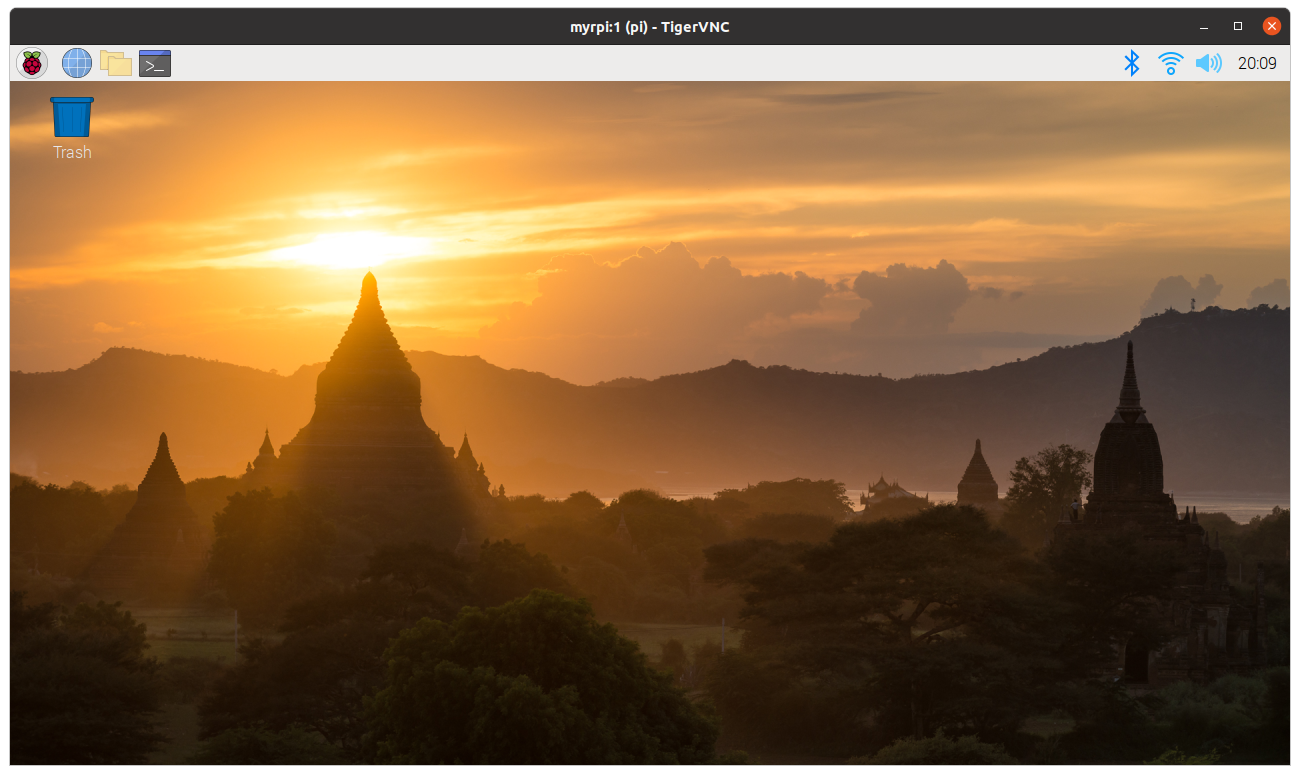
Result should look like this:
New 'myrpi:1 (pi)' desktop at :1 on machine myrpi

Starting applications specified in /home/pi/.vnc/xstartup
Log file is /home/pi/.vnc/myrpi:1.log

Use xtigervncviewer -SecurityTypes VncAuth,TLSVnc -passwd /home/pi/.vnc/passwd myrpi:1 to connect to the VNC server.
Now your VNC server is up and running over the Internet and available under myrpi hostname. In the following sections I will show you how to access this remote desktop from a client-end.
- List opened virtual desktops
pi@myrpi:~ $ vncserver -list

TigerVNC server sessions:

X DISPLAY #	RFB PORT #	PROCESS ID
:1		5901		1636
:2		5902		3147
- Close a specific virtual desktop:
pi@myrpi:~ $ vncserver -kill :2
Killing Xtigervnc process ID 3147... success!
Running TigerVNC Client
On the second computer (mylaptop device) I install only a TigerVNC client software called TigerVNC Viewer, by executing the following in the linux terminal
sudo apt-get install tigervnc-viewer
And that's it!
To connect to the remote desktop of Raspberry Pi, you need to launch a TigerVNC Viewer you just installed:
xtigervncviewer <IP-ADDRESS-OF-MY-RPI>:<X-DISPLAY-NUMBER> -geometry <RESOLUTION>
where:
IP-ADDRESS-OF-MY-RPI is a IP address of your RPi (eg. 192.168.0.120) and X-DISPLAY-NUMBER is a number of display hosted by your TigerVNC server (in our case it's 1), so in my case it would be:
xtigervncviewer 192.168.0.120:1 -geometry 1280x720
To access Raspberry Pi not only from LAN, but also over the Internet use Husarnet hostname of your Pi - in our case myrpi:
xtigervncviewer myrpi:1 -geometry 1280x720
Now you know, why we called Husarnet a zero-configuration VPN. Everything just works over the Internet, the same way as in a LAN. Just install Husarnet Client on your devices and connect them to a single Husarnet VPN network (with choosing an easy to remember hostname instead of IP address), by executing a single command.
Providing a Web Browser Access to a VNC Server
To make accessing remote desktop even easier, we can get rid off VNC client on your computer-end (in the article mylaptop device). To do so, we will configure a noVNC, that is web server app working next to VNC server (in our case on Raspberry Pi), which we already have configured.
Thanks to noVNC, we can simply access remote desktop of Raspberry Pi just from a level of a web browser!
Now I will guide you through configuration steps:
Installing noVNC
- Go to
/usr/local/sharefolder on your Raspberry Pi and clone here a GitHub repository with noVNC:
sudo git clone https://github.com/novnc/noVNC
- Launch a noVNC server:
sudo /usr/local/share/noVNC/utils/novnc_proxy --vnc <SERVER-HOSTNAME>:<VIRTUAL-DISPLAY-PORT> --listen 6080
where <VIRTUAL-DISPLAY-PORT> is a virtual display "RFB PORT" (typically 5901) from TigerVNC server (you can see available ports by executing vncserver -list) and 6080 is a port on which the web remote desktop will be available
- To test noVNC in the LAN network, open the following link in the web browser on your laptop (in our article
mylaptopdevice):http://<MY-RPI-IPv4-ADDRESS-IN-LAN>:6080/vnc.html.
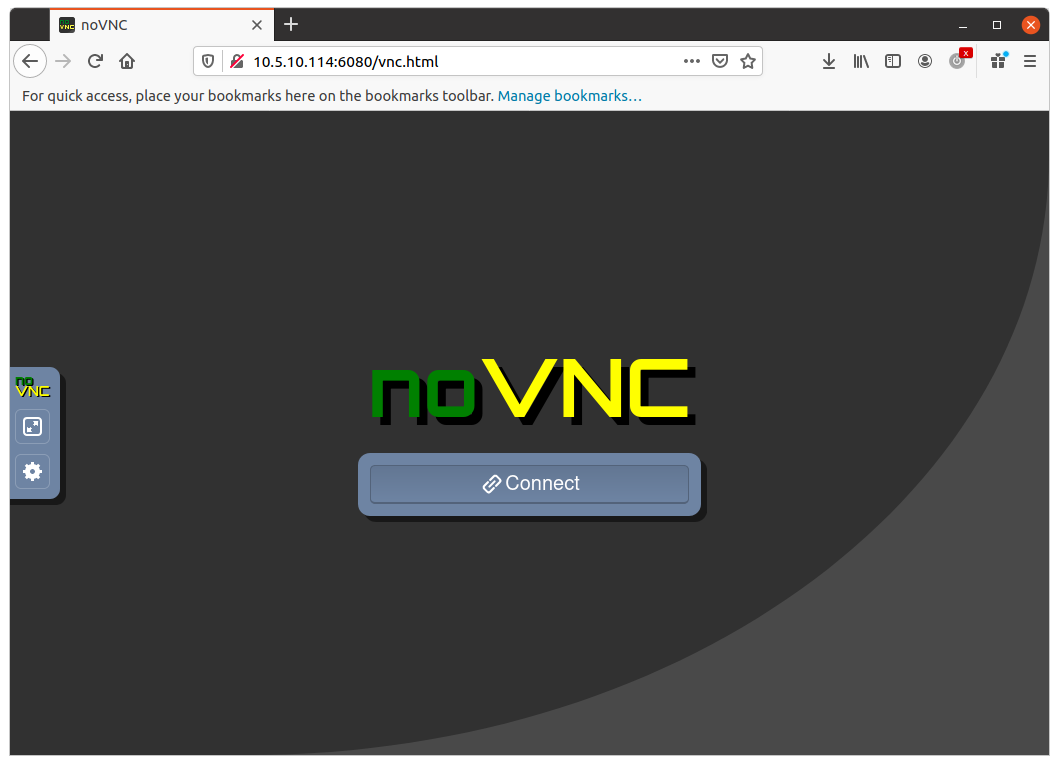
When you click a [Connect] button you will access the remote desktop of your Raspberry Pi.
Configuring Nginx
To access a noVNC server running on the Rasbperry Pi over the internet using Husarnet VPN, we need to configure a web server program that handles IPv6 better than a simple server working by default with noVNC.
I will show you how to do that with Nginx, however with other web servers (like Apache 2) the process will be very similar. There is a nice article presenting how to configure noVNC & Nginx here but we need a little bit more configuration to enable IPv6.
So long story short, open a separate SSH connection to your Raspberry Pi (in the first one noVNC process is running) and perform the following steps:
- If you don't have nginx, you can install it on you Raspberry Pi by executing:
sudo apt-get install nginx
- Modify the
/etc/nginx/sites-enabled/defaultfile, so it will look like this:
##
# You should look at the following URL's in order to grasp a solid understanding
# of Nginx configuration files in order to fully unleash the power of Nginx.
# https://www.nginx.com/resources/wiki/start/
# https://www.nginx.com/resources/wiki/start/topics/tutorials/config_pitfalls/
# https://wiki.debian.org/Nginx/DirectoryStructure
#
# In most cases, administrators will remove this file from sites-enabled/ and
# leave it as reference inside of sites-available where it will continue to be
# updated by the nginx packaging team.
#
# This file will automatically load configuration files provided by other
# applications, such as Drupal or Wordpress. These applications will be made
# available underneath a path with that package name, such as /drupal8.
#
# Please see /usr/share/doc/nginx-doc/examples/ for more detailed examples.
##

# Default server configuration
#
server {
        listen 80 default_server;
        listen [::]:80 default_server;

        root /var/www/html;

        # Add index.php to the list if you are using PHP
        index index.html index.htm index.nginx-debian.html;

        server_name _;

        location / {
                # First attempt to serve request as file, then
                # as directory, then fall back to displaying a 404.
                try_files $uri $uri/ =404;
        }


        location /websockify {
                proxy_http_version 1.1;
                proxy_pass http://127.0.0.1:6080/;
                proxy_set_header Upgrade $http_upgrade;
                proxy_set_header Connection "upgrade";

                # VNC connection timeout
                proxy_read_timeout 61s;

                # Disable cache
                proxy_buffering off;
        }

        location /vncws {
                index vnc.html;
                alias /usr/local/share/noVNC/;
                try_files $uri $uri/ /vnc.html;
        }

}
- Now restart Nginx with the following command:
sudo systemctl restart ngnix
- That's all! Now, from a level of
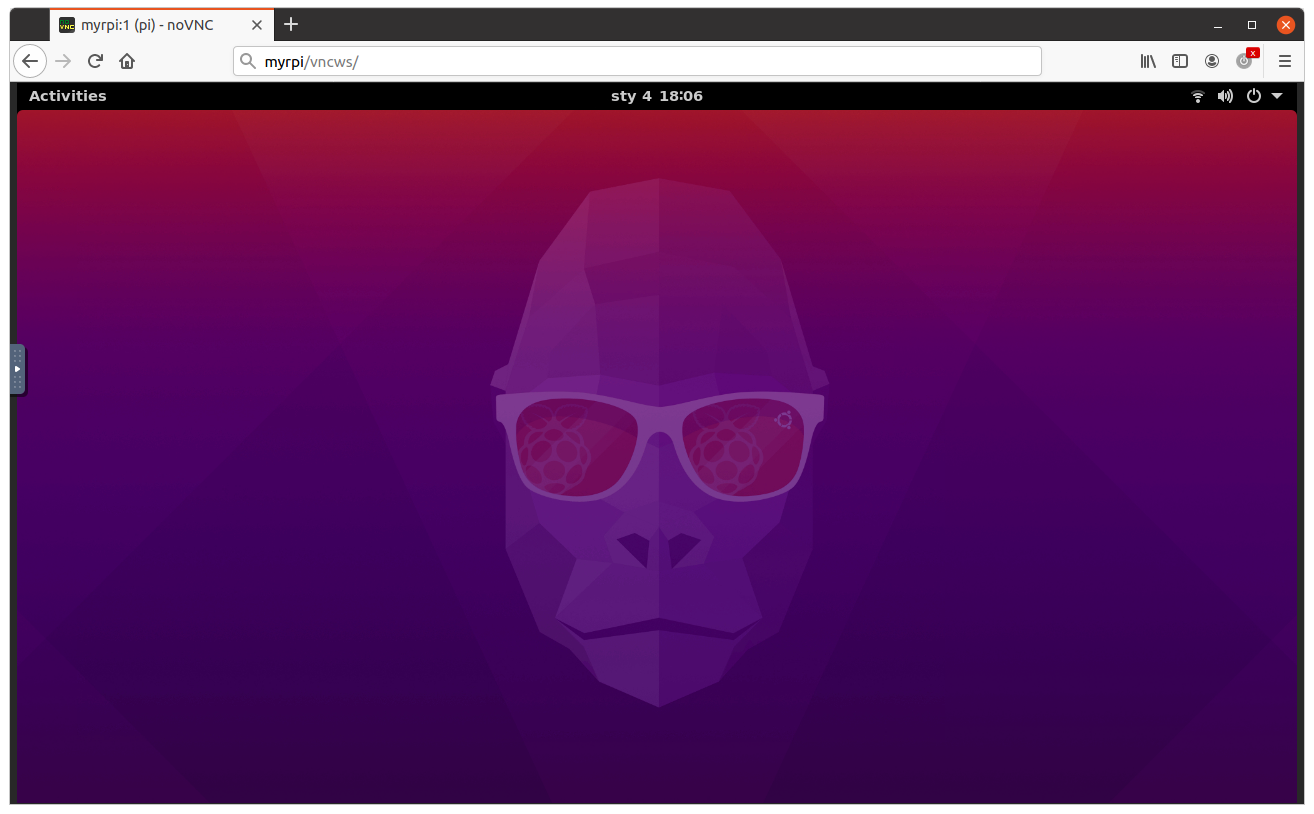
mylaptopdevice you should be able to access a remote desktop of your Raspberry Pi in the web browser, under the following URL (Firefox):
http://myrpi:80/vncws/vnc.html or simply http://myrpi:80/vncws
On other browsers instead of using hostname connect using myrpi Husarnet IP address.
then click [Connect] button, and voilà:
Summary
What I presented in this article:
- how to configure a VNC server on Raspberry Pi,
- how to connect to this VNC server from your laptop by using a VNC client software,
- how to get rid off VNC client software and just access you RaspberryPi over the web browser,
- how to make it worki not only in LAN but also over the Internet, even if you don't have a static IP and don't want to configure port forwarding on your router or dynamic DNS service.
We used a couple of interesting technologies here:
- TigerVNC - a VNC (remote desktop) server and client open-source software that is free to use, actively maintained and works really fast in comparison to other VNC solutions that I tested.
- noVNC - a server app working on the same machine (in most cases) as a VNC server, which provides a remote desktop to computers over a web browser (without a need to install anything on the client side).
- Husarnet - a zero-configuration VPN service, which allows you to connect your computers (and Raspberry Pi's) over the Internet directly, even if they are hidden behind NAT or firewall. Husarnet uses a peer-to-peer technology where Husarnet infrastructure is used for connection maintanance and provding failover route (if p2p is not possible for some reason). In most cases the p2p connection gives you lower latency, without transfer limits. It's also very secure, so even if within Husarnet network you use
http://instead ofhttps://it's still secure. Husarnet is free to use up to 5 devices in a Free plan.
I hope you will find this article helpful.
In case of any questions related to this blog post please contact us using Husarnet Community Forum or via email at support@husarnet.com.