Access Raspberry Pi Remotely

This blog post is an all-in-one setup guide for all of you interested in having both over the internet (remote) and LAN access to SSH terminal for your Raspberry Pi.
- ⛔ no port forwarding on your router
- ⛔ no static IP needed
- ⛔ no VPN server configuration
We start from installing the Raspberry Pi system image, then go through configuration of Wi-Fi connection, finishing on establishing VPN network between your laptop and Raspberry Pi.
Let's start!

1. Installing and configuring Raspberry Pi OS (previously Raspbian)
If you already have your system installed, and Internet connected, you can drop this section and go to section about establishing VPN connection
Instruction is on this website: https://www.raspberrypi.org/software/. The easiest way is to use Raspberry Pi Imager.
A quick installation guide for Linux (tested on Ubuntu 20.04):
- Download Raspberry Pi Imager from this website: https://downloads.raspberrypi.org/imager/imager_1.5_amd64.deb
- Install
imager_1.5_amd64.debpackage that you just downloaded, by executing the following command in the Linux terminal:
sudo apt install ./imager_1.5_amd64.deb
- Run in the Linux terminal (I work on Ubuntu 20.04):
rpi-imager
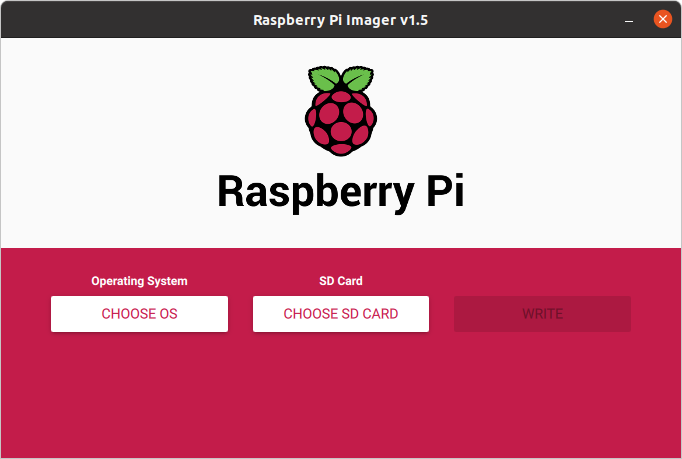
- Click [Choose OS] and select eg. "Raspberry Pi OS (32-bit)"
- Insert SD card to your laptop and choose by [Choose SD Card] button and click [Write] button
- Insert SD card with the system image into the Raspberry Pi, connect a display to HDMI, mouse and keyboard to USB ports and power your system
2. Configuring Wi-Fi connection
During the onboarding process you should be asked to choose a Wi-Fi network you would like to be connected to. You can save more Wi-Fi networks in the Raspberry Pi system by editing /etc/wpa_supplicant/wpa_supplicant.conf file:
ctrl_interface=DIR=/var/run/wpa_supplicant GROUP=netdev
update_config=1
p2p_disabled=1
country=PL

network={
        ssid="my-first-wifi-ssid"
        psk="pass1"
        key_mgmt=WPA-PSK
        priority=1
        id_str="work"
}

network={
        ssid="my-second-wifi-ssid"
        psk="pass2"
        key_mgmt=WPA-PSK
        priority=2
        id_str="phone"
}
Then to list available networks execute:
pi@myrpi:~$ wpa_cli reconfigure
Selected interface 'wlan0'
OK
, then:
pi@raspberrypi:~$ wpa_cli list_networks
Selected interface 'p2p-dev-wlan0'
network id / ssid / bssid / flags
0       my-first-wifi-ssid   any     [DISABLED]
1       my-second-wifi-ssid  any     [CURRENT]
, and to select a network:
pi@raspberrypi:~$ wpa_cli -i wlan0 select_network 0
[TODO: setup autoconnect if one of the networks is temporary unavailable]
3. [Optional] Configuring serial connection
Sometimes it is good to have access to Raspberry Pi terminal not only over display/keyboard/mouse or LAN, but also over a serial interface. To do so edit /boot/config.txt file, add line enable_uart=1 and save. Connect your serial adapter to GPIO14 (TXD), GPIO15 (RXD) and GND (for Raspberry Pi 4) and run the following command in the terminal on your laptop:
screen /dev/ttyUSB0 115200
(if your serial adapter is available under /dev/ttyUSB0).
To exit the screen and return to your bash, type ctrl+a, then k.
4. Establishing a VPN connection
To make an over-the-internet connection between your laptop and Raspberry Pi we will setup a VPN network. We will install Husarnet VPN Client on your Raspberry Pi and laptop.
Husarnet Client creates a virtual network interface on the level of your operating system. So from your applications point of view it's like a network adapter with IPv6 (but works over physical IPv4 or IPv6 networks provided by Ethernet, Wi-Fi, LTE or 5G). Husarnet is trying to establish a direct, peer-to-peer connection between your devices, so latency is minimized and you do not need to worry about configuring a VPN server.
Husarnet infrastructure is used to help your devices find each other over the Internet, even if they do not have a static IP addresses, or are behing NAT's and firewalls.
Husarnet is free to use for up to 5 devices, without any transfer limits. We do not care about how much data your devices transfer because the traffic goes directly between them, not through our servers. We don't even know how much data you transfer :)
1. Installing Husarnet VPN Client on your Raspberry Pi and laptop:
curl https://install.husarnet.com/install.sh | sudo bash
after the installation process is finished, run:
sudo systemctl restart husarnet
2. Connecting your devices to the same VPN network.
At first you will need to obtain a Husarnet join code for the network you want your devices to be connected to. To find your join code, create an account and log into https://app.husarnet.com . Then create a new network, by clicking [Create network] button, and then click [Add element] button. Your join code will be available under join code tab:
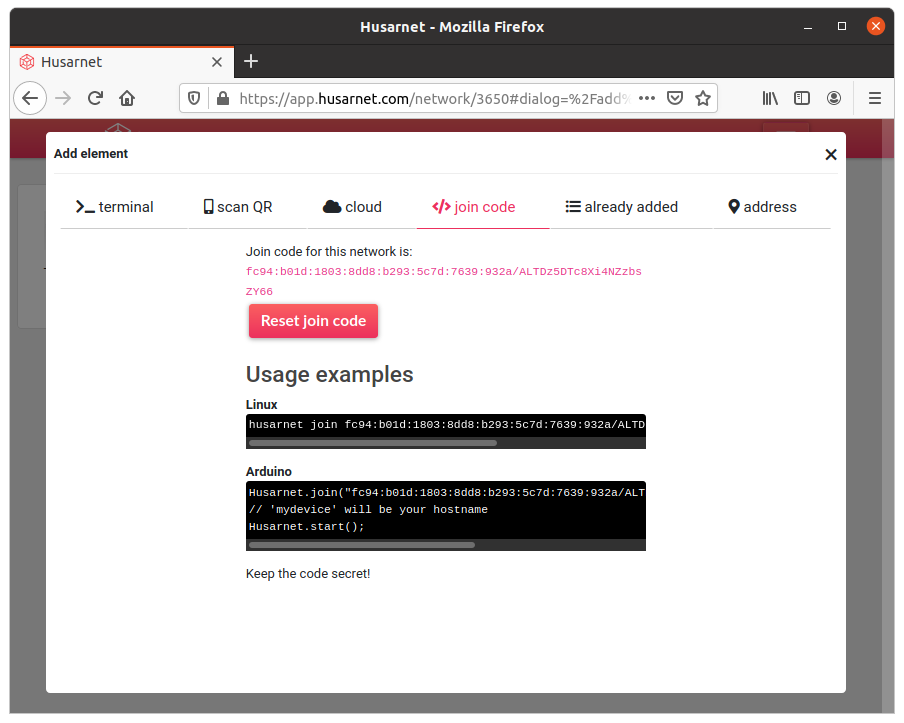 It looks like this:
 fc94:b01d:1803:8dd8:b293:5c7d:7639:932a/XXXXXXXXXXXXXXXXXXXXX.
Now when you have your join code available all you have to do is to execute:
a) on your Raspberry Pi:
sudo husarnet join fc94:b01d:1803:8dd8:b293:5c7d:7639:932a/XXXXXXXXXXXXXXXXXXXXX myrpi
b) on your laptop:
sudo husarnet join fc94:b01d:1803:8dd8:b293:5c7d:7639:932a/XXXXXXXXXXXXXXXXXXXXX mylaptop
where: myrpi and mylaptop are easy to remember host names under which you will be able to access your devices.
5. Connecting to your Raspberry Pi using SSH over the Internet
At this point you are able to connect to your Raspberry Pi over the Internet or in LAN the same way.
For example you can ping your Pi (remember to use ping6 instead of ping because Husarnet creates a virtual LAN network based on IPv6):
johny@mylaptop:~ $ ping6 myrpi
PING myrpi(myrpi (fc94:8327:5b4e:2c50:95b3:69af:67a4:4f30)) 56 data bytes
64 bytes from myrpi (fc94:8327:5b4e:2c50:95b3:69af:67a4:4f30): icmp_seq=1 ttl=3 time=6.100 ms
64 bytes from myrpi (fc94:8327:5b4e:2c50:95b3:69af:67a4:4f30): icmp_seq=2 ttl=3 time=3.25 ms
64 bytes from myrpi (fc94:8327:5b4e:2c50:95b3:69af:67a4:4f30): icmp_seq=4 ttl=3 time=2.45 ms
64 bytes from myrpi (fc94:8327:5b4e:2c50:95b3:69af:67a4:4f30): icmp_seq=5 ttl=3 time=3.41 ms
64 bytes from myrpi (fc94:8327:5b4e:2c50:95b3:69af:67a4:4f30): icmp_seq=6 ttl=3 time=2.02 ms
64 bytes from myrpi (fc94:8327:5b4e:2c50:95b3:69af:67a4:4f30): icmp_seq=7 ttl=3 time=2.33 ms
64 bytes from myrpi (fc94:8327:5b4e:2c50:95b3:69af:67a4:4f30): icmp_seq=8 ttl=3 time=2.81 ms
64 bytes from myrpi (fc94:8327:5b4e:2c50:95b3:69af:67a4:4f30): icmp_seq=9 ttl=3 time=2.02 ms
You can also just SSH your pi from your laptop.
By default SSH is disabled in Raspberry Pi. You can enable it by executing the following command in the RPi's terminal:
sudo raspi-config
Then go to 3 Interface Options > P2 SSH > "Would you like the SSH server to be enabled?" select <Yes>. Now exit raspi-config.
Now you can SSH to your Pi just by using it's host name:
johny@mylaptop:~ $ ssh pi@myrpi
The authenticity of host 'myrpi (fc94:df56:349f:b339:789:828:2345:1234)' can't be established.
ECDSA key fingerprint is SHA256:Nl9JriipBdj4dasdScaHaA45n+t1o3bv9/h19fQ.
Are you sure you want to continue connecting (yes/no/[fingerprint])? yes
Warning: Permanently added 'myrpi,fc94:df56:1234:5678:4865:828:9101:1234' (ECDSA) to the list of known hosts.
pi@myrpi's password:
Linux myrpi 5.4.79-v7l+ #1373 SMP Mon Nov 23 13:27:40 GMT 2020 armv7l

The programs included with the Debian GNU/Linux system are free software;
the exact distribution terms for each program are described in the
individual files in /usr/share/doc/*/copyright.

Debian GNU/Linux comes with ABSOLUTELY NO WARRANTY, to the extent
permitted by applicable law.
Last login: Tue Dec 22 18:59:37 2020

SSH is enabled and the default password for the 'pi' user has not been changed.
This is a security risk - please login as the 'pi' user and type 'passwd' to set a new password.

pi@myrpi:~ $ ls
Bookshelf  Desktop  Documents  Downloads  Music  Pictures  Public  Templates  Videos
pi@myrpi:~ $
Summary
I hope this simple guide about accessing Raspberry Pi over the Internet (by using SSH) will prove useful.
In this article you learned:
- how to access Raspberry Pi command line with low latency over the Internet even if your device is behind NAT or firewall
- how to use your Raspberry Pi hostname instead of IP address
I showed you how to access your Raspberry Pi over the Internet under 5 minutes using Husarnet VPN, and without the need to worry about:
- static IP
- port forwarding on your routers
- dynamic DNS
- configuring VPN servers (because Husarnet is a peer-to-peer VPN)
In case of any questions related to this blog post please contact us using Husarnet Community Forum or via email at support@husarnet.com.