Using Husarnet Docker Image

Most of the content from this post was migrated to our Docker Platform tutorial. Content left here will be getting gradually more and more outdated.
In the recent blog posts we presented how to embed Husarnet VPN Client inside a Docker container. This solution is fine, however has a few drawbacks like:
- you need to modify your existing containers
- you need to install one instance of Husarnet Client for each of the containers you want to connect (and manage multiple hostnames)
To overcome those issues we introduced an official Husarnet Docker Image, that utilizes a sidecar Docker design pattern. You can run this container next to your existing containers to share the VPN network from a Husarnet Container to one or multiple other containers at once.

Pros and cons of both solutions
| - | Sidecar | Built in binary |
|---|---|---|
| Updates? | Updates are provided by Husarnet. | You need to keep track of the Husarnet Client updates in your images yourself. |
| Ease of use? | Add our container to the set, change the network namespace of you workloads and you're done! | You need to change your Docker and compose files in order to make it work. |
| Shared Husarnet IP and configuration? | Yes. In as many containers as you want. | In a basic form no. You'd need to replicate our shared network setup in order to make it so. |
| Can be run in a single container? | No. | Yes. You can easily start it using a single docker command invocation if you want. |
Can my app run without NET_ADMIN permission? | Yes. Only Husarnet container needs to have NET_ADMIN permission to make an initial setup. | No. Hence you're bundling your app and Husarnet your container needs to be running with a superset of all permissions needed for these. |
| Can it run on Kubernetes? | Yes. Sidecar pattern is a recommended way of augmenting your Pods with new features. | Yes, but it's not a recommended setup in all of the cases (even if you know what you're doing). |
As you can see there are many things to consider when choosing how to integrate Husarnet with your apps. Unless you have a very specific case, the sidecar pattern will be better for production use. If you want to learn more about Husarnet's internals - installing Husarnet Client directly into your own container will be a viable experiment.
How do I use the sidecar, then?
In this example we'll describe the Docker Compose setup. It'll be fairly easy to migrate these concepts to your favourite Kubernetes configuration engine if you need to. Keep in mind that all containers in a pod already share a network namespace, so you won't need to add extra config for it.
Let's look at an example docker-compose.yml file:
version: '2.2'

services:
    my-app:
        image: gcr.io/google-samples/hello-app:1.0
        restart: unless-stopped

        # port definitions need to be moved to the 'husarnet' service
        network_mode: service:husarnet
        depends_on:
            - "husarnet"

    husarnet:
        image: husarnet/husarnet
        restart: unless-stopped
        ports:
            - "8080:8080" # from my-app
        volumes:
            - /var/lib/husarnet  # This will persist your Husarnet Client keys, thus IP of the container will be stable/the same between (re)boots
        sysctls:
            - net.ipv6.conf.all.disable_ipv6=0  # Husarnet is using IPv6 for the internal connections
        cap_add:
            - NET_ADMIN
        devices:
            - /dev/net/tun
        env_file:
            - ./.env  # create .env file in the same folder as Dockerfile and specify HOSTNAME and JOINCODE there
As you can see we have two containers here. One for our app and one for the Husarnet sidecar.
Let's focus on the app first. There are no special limitations to what you can do to your app(s) except two:
- you need to set the network namespace to the
husarnet's one in all containers you want to have a Husarnet connectivity to/from - you need to move port declarations to the
husarnetservice (and we recommend putting a comment with service's name there in order to keep track of them)
As per husarnet declaration you'll find all the important stuff in the comments. This is a pretty minimal example so there's not much you can omit, but you definitely can change things around. I.e. you can change the way environment variables are defined (as long as they are defined), you can name your volumes, etc.
Example use case for Husarnet Container
System architecture and overview

In this example we will show you how to use a cheap VPS as a reverse proxy for your LAN devices that do not have a static public IP (or they do but you don't want to expose it).
Why might we want to host a website on Raspberry Pi / laptop / PC?
- saving IP addresses space - you need only one public IP address associated with your reverse proxy server. Other services can be hosted i.e. from your local LAN network, even if you have dynamic IP.
- security - your application servers do not need to have public or static IP at all - which may make i.e DDoS attacks more difficult
In this example Raspberry Pi will be the "LAN" device and VPS will be the "public" device, but you can change it with other similar things - i.e. your parent's place have a public IP, but your's doesn't - with a little bit of tinkering you can change the VPS to a second Raspberry Pi at their's place or you can even use this method to expose your ESP32's to the internet (you won't need the Raspberry Pi part in that case - you'll simply use the IPv6/hostname of your ESP32 on the VPS's config instead)!
As the example application we'll use a Kubernetes demo app provided by Google, as it's plain and simple, but you can do all the regular stuff Docker allows you. Static websites? Of course. Wordpress for your blog? Sure. You'll find lots of tutorials on the Internet, just apply hints from the previous chapter of this blog post.
You'll find all the required files on Github. There are three naub directories there, but we'll use only two for the most part of this example:
raspberry_pi- containers to be ran on Raspberry Pi/LAN/application servervps-no-dns- containers to be ran on your VPS/publicly accessible devicevps-dns- [extra] containers to be ran on your VPS/publicly accessible device if you don't want to deal with IPv6 addresses manually and want to use hostnames
Let's go then!
Install Docker and Docker Compose
Do that both on your Raspberry Pi and on the VPS.
The official instruction how to install Docker on Linux is the best tutorial but here's a quick rundown for you (for Linux):
sudo -E apt-get -y install apt-transport-https ca-certificates software-properties-common && \
curl -sL https://download.docker.com/linux/ubuntu/gpg | sudo apt-key add - && \
arch=$(dpkg --print-architecture) && \
sudo -E add-apt-repository "deb [arch=${arch}] https://download.docker.com/linux/ubuntu $(lsb_release -cs) stable" && \
sudo -E apt-get update && \
sudo -E apt-get -y install docker-ce docker-compose
sudo systemctl daemon-reload
sudo systemctl restart docker
Prepare your application server on Raspberry Pi
- Clone the repository and create
.envfile
git clone https://github.com/DominikN/nginx-reverse-proxy-docker.git
cd nginx-reverse-proxy-docker/raspberry_pi/
touch .env
Edit .env file and add your Husarnet Join Code (you'll get one from the dashboard) and preferred hostname there:
HOSTNAME=my-pi
JOINCODE=fc94:b01d:1803:8dd8:b293:5c7d:7639:932a/xxxxxxxxxxxxxxxxxxxxxx
- And start a container:
docker-compose up
You should see a similar log:
$ docker-compose up
Starting raspberry_pi_my-app_1 ... done
Starting raspberry_pi_husarnet_1  ... done
Attaching to raspberry_pi_my-app_1, raspberry_pi_husarnet_1
husarnet_1   | Waiting for the husarnet daemon to start
my-app_1  | 2021/06/12 12:38:38 Server listening on port 8080
husarnet_1   | [42893930] joining...
husarnet_1   | [42895931] joining...
husarnet_1   | [42897932] joining...
husarnet_1   | [42899932] joining...
husarnet_1   | [42901933] joining...
husarnet_1   | Husarnet IP address: fc94:f4b2:9ffc:c3a5:93b4:b873:9ae1:67da
Save the Husarnet IPv6 address you get. You'll need to enter it into your Nginx's config file.
Prepare the reverse proxy server on your VPS
- Clone the repository and create
.envfile
git clone https://github.com/DominikN/nginx-reverse-proxy-docker.git
cd nginx-reverse-proxy-docker/vps-no-dns/
touch .env
Edit .env file and add your Husarnet Join Code (you'll get one from the dashboard) and preferred hostname there:
HOSTNAME=my-vps
JOINCODE=fc94:b01d:1803:8dd8:b293:5c7d:7639:932a/xxxxxxxxxxxxxxxxxxxxxx
- Edit
nginx.conffile and add place Husarnet IPv6 address of a Husarnet Client running on Raspberry Pi in theupstreamvariable:
server {
    listen 8089;
    listen [::]:8089;

    location / {
        set $myupstream http://[fc94:f4b2:9ffc:c3a5:93b4:b873:9ae1:67da]:8080;
        proxy_pass $myupstream;
    }
}
- And start the container:
docker-compose up --build
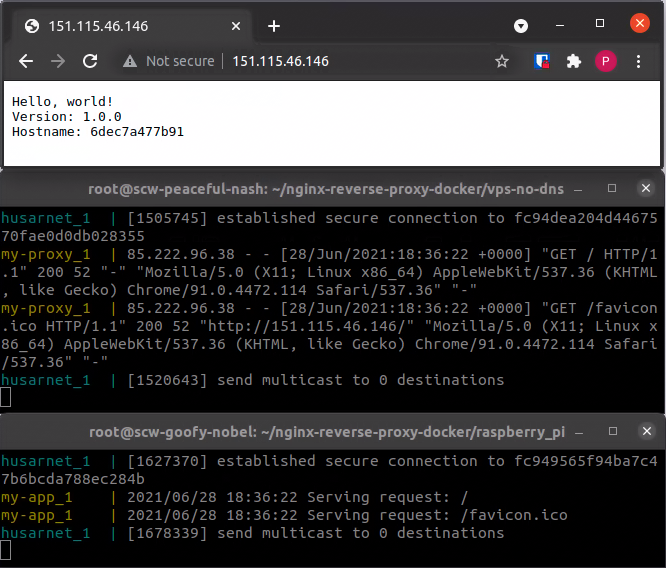
Testing Reverse Proxy Server
In your favourite browser you can now access your website running on Raspberry Pi via a proxy server's public IP address!
Summary
As you can see, using a Husarnet Container as a docker VPN sidecar is a clean and easy solution to integration of Husarnet with your projects. This way you can add an SDN-like layer to your projects and make it much more flexible than the regular implementations.
We hope you will find this article helpful.
We would be happy to discuss the topic covered in this blog post on the Husarnet Community Forum.
Extra bits
If you don't want to put raw IPv6 addresses in your config files, there's an vps-dns directory in the repository with a proof of concept of a solution utilizing hostnames. It has a slight drawback of requiring yet another container/sidecar to be running alongside the existing containers and some extra fiddling with the volumes, but… if you need it - it's there for you to reference while building your own solution. As it's a little bit more complex solution, we'll leave it without a thorough comment for more advanced users.