Using Husarnet & ROS 2
ROS 2 and DDS Implementation
Both ROS and ROS 2 allow you to run nodes on different physical machines and they discover each other as long as they are in the same LAN network (with multicasting enabled). Therefore to run ROS on robotic systems distributed among multiple networks VPN is needed.
Husarnet is a peer-to-peer, low-latency and lightweight VPN dedicated for robotics applications. In this short guide we will show you how to configure ROS 2 to make it work with the Husarnet VPN client.
Basically "configure ROS 2" means "configure DDS" that is an abstraction layer ROS 2 is based on. DDS in scope of ROS 2 is often called a ROS Middleware Implementation and you can set it with RMW_IMPLEMENTATION environment variable. To use Husarnet with DDS some preconfiguration is needed. The specific configuration depends on which DDS implementation is used, but generally peers from Husarnet should be added to an XML configuration file.
There are various distributions of ROS 2, each with different default DDS installed:
| Realase Date | ROS 2 Distro name | Default RMW implementation |
|---|---|---|
| 2022 | Humble (LTS) | Fast DDS |
| 2021 | Galactic | Cyclone DDS |
| 2020 | Foxy (LTS) | Fast DDS |
| 2019 | Dashing | Fast DDS |
In the next sections we will present how to configure two most popular DDS implementations on a system running ROS 2: Cyclone DDS and eProsima Fast DDS. They both just work with Husarnet so the choice is yours.
Let's start with creating a VPN network for your devices...
Installing Husarnet VPN client
Execute this command on each physical device you need to connect.
curl -s https://install.husarnet.com/install.sh | sudo bash
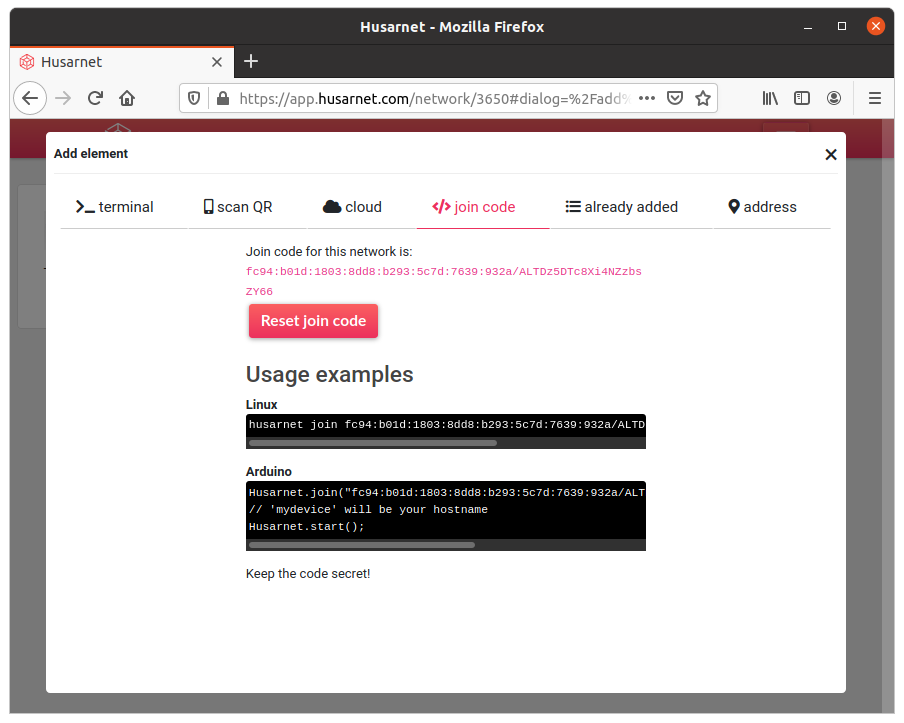
Creating a Husarnet group
Add your physical devices to the same Husarnet group, by executing following commands on each of them:
husarnet join <your-join-code> <device-hostname>
More information at: Getting Started Guide for Linux
Configuration of the DDS
Option 1: using Husarnet-DDS (recommended)
Husarnet-DDS is a utility that automates the generation of DDS XML configuration files for Husarnet.
First, install Husarnet-DDS on each device in your Husarnet group (eg. on your robot and your laptop) from GitHub releases (available for Linux, MacOS, and Windows), eg. on Ubuntu:
RELEASE="v1.3.5"
ARCH="amd64"

sudo curl -L https://github.com/husarnet/husarnet-dds/releases/download/$RELEASE/husarnet-dds-linux-$ARCH -o /usr/local/bin/husarnet-dds
sudo chmod +x /usr/local/bin/husarnet-dds
Next, choose the DDS implementation that you want to use with your ROS 2 application. Husarnet-DDS supports both Fast DDS and Cyclone DDS.
Set up the required environment variables based on your chosen DDS implementation on each device in your ROS 2 network (eg. on your robot and your laptop)
- Fast DDS (Simple Discovery)
- Fast DDS (Discovery Server)
- Cyclone DDS
export RMW_IMPLEMENTATION=rmw_fastrtps_cpp
export FASTRTPS_DEFAULT_PROFILES_FILE=/var/tmp/husarnet-fastdds-simple.xml
husarnet-dds singleshot
For devices acting as a SERVER (with the my-server Husarnet hostname used below in the CLIENT config):
export DISCOVERY_SERVER_PORT=11811
husarnet-dds singleshot
fast-discovery-server -i 0 -x /var/tmp/husarnet-dds/fastdds-ds-server.xml
For devices acting as a CLIENT:
export RMW_IMPLEMENTATION=rmw_fastrtps_cpp
export FASTRTPS_DEFAULT_PROFILES_FILE=/var/tmp/husarnet-fastdds-ds-client.xml
export ROS_DISCOVERY_SERVER=my-server:11811
husarnet-dds singleshot
export RMW_IMPLEMENTATION=rmw_cyclonedds_cpp
export CYCLONEDDS_URI=file:///var/tmp/husarnet-cyclone.xml
husarnet-dds singleshot
Option 2: Manual DDS configuration
If you require a configuration different from the default one supplied by the Husarnet-DDS utility, you will need to generate a custom XML configuration file. The following steps outline how to create this file for both Fast DDS and Cyclone DDS:
Using Fast DDS
Installation
If the default DDS implementation used in you ROS 2 distribution is different than FastDDS, you need to install it:
sudo apt-get update
sudo apt-get install ros-$ROS_DISTRO-rmw-fastrtps-cpp
export RMW_IMPLEMENTATION=rmw_fastrtps_cpp
Preparing a Configuration
Create a Fast DDS configuration file in your system: ~/fastdds_husarnet.xml
To make the communication work, you have to set some parameters as shown in the following template.
IMPORTANT: Provide all peers under initialPeersList tag.
<?xml version="1.0" encoding="UTF-8" ?>
<profiles xmlns="http://www.eprosima.com/XMLSchemas/fastRTPS_Profiles">
    <transport_descriptors>
        <transport_descriptor>
            <transport_id>HusarnetTransport</transport_id>
            <type>UDPv6</type>
        </transport_descriptor>
    </transport_descriptors>

    <participant profile_name="CustomHusarnetParticipant" is_default_profile="true">
        <rtps>
            <userTransports>
                <transport_id>HusarnetTransport</transport_id>
            </userTransports>
            <useBuiltinTransports>true</useBuiltinTransports>
            <builtin>
                <initialPeersList>
                <!-- Repeat this part for each husernet peer -->
                    <locator>
                        <udpv6>
                            <address>husarnet-IPv6-address</address> <!-- or <address>husarnet-hostname</address> -->
                        </udpv6>
                    </locator>
                <!-- End repeat -->
                </initialPeersList>
            </builtin>
        </rtps>
    </participant>
</profiles>
Launching the Configuration
Set this file as default profile in your .bashrc file, so as to use this configuration every time you boot your system. Open a new terminal and execute:
echo "export RMW_IMPLEMENTATION=rmw_fastrtps_cpp" >> ~/.bashrc
echo "export FASTRTPS_DEFAULT_PROFILES_FILE=/home/$USER/fastdds_husarnet.xml" >> ~/.bashrc
. ~/.bashrc
Using Cyclone DDS
Installation
If the default DDS implementation used in you ROS 2 distribution is different than Cyclone, you need to install it:
sudo apt-get update
sudo apt-get install ros-$ROS_DISTRO-rmw-cyclonedds-cpp
export RMW_IMPLEMENTATION=rmw_cyclonedds_cpp
Preparing a Configuration
Create communication settings file, for example in your home directory /home/$USER/cyclonedds.xml
To make communication work you have to set some params as follows:
<?xml version="1.0" encoding="UTF-8" ?>
<CycloneDDS xmlns="https://cdds.io/config" xmlns:xsi="http://www.w3.org/2001/XMLSchema-instance" xsi:schemaLocation="https://cdds.io/config https://raw.githubusercontent.com/eclipse-cyclonedds/cyclonedds/master/etc/cyclonedds.xsd">
    <Domain id="any">
        <General>
            <NetworkInterfaceAddress>hnet0</NetworkInterfaceAddress>
            <AllowMulticast>false</AllowMulticast>
            <MaxMessageSize>65500B</MaxMessageSize>
            <FragmentSize>4000B</FragmentSize>
            <Transport>udp6</Transport>
        </General>
        <Discovery>
            <Peers>
                <Peer address="[IPV6-address]"/> <!-- example: <Peer address="[fc94:dd2c:a2e6:d645:1a36:****:****:****]"/> -->
                <Peer address="[hostname]"/> <!-- example: <Peer address="[my-laptop]"/> -->
            </Peers>
            <ParticipantIndex>auto</ParticipantIndex>
        </Discovery>
        <Internal>
            <Watermarks>
                <WhcHigh>500kB</WhcHigh>
            </Watermarks>
        </Internal>
        <Tracing>
            <Verbosity>severe</Verbosity>
            <OutputFile>stdout</OutputFile>
        </Tracing>
    </Domain>
</CycloneDDS>
You can provide Peer as IPv6 address or hostname from Husarnet.
IMPORTANT: Provide all peers <hostnames/IPv6 address>, (chose one) in every machine.
Important fields:
-
NetworkInterfaceAddress
<NetworkInterfaceAddress>hnet0</NetworkInterfaceAddress>- force DDS to usehnet0network interface (the one created in your host OS by Husarnet VPN). -
Multicast
<AllowMulticast>false</AllowMulticast>. At the time of writing this file multicast is not supported by Husarnet so it's necessary to disable this. Multicast feature will be added soon. -
Transport Protocol
<Transport>udp6</Transport>. It's necessary to use IPv6 but Cyclone doesn't allow to mix IPv4 with IPv6 so every node must communicate over IPv6. -
IPV6-address
<Peers><Peer address="[IPV6-address]"/></Peers>. Here appropriate IP addresses should be filled, you can take this address form Husarnet WebUI. Safe method is to provide address of local IPv6 and remote machines.
If you need information about params check cyclonedds-manual
Launching the Configuration
Add changes to .bashrc file to use that configuration every time you boot your system. Open a new terminal and execute:
echo "export RMW_IMPLEMENTATION=rmw_cyclonedds_cpp" >> ~/.bashrc
echo "export CYCLONEDDS_URI=file:///home/$USER/cyclonedds.xml" >> ~/.bashrc
. ~/.bashrc
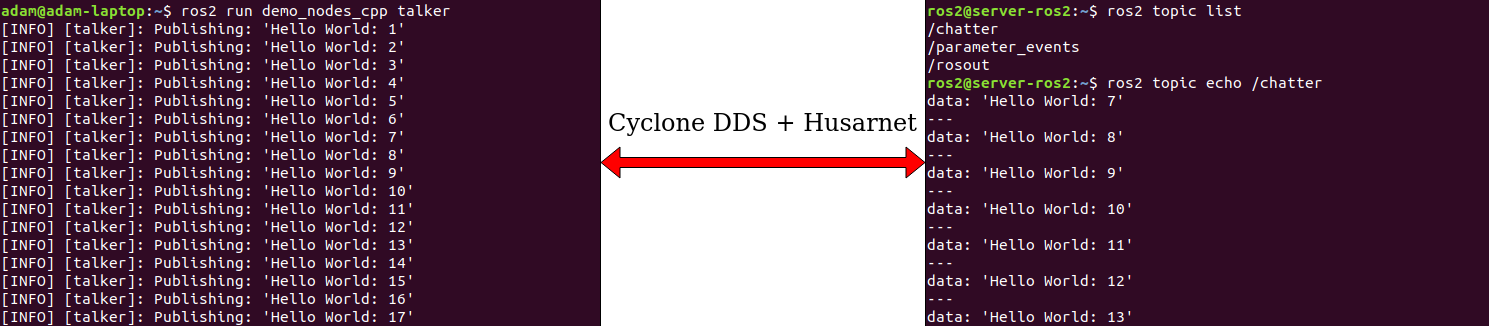
Testing
Now you will be able to use your default ROS 2 tools with Husarnet:
Run a publisher and subscriber demo, from demo-nodes-cpp package. To install it run:
sudo apt-get update
sudo apt-get install -y ros-$ROS_DISTRO-demo-nodes-cpp
At the first physical machine execute in the terminal:
ros2 run demo_nodes_cpp talker
And this command at the second:
ros2 topic echo /chatter
You should receive messages from talker on your second, Husarnet connected host.
Summary
As demonstrated, integrating Husarnet with ROS 2 and either Cyclone DDS or Fast DDS is quite straightforward, particularly when employing the Husarnet-DDS utility.
In case of any questions related to this article please contact us using Husarnet Community Forum or via email at support@husarnet.com.
Husarnet ROS 2 Docker base images
If you are a Docker user, then using Husarnet with our ROS 2 docker images might be even easier, because the Husarnet-DDS is already preinstalled there and launched inside the entrypoint.
Visit https://github.com/husarnet/ros to learn more.